Visitors
In the Odoo Frontdesk application, a visitor is defined as any non-employee (e.g., repair person, job candidate, etc.). These visitors can be logged upon arrival and departure for security purposes. This ensures an accurate list of people on the premises.
Visitor list
To access a complete list of checked-in visitors, navigate to .
Note
By default, the Planned or Checked-In and Today filters appear in the Search… bar.
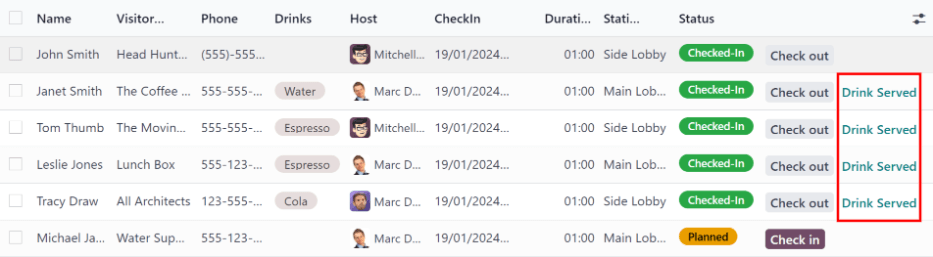
All visitors are presented in a list view, with the following details that were entered upon check in:
Name: the guest’s name.
Visitor Company: the company the guest represents.
Phone: the guest’s phone number.
Drinks*: the drink the guest requested.
Host: who the guest is waiting to see.
CheckIn: the date and time the guest checked in.
Checkout*: the date and time the guest checked out. In the default view, only guests with a Checked-In or Planned status are visible. Guests with check-out times are only visible if the Today filter is not active.
Duration: the amount of time the guest has been checked in for.
Station: the location of where the guest checked in.
Status: the status of the guest. The options are Checked-In, Planned, Checked-Out, or Canceled.
Email*: the guest’s email address.
* These fields are not visible in the default Visitor list. These must be enabled using the (settings adjust) icon in the top-right of the list.
To the far-right of the titled columns on the Visitors page, there is an untitled column, where a guest’s status can be updated.
When a guest leaves, click the available Check out button to update the guest’s record, and log the date and time they left.
If a scheduled guest arrives, and they did not check in using the Frontdesk kiosk, they can be checked in here, by clicking the available Check in button to log the date and time they arrived.
Beside the untitled status column, a Drink Served button appears, but only if that particular visitor requested a drink.
When their drink has been served, click the Drink Served button to indicate the drink has been delivered to the guest. Once clicked, that button disappears.
If any column is not visible, or if a visible column is preferred to be hidden, click the (additional options) icon, located at the end of the column name list. Doing so, reveals a reveals a drop-down menu of column options to enable or disable. A (check) icon indicates the column is visible.
Planned visitors
Enter expected guest information in advance by creating a planned guest in the Frontdesk app.
To create a planned guest, navigate to , and click New. Then, enter the same information as any other visitor on the guest form that appears. The only required fields are the visitor’s Name and the Station at which they are expected to arrive.
Important
If a guest is planned in advance, they must be checked in from the list on the Visitors page in the Frontdesk application (). If a planned guest checks in using a kiosk, they will be checked in separately, and their planned visitor entry remains listed as Planned.
The Planned status of a planned guest only changes to Checked-In when they are checked in inside the application’s Visitors list.
If a guest does check in using a kiosk, ensure all records are current, and the list of guests that are currently on-site is correct. Be sure to check in and/or check out the correct entries, so the visitors list correctly reflects who is currently on the premises.
Ensure planned guests are informed that they should not check in using the kiosk if they are listed as a planned guest in advance.
Visitor flow
Visitor check in
When a visitor arrives at a facility, they approach a Frontdesk kiosk, and click Check in. The information requested from the visitor is what was configured for that specific Frontdesk station. If any information is required, the field displays a red asterisk (*). The visitor must enter the required information in order to check in.
Once all the information is entered, the visitor taps the Check In button.
Note
At any point in the check-in process, if ten seconds pass with no selection, the kiosk returns to the main welcome screen.
Drinks
If drinks were configured for the station, after tapping Check In, a registration confirmation screen loads, along with the question: Do you want something to drink?
The visitor can tap either Yes, please, or No, thank you.
If they select Yes, please, a drink selection screen appears, and the pre-configured options are listed. The visitor then taps the desired selection, or, if they do not want anything, they can tap the Nothing, thanks button at the bottom of the screen.
If a drink selection was made, a Thank you for registering! Your drink is on the way. message appears.
Notifications
Once the visitor has checked in, the person they are visiting, and any other users who were configured to be notified when check-ins occur at the kiosk, are notified. The notification is either by email, SMS message, a Discuss chat, or any combination of those three options.
If the visitor requested a drink, the user(s) configured as the People to Notify on the drink form, are notified, via the Discuss application. The message that appears is: (Visitor Name) just checked-in. They requested (Drink Name).
Once the drink has been delivered to the guest, the person who delivered the drink is responsible for marking the drink as delivered.
To mark a drink as delivered, navigate to , and choose the desired station card displaying (#) Drinks to serve.
This opens a list of all the visitors checked in at that station, and are waiting for a drink. Click the Drink Served button at the end of the line for the visitor who was served. Once they are marked as having their drink served, the visitor disappears from the list.
Check out
Once the visitor has completed their business, and has left the premises, it is important to check them out for accurate record keeping.
To check visitors out properly, navigate to , and choose the desired station card displaying (#) Drinks to serve. Doing so opens a list of all the visitors who are currently checked-in at that station.
Click the Check out button near the end of the line for the visitor who left. Once they are marked as checked-out, the visitor disappears from the list.
Important
Visitors do not check themselves out when they leave. It is important for Frontdesk users to check out visitors for accurate record keeping.
Always have an accurate list of who is on the premises at any given time. This is important for security purposes, and in the case of an emergency.