Refuse applicants
At any point in the recruitment process, an applicant can be refused for a job position.
To refuse an applicant, start by navigating to the applicant’s card in the Recruitment app. This is done in one of two ways:
Navigate to . In the Applications list, click anywhere on the desired applicant’s line to open that specific applicant’s card.
Navigate to the main ob Positions dashboard by navigating to . Next, click on the desired job position card, then click on the individual applicant card from the Applications page.
At the top of the applicant’s card, there are several buttons. Click the one labeled Refuse.
Refuse reasons
Refuse reasons allow recruiters to document why an applicant was not a good fit, and send specific refusal reason email templates to the applicant.
Clicking Refuse on an applicant’s form makes the Refuse Reason pop-up window appear.
The default refuse reasons in Odoo, and their corresponding email templates, are:
Email Template |
Refusal Reason |
|---|---|
Recruitment: Refuse |
Doesn’t fit the job requirements
Language issues
Role already fulfilled
Duplicate
Spam
|
Recruitment: Not interested anymore |
Refused by Applicant: don’t like job
Refused by Applicant: better offer
Refused by Applicant: salary
|
Additional refusal reasons can be created, and existing ones can be modified (or deleted).
Select a refusal reason to send a refusal email.
Create or modify refuse reasons
To view and configure refuse reasons, navigate to . Doing so reveals the Refuse Reasons page, where all the existing refuse reasons are listed.
To create a new refuse reason from the Refuse Reasons page, click the New button in the top-left corner. A blank line appears at the bottom of the list, with an empty field present in the Description column.
Type in the new refuse reason in the field. It is recommended to enter a reason that is short and
concise, such as Offer expired or Withdrew application.
Then, in the Email Template field, click on the field to reveal a drop-down menu. Select an Email Template from the list to be used when this refuse reason is selected.
If a new Email Template is desired, type in the name for the new template in the field. Then, click Create and edit…, and a Create Email Template form pop-up window appears.
In the Create Email Template pop-up window, enter a Name for the form, and an email Subject in the corresponding fields.
Enter the desired email content in the Content tab. Proceed to make any other modifications to the template in the Email Configuration and Settings tabs, then click Save & Close to save the template. Upon clicking that, Odoo returns to the Refuse Reasons list.
The new template appears in the new refuse reason Email Template field.
Note
Pre-configured recruitment refusal email templates in Odoo use dynamic placeholders, which are personalized placeholders that populate data from the applicant’s record in the email body.
For example, if the applicant’s name is a used in a dynamic placeholder, the applicant’s name appears anytime that dynamic placeholder appears on the email template.
For more detailed information on email templates, refer to the Email templates documentation.
Send refusal email
After clicking the Refuse button on an applicant form, a Refuse Reason can be selected from the refuse reason pop-up window. Then, two fields appear below the selected refusal reason: Send Email and Email Template.
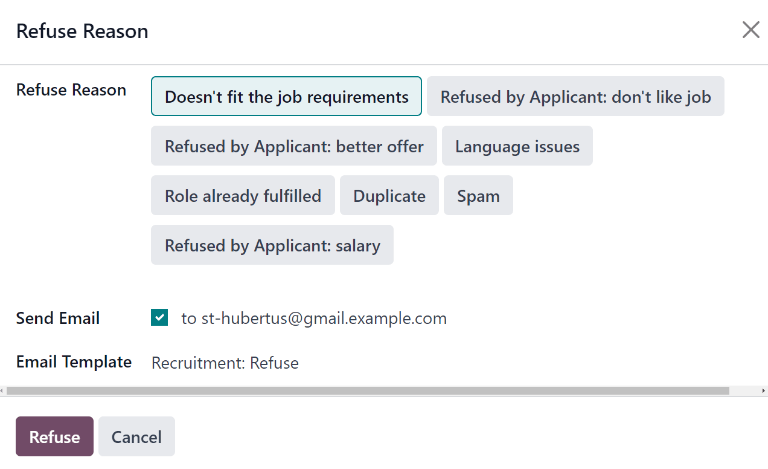
The applicant’s email address automatically populates the Send Email field; additional email recipients cannot be added.
If an email should not be sent to the applicant, uncheck the Send Email checkbox.
The email template associated with the refusal reason populates the Email Template field. If a different email template is desired, select a different template from the Email Template drop-down menu.
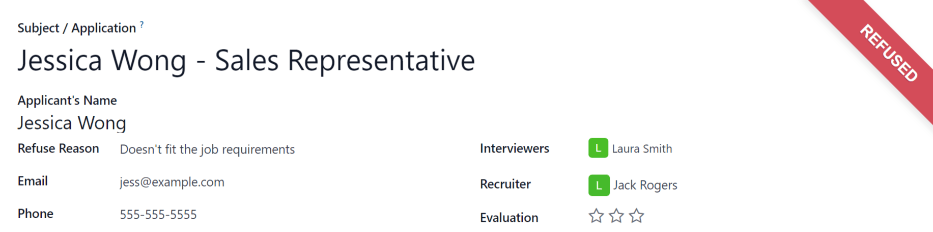
To send the refusal email to the applicant, ensure the Send Email checkbox is ticked, then click Refuse at the bottom of the Refuse Reason pop-up window. The refusal email is sent to the applicant, and a red Refused banner appears on the applicant’s card in the top-right corner.
View refused applicants
After refusal, the applicant’s card is no longer visible in the job position’s Kanban view. However, it is still possible to view applicants who have been refused.
To view only the refused applicants, go to , or .
On the Applications page, click the (caret down) button in the Search… bar, then click Refused, located under the Filters section.
All applicants that have been refused for the job position appear on the Applications page for that position, organized by the stage they were in when they were refused.