Marketing Automation
Use the Odoo Marketing Automation application to create dynamic campaigns with actions that automatically occur within a defined duration, such as sending a series of timed mass emails or engaging with leads based on their interactions with marketing campaigns.
While the application is designed to be user-friendly for creating, launching, and reviewing marketing campaigns, it also provides advanced features to automate repetitive tasks throughout the database.
Get started by creating a new campaign from scratch or start with a campaign template.
See also
Configuration
To begin, make sure the Marketing Automation application is installed.
Important
Installing the Marketing Automation application also installs the Email Marketing app, as most features of Odoo Marketing Automation are dependent on that specific application.
Additionally, install the CRM and SMS Marketing applications to access all of the features available in Marketing Automation.
The following documentation assumes that all three of these dependent applications are installed on the database.
Campaigns
A campaign refers to a workflow of activities that are automatically executed to a target audience, based on predefined filters, triggers, and durations of activities.
A new campaign can be created from scratch or from a template.
To create a campaign, navigate to the application and click the New button to reveal a new campaign form.
Campaign templates
Odoo provides six campaign templates to help users get started. The campaign template cards only display when there are no existing campaigns in the database. Once a campaign has been created, the template cards on the Campaigns dashboard are replaced with a Kanban view of the existing campaigns.
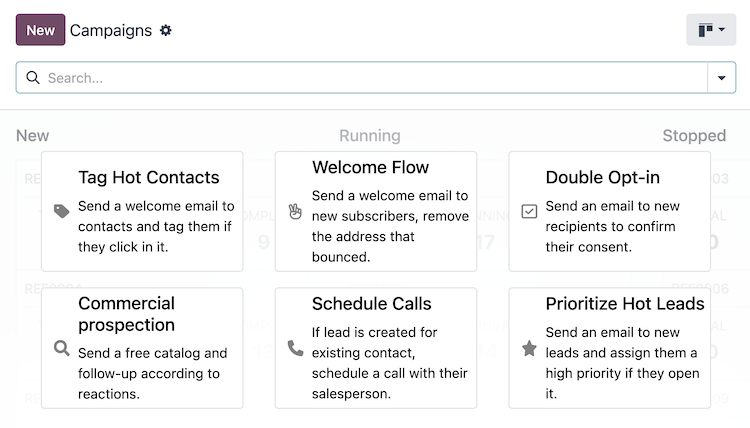
To get started with a template, navigate to the application, from the main Odoo dashboard, to open the Campaigns dashboard, which displays six campaign template cards:
- Tag Hot ContactsSend a welcome email to contacts and tag them if they click it.
- Welcome FlowSend a welcome email to new subscribers, remove the address that bounced.
- Send an email to new recipients to confirm their consent.
- Commercial prospectionSend a free catalog and follow-up according to reactions.
- Schedule CallsIf a lead is created for existing contact, schedule a call with their salesperson.
- Prioritize Hot leadsSend an email to new leads and assign them a high priority if they open it.
These templates are designed to be used as starting points for creating new campaigns. Click one of the template cards to open the campaign form.
Tip
To display the campaign template cards again after a campaign has been created, type the name of a campaign that does not exist in the database into the search bar, then press Enter.
For example, searching for empty displays the campaign template cards again, as long as there
is not a campaign with the name “empty” in the database.
Targets and filters
On the campaign form, the Target and Filter section, also referred to as the domain, contains the fields used to define the target audience for the campaign’s reach (i.e., the unique contact records in the database).
The target audience specifies the type of records available for use in the campaign, such as Lead/Opportunity, Event Registration, Contact, and more.
Records
The contacts in the system that fit the specified criteria for a campaign are referred to as records.
The number of records that are displayed next to the campaign Filter represent the total number of records the campaign is targeting.
Participants
The records that are engaged by the campaign are referred to as participants.
The number of participants engaged in a test run are shown in the Tests smart button, which displays on the top of the campaign form after a test has been run.
The number of participants engaged in a running, or stopped, campaign are shown in the Participants smart button at the top of the campaign form.
See also
Workflow
A workflow consists of an activity, many activities, or a sequence of activities organized in a campaign. A campaign’s workflow is defined in the Workflow section of the campaign form.
Activities
Activities are the methods of communication or server actions, organized in a workflow, that are executed within a campaign. Once running, each activity displays the number of participants that are engaged by the activity as Success and Rejected counts.
To create one of the following activities, click Add new activity in the Workflow section of the campaign form:
Email: an email that is sent to the target audience.
Server action: an internal action within the database that is executed.
SMS: a text message that is sent to the target audience.
See also
Testing and running
Once a campaign has been created, it can be tested to ensure the workflow is functioning as expected, to check for errors, and correct any mistakes before it reaches its target audience.
After testing, the campaign can be launched to start engaging the target audience. The campaign can also be launched without testing, if the user is confident in the workflow.
See also
Reporting
A range of reporting metrics are available to measure the success of each campaign. Navigate to to access the following menu options:
Link Tracker: displays the metrics of links to track the number of clicks.
Traces: displays the results of all activities from all campaigns.
Participants: displays an overview of the participants of all campaigns.
Additionally, each activity within the workflow of a campaign displays its engagement metrics.
See also