Failure locations
In Odoo, quality control points (QCPs) are used to create quality checks, which prompt employees to confirm the quality of products, when they are included in certain operations. By setting one or more failure locations on a QCP, products that fail the quality checks it creates can be sent to one of the specified locations.
Important
The Failure Location feature was added in version 17.0 of Odoo, and does not appear in any previous version. To upgrade an Odoo database to a more recent version, see the documentation on database upgrades.
Configuration
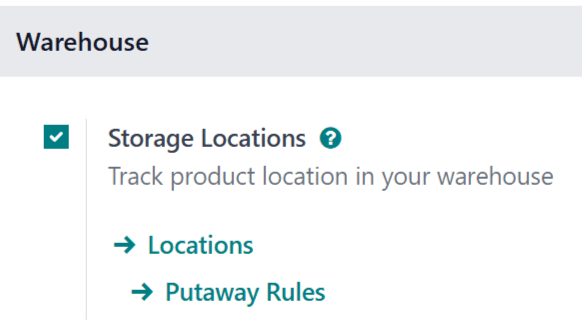
To use failure locations, the Storage Locations setting must be enabled in the settings of the Inventory app. This setting allows for the creation of sub-locations within a warehouse, including failure locations.
To enable the Storage Locations setting, navigate to , and tick the checkbox next to Storage Locations, under the Warehouses heading. Then, click Save.
Important
Failure locations are most effective when used for products configured as storable products. This is because inventory counts are only tracked for storable products, versus consumable products, for which exact counts are not tracked.
Quality checks can still be created for consumable products, and those products can be sent to a failure location if they fail a check. However, Odoo does not track the exact quantity of a consumable product stored at a failure location.
To configure a product as storable, navigate to , and select a product. In the Product Type field on the General Information tab, make sure that Storable Product is selected from the drop-down menu.
Add failure location to QCP
To add a failure location to a QCP, navigate to . Select an existing QCP from the list, or create a new one by clicking New.
Note
The following instructions only detail the configuration settings necessary for adding a failure location to a QCP. For a full overview of QCP and all of the options available when configuring them, see the documentation on quality control points.
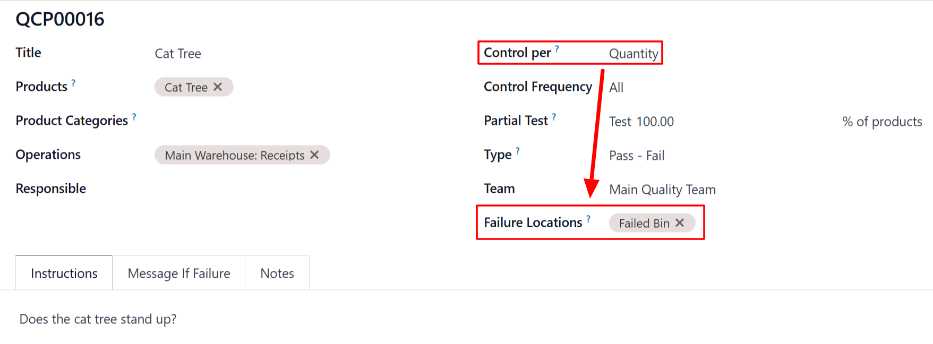
In the Control Per field on the QCP form, select the Quantity option. Doing so causes a Failure Locations field to appear on the form. This field is only available when the Quantity option is selected.
In the Failure Locations field, select one or more locations from the drop-down menu. To create a new location, type the desired location name into the field, and then select Create “[name]” from the drop-down menu.
Send products to failure location
Once a QCP has been configured with one or more failure locations, products that fail a check created by the QCP can be routed to one of the locations.
To do so, open an order that requires a quality check created by a QCP configured with a failure location. For example, navigate to , and select a receipt.
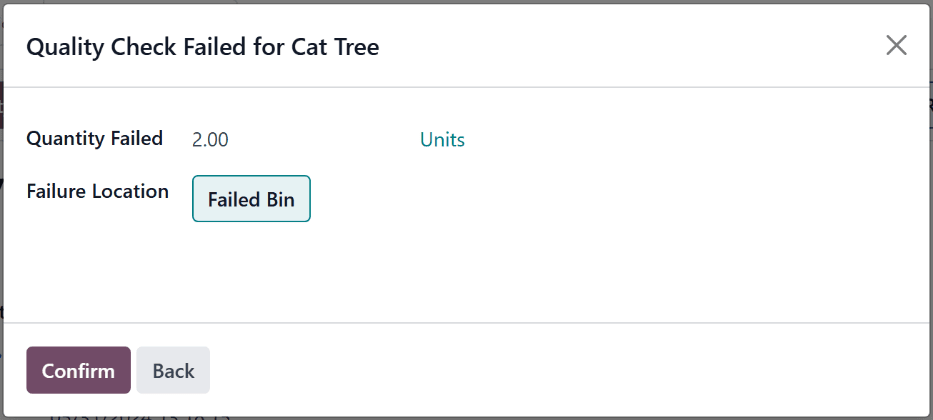
At the top of the selected order, click the Quality Checks button to open a pop-up window, from which the quality check can be processed. At the bottom of the pop-up window, click the Fail button to fail the quality check, which opens a second pop-up window, titled Quality Check Failed for [Product].
In the Quantity Failed field, enter the quantity of the product that failed to pass the quality check. In the Failure Location field, select a location to which the failed quantity should be sent. Then, click Confirm at the bottom of the pop-up window to close it.
Finally, on the order, click the Validate button at the top of the page. Doing so confirms the products that failed the quality check were sent to the failure location, while products that passed it were sent to their normal storage locations.
View failure location inventory
To view the product quantities stored in a failure location, navigate to . Select a failure location from the list. Then, click the Current Stock smart button on the location’s page.
A failure location’s page lists all of the products stored within the location, along with the quantity of each.