Sessões de eventos
In Odoo, Tracks is a term used for talks, lectures, demonstrations, presentations, etc. that occur at an event.
With the Events application, create, schedule, and manage tracks for any event.
There is also the option to allow attendees to propose talks (tracks) for an event, which can then be approved or denied.
Configuração
Navigate to , and tick the Schedule & Tracks checkbox.
When that checkbox is ticked, two additional setting options appear: Live Broadcast and Event Gamification.

The Live Broadcast option provides the ability to air tracks online, through a YouTube integration.
The Event Gamification option provides the ability to share a quiz with attendees once the track is over.
Nota
With the Event Gamification setting enabled, an Add Quiz button appears on track forms.
Once all desired settings have been enabled, click Save.
Página Sessões de eventos
To access, modify, and/or create tracks for an event, navigate to a preconfigured event, or create a new one.
On the desired event form, click the Tracks smart button at the top of the form.
Dica
Se o botão inteligente Sessões não estiver imediatamente disponível, clique no menu suspenso Mais para revelar botões inteligentes ocultos. Em seguida, clique em Sessões no menu suspenso resultante.
Clicking the Tracks smart button reveals the Event Tracks page, with all the tracks (both scheduled and proposed) for the event, if there are any.

The tracks are presented in a default (Kanban) view, but there is the option to view these tracks in a (List), (Gantt) chart, (Calendar), (Graph), or (Activity) view. All of which are accessible in the upper-right corner.
Na visualização padrão (Kanban), as sessões são categorizadas em diferentes estágios. Os estágios padrão são: Proposta, Confirmada, Anunciada, Publicada, Recusada (estágio comprimido), e Cancelada (estágio comprimido). Todos eles podem ser editados, se necessário.
Dica
To edit a stage, hover over the stage name, click the (gear) icon, and select Edit Stage from the resulting drop-down menu.
Clicando em uma sessão na página Sessões de eventos revela o formulário dessa sessão em particular.
Criar sessão de evento
Na página Sessões de eventos, clique em Novo no canto superior esquerdo para abrir um formulário de sessão de evento em branco para criar uma.

Start by giving the track a Title. This field is required by Odoo.
If desired, add an accompanying image to the track, via the (pencil) icon that appears when the cursor hovers over the (camera) icon. When clicked, upload the desired image for the track. This image appears on the event website, on this specific track’s page.
Enter a Track Date and time for the track, and designate a Location where the talk is planning to be held.
Dica
To access a complete list of locations for event tracks, which can be modified at any time, navigate to .
Add a Duration to the track (in hours).
If the Live Broadcast setting is enabled, the option to add a corresponding link in the YouTube Video Link field is available.
Se a caixa de seleção Sempre na lista de favoritos estiver assinalada, a palestra é automaticamente definida como favorita para cada participante inscrito no evento.
Assign someone to be in charge of managing this track in the Responsible field. By default, the person who created the track is assigned.
Ensure the track is applied to the correct event in the Event field. By default, this field is auto-populated with the event related to the Event Tracks page the track was created from.
Choose to add existing Tags, or create new ones, to further organize the track. These tags, and their corresponding categories, are utilized on the event specific website.
Abaixo desta seção de informações gerais, existem três abas: Palestrante, Descrição e Interatividade.
Aba Palestrante
The Speaker tab on an event track form has fields related to the specific speaker/host of the track.

Informações de contato
In the Contact Details section, use the Contact drop-down field to select an existing contact from the database as the main point of contact for the talk.
If this contact is not in the database, type in the name of the contact, and click Create [contact name], to create and edit the contact form later, or click Create and edit… to be taken to that new contact’s contact form, where the rest of their pertinent information can be entered.
The Contact Email and Contact Phone fields are populated with the information found on that chosen contact’s contact form. These fields are not modifiable once the Contact is selected.
Speaker bio
In the Speaker Bio section, enter information related to the speaker. Portions of this section may auto-populate, based on the Contact selected in the Contact Details section. If not, enter information in the necessary fields.
Nota
This information appears on the event website, on the specific track page.
Enter a Name, Email, and Phone number for the speaker.
If desired, add an image to appear alongside the speaker biography on the event website, via the (pencil) icon that appears when the cursor hovers over the (camera) icon. When clicked, upload the desired image for the speaker.
Enter a Job Position for the designated speaker, and the Company Name associated with the speaker.
In the Biography field, enter a custom biography with any speaker-related information.
Aba Descrição
A aba Descrição do formulário de uma sessão de evento é um campo de texto em branco, no qual pode ser introduzida uma descrição da sessão. Informações inseridas aqui aparecem na página da sessão específica no site do evento.
Aba Interatividade
The Interactivity tab on an event track form only has a single option at first: Magic Button.
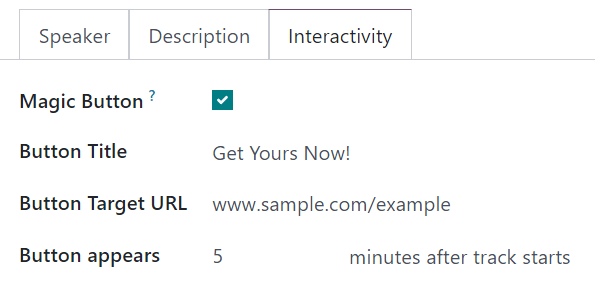
When the Magic Button checkbox is ticked, Odoo displays a call-to-action button to attendees on the track sidebar, while the track is taking place.
Com esta caixa de seleção marcada, aparecem mais três opções, todas elas relacionadas com o Botão mágico:
Button Title: Enter a title to appear on the button for attendees.
Button Target URL: Enter a URL that leads attendees to a specific page.
Button appears: Enter a number in the field, and the button appears that number of minutes after track starts.
Nota
O botão mágico só aparece se houver mais do que uma sessão publicada.
Botão Adicionar questionário
The Add Quiz button only appears on event track forms if the Event Gamification setting is enabled.
To add a quiz to the event track, click the Add Quiz button to reveal a separate page, where an event track quiz can be configured.

Enter a title for the quiz in the blank field at the top of the page.
If participants can try the quiz multiple times, tick the Allow multiple tries checkbox.
The Event and Event Track fields are non-modifiable, and show the corresponding event and track the quiz is associated with.
To add questions to the quiz, click Add a line beneath the Question column to reveal a Create Questions pop-up window.

Nota
Todas as perguntas do questionário de sessão são de múltipla escolha.
From the pop-up window, enter the question in the blank field at the top. Then, click Add a line, and a new line appears, in which an answer option can be entered.
Once an answer option has been entered, designate whether it is the Correct response, by ticking the checkbox in the Correct column. If it is incorrect, leave the checkbox unticked.
There is also the option to add a point value to each answer option in the Points column.
If there are any additional comments that should accompany an answer option, type them into the Extra Comment field.
Nota
The Points and Extra Comment fields are optional.
Repeat this process for all answer options.
To remove an answer option, click the (trash can) icon on the far-right of the desired answer line.
Once all answer options are complete, click Save & Close to save the question, close the pop-up window, and return to the track quiz form. Or, click Save & New to save this question, and instantly start creating another question on a new Create Questions pop-up form.
Publicar sessão de evento
Once all desired configurations are complete on an event track form, click the desired stage it should be in from the status bar in the upper-right corner (e.g. Confirmed, Announced, etc.).
Nota
The stage of a track can also be changed from the Event Tracks page, where the desired track card can be dragged-and-dropped into the appropriate Kanban stage.
Se uma sessão de evento ainda não tiver sido publicada e for movida para o estágio Publicado, o Odoo publica automaticamente a sessão no site do evento.
An event track can also be published by opening the desired event track form, and clicking the Go to Website smart button. Then, toggle the Unpublished switch at the top of the page to Published; thus turning it from red to green, and making it accessible for attendees.
Veja também