E-mail-sjablonen
Iedereen weet d
Enable it and understand a few concepts
The Developer mode must be activated). Then, go to . A view of the existing templates is shown.
Gevaar
It is highly recommended not to change the content in existing templates unless the user has prior knowledge about placeholders.
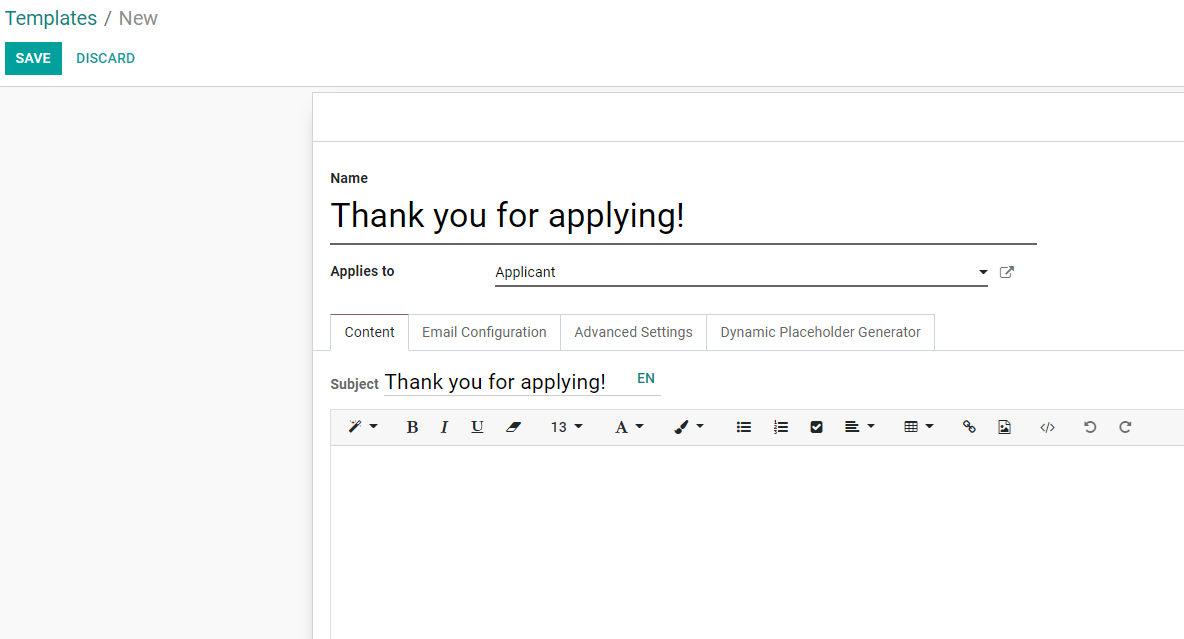
To add a new one, click on Create and choose the type of document this template is used with. In the example below, the template would be sent to job applicants.
Writing content including placeholder expressions
A placeholder is a string of characters that temporarily takes the place of the final data. With email templates, for example, placeholders let you put dynamic content in order to personalize the email for the recipient.
A common use is to use it to indicate the name of the recipient in the newsletter so that each recipient gets a personalized newsletter.
Placeholders and more specifically fields that are available for a template will depend on the template you modify. One way to see the fields that are available is to check the Dynamic Placeholder Generator tab.
Under the tab Dynamic Placeholder Generator, look for the Field you would like to use.

Next, copy the Placeholder Expression and paste it in the Body of the email, under the Content tab, using - essentially - the Code View.

Deactivate the Code View option by simply clicking on it again, and easily design the message. Click on Preview to check how the email looks before sending it.

Using functions with placeholders
Functions can be used along with your placeholders in order to format the data as you’d like within
your mail templates, for example, the time format can be changed using a function such
as format_time.
In order to use functions, you have to know the available fields to format. To know that, you have to check the fields (the properties) of the object that are available to be used.
Checking the fields (properties) available on the object
To check the fields available, click on the link next to Applies to. For the example we use the Portal: new user template, so we click on Portal user Config.

By clicking on the link, you are redirected to the model, in this case the Portal user Config
model that lists all the fields that you can use within your mail template.
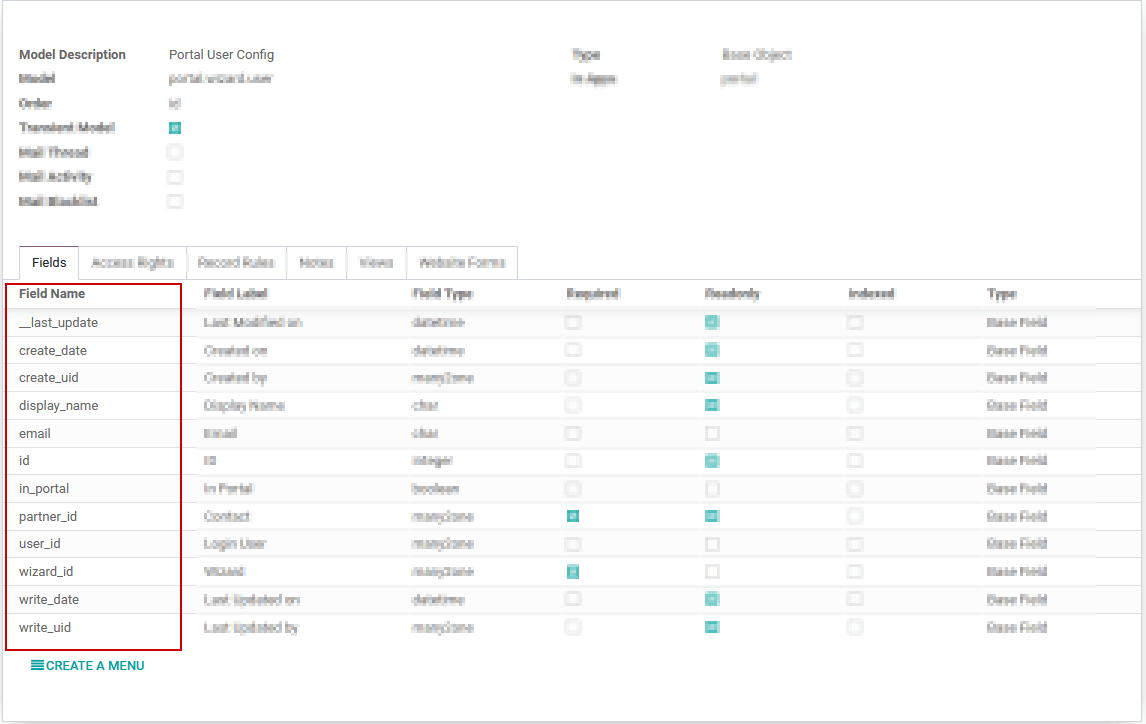
As a side note, you can also see the fields that are available by accessing the dynamic placeholder generator, as described previously.
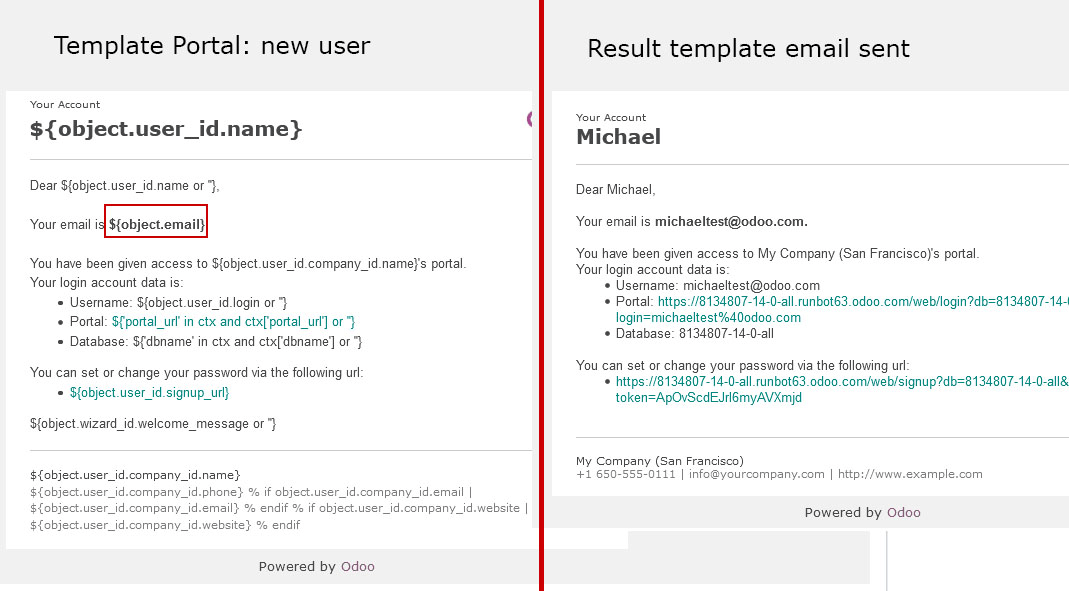
See below an example with the email field that was added in the template and its result as well as some other placeholders already present by default.
Using fields with functions
Now that you know the fields that can be used, you can use one of them with a function. For this
example, we add the creation date, create_date field to the body of the template ‘Portal: new user’
along with the format_date function so that the user knows when he was invited.
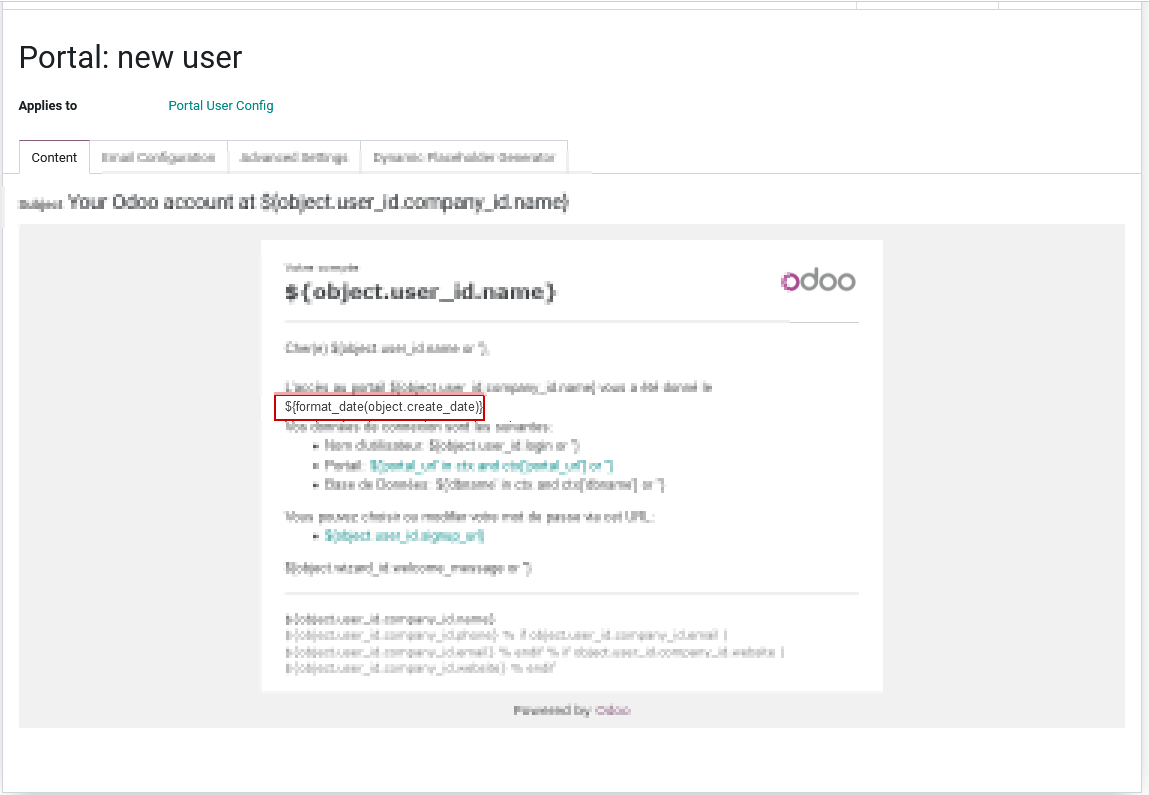
As you can see we use the placeholder ${} with the format_date function which uses as a
parameter the field create_date available on the current object, this gives the following line
of code ${format_date(object.create_date)}.
Waarschuwing
It’s really important to check that the preview is working, if it’s broken your template might appear totally blank when previewing it. We also recommend not changing the content in existing templates unless you have prior knowledge. We highly recommend duplicating the template and apply your changes within this one.
Find below the result of the e-mail received in the recipient’s mailbox with the modifications applied.
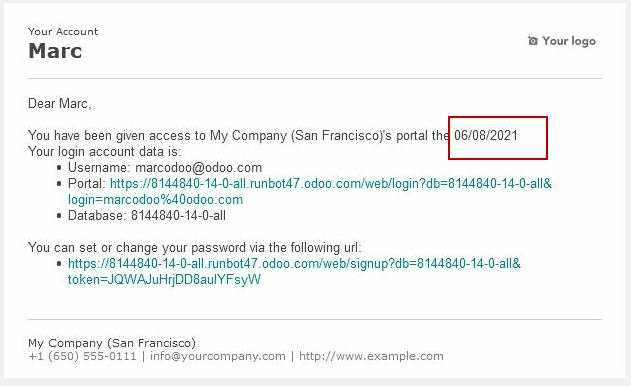
Still by using the format_date function, you have the possibility to adapt the format of the
date just in a specific email by specifying the formatting of the date as a second parameter.
If not specified, the format used by default is the one defined in the settings of the language.
More information on how to access these parameters can be found here.
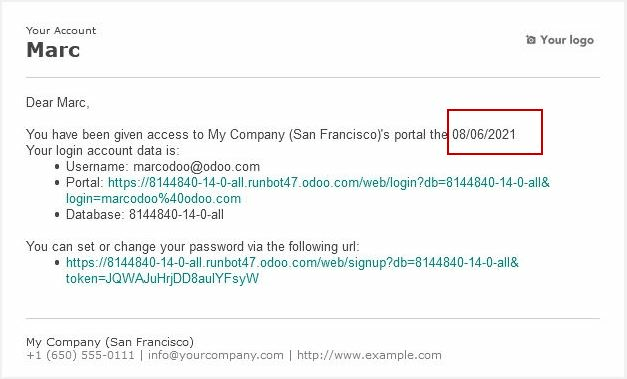
In order to adapt the date format, the piece of code used in the above example
${format_date(object.create_date)} becomes ${format_date(object.create_date, date_format='dd -- MM -- YYYY')}
here dd is the day, MM the month and YYYY the year.
Here is the result once the function is adapted in the template.
Functions used by default within email templates
To format your data, many functions can be used, here are some examples.
Notitie
This list of functions is not exhaustive, meaning that all functions that are available aren’t listed in the below list, for more functions, we invite you to check the babel documentation, last but not least, modifications on the templates are considered as customization and isn’t covered by our support.
For the following examples, we will introduce mostly some date functions. By default, the format of the date used is the one defined in the settings of the language.
These settings can only be accessed when the developer mode is enabled. Once developer is enabled go to and click on one of the languages to see all the settings such as the time format or date format used by the language.
format_date() - formats the date (without the time).
Can be found on the template
Purchase Order: Send PO:
The result will look like this:

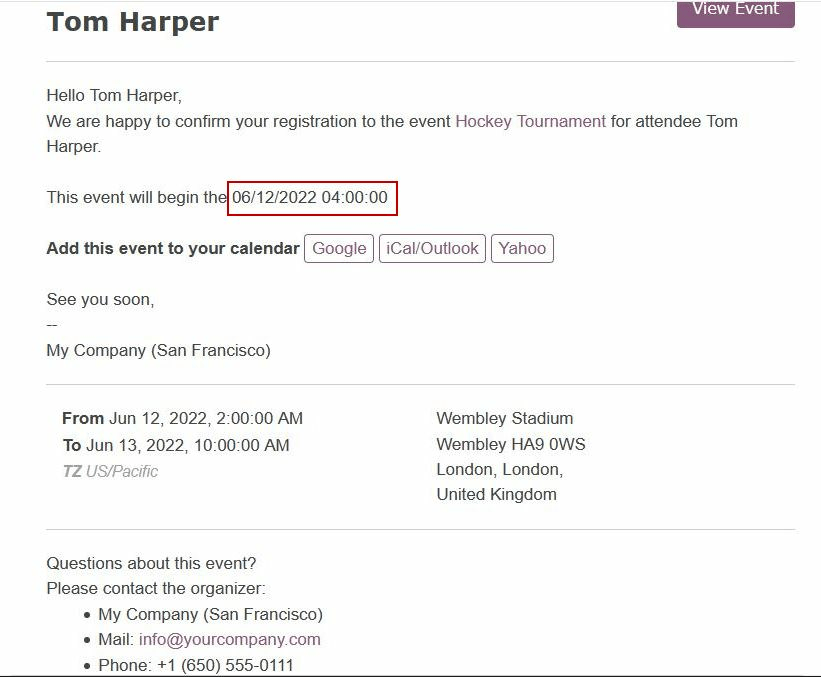
format_datetime() - formats the datetime, defining a specific timezone, in this case Central European Time (CET).
Can be found on the template
Event: Registration.
The result will look like this:
format_time() - Similar to the format_datetime function except It’s used only for the time, not a date.
format_amount() - Formats a number, an amount to display the currency depending on the display setting that has been defined on the currency (the debug mode must be activated to see this feature) (before or after the amount depending on the convention).

Which will look like this:

Een standaard antwoord op je e-mailsjablonen bepalen
Hoewel het veld antwoorden op beschikbaar is in de e-mailsjablonen, wordt dit veld enkel gebruikt voor massamails (bij het verzenden van sjablonen in wat wij bulkmailing noemen). Je kan e-mails in bulk versturen in bijna elke app die een lijstweergave heeft. Selecteer de records die je wilt en klik op de actieknop. Als je de optie hebt om een e-mail te versturen, zie je een mailcomposer met de mogelijke te definiëren waarden:
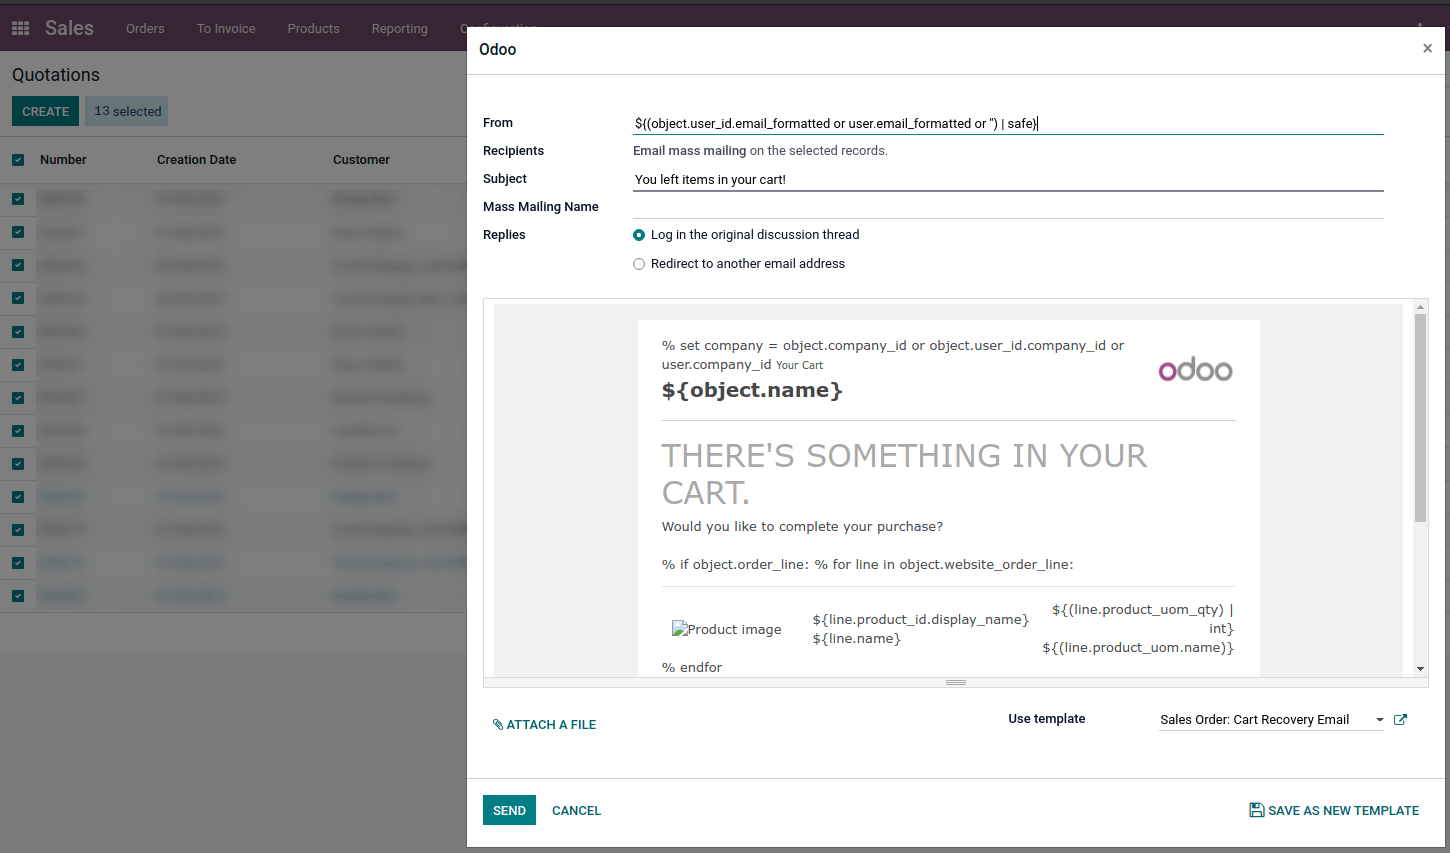
Je kan dit veld ook standaard definiëren op het sjabloon:
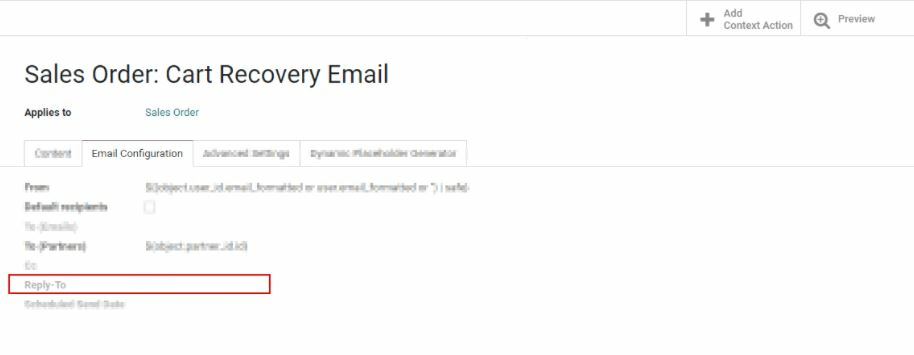
Hierdoor is het instellen van een waarde in dit veld nutteloos, omdat de ingestelde waarde genegeerd zal worden. De standaard antwoorden aan waarde is het standaard catch-all e-mailadres om de communicatie tussen je klant en je Odoo database te garanderen. Voor meer informatie over de werking van de catch-all, bekijk hoe je inkomende berichten beheert.
Transactionele e-mails en bijbehorende URL voor elk bedrijf
Wanneer je Odoo gebruikt, triggeren meerdere evenementen het verzenden van geautomatiseerde e-mails. Deze e-mails worden ook transactionele e-mails genoemd en bevatten soms links die naar je Odoo database verwijzen.
Standaard gebruiken de door de database gegenereerde links de dynamische web.base.url sleutel die bepaald is in de systeemparameters. Meer informatie over deze parameter.
Als de Website applicatie niet is geïnstalleerd, zal de web.base.url sleutel altijd de standaard parameter zijn die gebruikt wordt om alle links te genereren.
Het is belangrijk om te weten dat deze sleutel slechts één waarde kan hebben, wat betekent dat in een database omgeving met meerdere websites/bedrijven, zelfs als je een specifieke domeinnaam hebt voor elke webiste, de links die worden gegenereerd om een document te delen of in transactionele e-mails dezelfde kunnen blijven, ongeacht de website/het bedrijf gerelateerd aan het verzenden van de e-mail/het document.
Dit is niet altijd het geval, aangezien sommige Odoo applicaties een koppeling hebben in de database met de Website applicatie. In dit geval betekent dit dat als een specifiek domein is bepaald voor de websites, de URL gegenereerd in de e-mailsjabloon het domein zal gebruiken dat bepaald is op de website van het bedrijf.
Pas op
Een document dat gedeeld wordt via de Documenten applicatie zal altijd de web.base.url sleutel gebruiken, omdat het gedeelde document niet met een specifieke website geassocieerd is. De URL zal dus altijd dezelfde zijn (de waarde van de web.base.url sleutel), ongeacht het bedrijf waar het van gedeeld wordt, dit is een gekende beperking!
Anderzijds hebben de verkooporders die door een klant gemaakt worden op je Odoo E-commerce websites een koppeling met de website van waaruit de order is gemaakt. Als gevolg hiervan gebruikt de e-mail die wordt verzonden voor de verkooporders de domeinnaam die is gedefinieerd voor de overeenkomstige webiste om de koppelingen te genereren.
Voor meer informatie over het configureren van je domeinen, nodigen we je uit om onze documentatie over domeinnamen te lezen.
Vertalingen bijwerken in e-mailsjablonen
E-mailsjablonen worden automatisch vertaald. Het zou niet nodig moeten zijn om de vertalingen te wijzigen. Als je echter om een specifieke reden enkele vertalingen wilt wijzigen, kan dat zeker.
Zoals bij elke wijzigingin de code, houd er rekening mee dat wijzigingen die niet correct zijn doorgevoerd (die bijvoorbeeld leiden tot slechte syntaxis) het sjabloon kunnen breken, met als gevolg dat het sjabloon leeg zal verschijnen.
Om je vertalingen bij te werken, volg deze stappen op het sjabloon.
Klik op de knop Bewerken en vervolgens op de taalknop

Er verschijnt een pop-upvenster met de verschillende talen die op de database zijn geïnstalleerd. Hier kan je de vertalingen bewerken. Vergeet niet om op Opslaan te klikken om je wijzigingen te bewaren.
