Create a bill of materials (BoM)
A bill of materials (or BoM) is a document that defines the quantity of each component required to manufacture (or deliver) a finished product. It can also include various operations types, steps, and instructions for the individual guidelines needed to complete a production process.
In Odoo Manufacturing, multiple BoMs can be linked to a product, so even product variants can have their own specific BoMs.
Correctly setting up a BoM helps optimize the manufacturing process, and saves time.
Set up a BoM
BoMs can be set up with or without operations steps or instructions, and can include as many or as few components as needed. The simplest setup is one without operations or instructions. In that case, the production is solely managed with manufacturing orders (MOs).
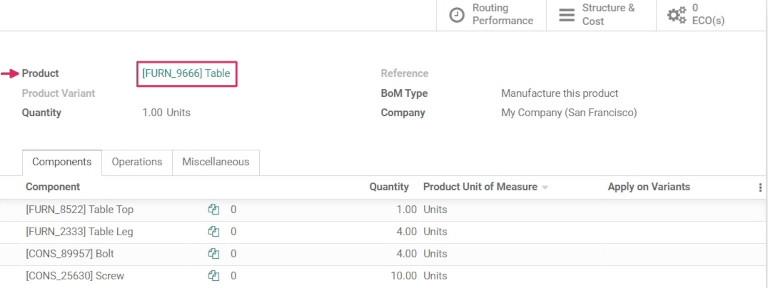
To create a BoM, navigate to , and click Create. Then, in the Product field, choose the product that will be associated with the BoM.

There are three BoM Types that can be chosen for any bill of materials:
Manufacture this product indicates that this product is manufactured in-house, from start to finish using the components listed on the BoM.
Kits are sets of unassembled components that may be sold as products, and are useful for managing more complex BoMs.
Subcontracting outsources the production of some (or all) components or products to outside manufacturers. This feature needs to be enabled in , under the Operations section.
Notitie
A BoM can also be created directly from the BoM smart button on the product template, in which case the Product field is pre-filled.
The most common BoM Type is Manufacture this product. Once the BoM Type is chosen, click Add a Line to add all the Components that go into the production of the final product, as well as the Quantity of each component. Finally, click Save to finish creating the BoM.
Tip
New components can be added, even during production, directly from the BoM. After selecting Add a line, create the new component and select Create or Create and Edit. Components can also be created by going to , and clicking Create.
Specify a BoM for a product variant
Belangrijk
To assign product variants to BoMs, the feature must be enabled in , under the Products section by selecting Variants and clicking Save.
BoMs can also be assigned to specific product variants, with two setup options available to choose from.

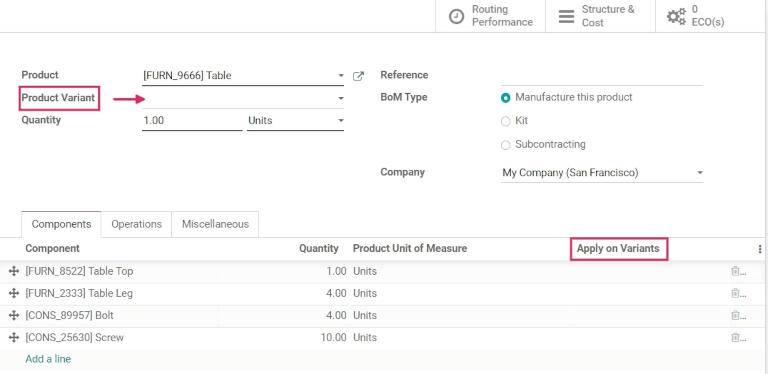
The first method is to create one BoM per product variant, by specifying the Product Variant every time a new BoM is created.
The second method is to create one master BoM that contains all components, and specify which variant each component applies to in the Apply on Variants column.
Notitie
The Apply on Variants column is hidden by default and can be accessed by clicking on the Additional Options menu icon at the right of the Components tab.
Set up operations steps
Some BoMs require multiple operations and steps during the manufacturing process. To create Operations on a BoM, first enable the Work Orders feature in .

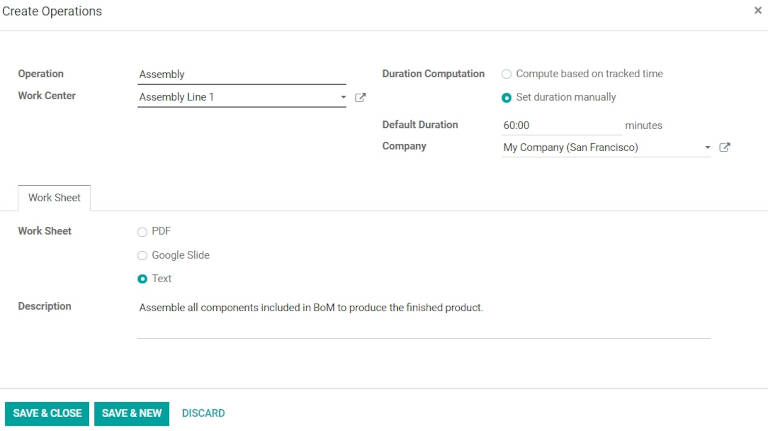
When creating a new BoM, click the Operations tab and click Add a line to add a new operation.
In the Create Operations box, give the operation a name, and specify the Work Center and the Default Duration settings. Under the Work Sheet tab, the type of Work Sheet can also be chosen, if assembly instructions need to be attached.
The Work Sheet types that can be added are: Text (with a Description); PDF files; and Google Slide presentations. When all the information has been filled out, select Save & Close.

Add by-products to a BoM
A by-product is a residual product that is created during production of a BoM. Unlike the finished product, there can be more than one by-product on a BoM.
To add by-products to a BoM, first enable the By-Products feature in .
Once the feature is enabled, by-products can be added to a BoM from the By-products tab by clicking Add a line. The by-product can be named, its Quantity specified, and a Unit of Measure chosen.
If the BoM has Operations steps, specify exactly which operation the by-product is produced from in the Produced in Operation field. Finally, click Save to save changes.