Skip to Content
Menu
This question has been flagged
3 Replies
920 Views

Hi Odoo Community,

I’m trying to configure payment methods for Bank and Cash journals in Odoo 18, but I cannot find an option to add a line or create new payment methods in the journal settings.


Details:

  1. What I’ve Tried:
    • Navigated to Accounting > Configuration > Journals.
    • Opened the specific journal (e.g., Bank or Cash).
    • Looked under Incoming Payments and Outgoing Payments, but there’s no option to add or create payment methods.
    • Enabled Developer Mode, but still no success.
  2. Environment Details:
    • Odoo Version: Odoo 18
    • Hosting: Odoo.sh
  3. User Access:
    • I have full admin rights and Accounting/Finance Manager permissions.
  4. Modules Installed:
    • Accounting/Invoicing modules are fully installed.

Question:

How can I add or create desired payment methods for Bank and Cash journals? Is there any specific configuration or workaround I’m missing?

I’d appreciate any guidance or steps to resolve this issue.

Thanks in advance!

Avatar
Discard
Best Answer

Hi,

payment method auto populated when you activated respective payment acquire( Stripe, Autorize.net, Paypal) else there only two options display for payment method.

I hope this will help out.

Best Regards,
Sunny Sheth (shethsunny555@gmail.com)

Avatar
Discard
Author

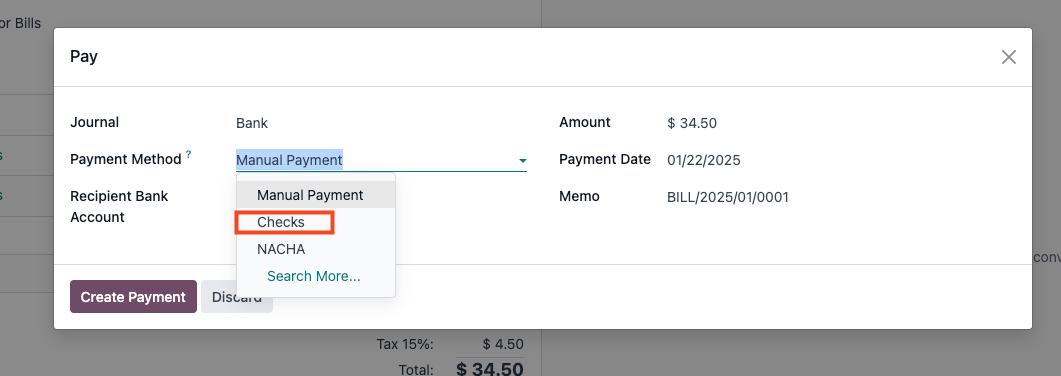
Thank You for the reply, May I know how to add payment method for journals for cheque payments.

Best Answer

Hello,

Integrating online table reservations with Odoo 18's Point of Sale (POS) system enhances restaurant operations by streamlining customer management and table allocation. This integration ensures seamless coordination between front-of-house and kitchen staff, improving operational efficiency and customer satisfaction. Here's a step-by-step guide to setting up this feature:

Step 1: Configure Floors and Tables

  1. Access the POS Module: Navigate to the Point of Sale module in your Odoo dashboard.
  2. Set Up Floor Plans:
    • Click on Configuration and select Floor Plans.
    • To add a new floor, click New.
    • Enter the Floor Name and select the associated Point of Sale.
    • Choose a Background Color for visual differentiation. 
  3. Add Tables:
    • Within the floor configuration, click Add a line.
    • For each table, specify the Table Name, Number of Seats, and Table Shape.
    • Repeat this process to add all tables under the respective floor.

Step 2: Assign Floors in POS Settings

  1. Navigate to POS Settings:
    • Go to Configuration and select Settings within the Point of Sale module.
  2. Enable Restaurant Mode:
    • Under the Restaurant Mode section, ensure the Floors & Table Map option is activated.
    • This setting allows the creation of floors and assignment of orders to specific tables.

Step 3: Configure Appointment Types for Online Reservations

  1. Access Appointment Settings:
    • In the Calendar module, navigate to Appointments menu.
  2. Create New Appointment:
    • Click Create to define a new appointment type.
    • Fill in necessary details such as Name, Duration, and Reservation Settings.
  3. Set availability:
    • Select “Resources” option (resources are the tables) 
  4. Set up your Schedule:
    • Select days and time under the Schedule tab.
  5. Set up the Options:
    • Set up emails for reminders, confirmations, and cancellations.
    • Enable "Up-front Payment" checkbox, if visitors must make a payment to confirm their reservation.
  6. Publish this Appointment on your website:
    • Click “Go to Website” and then enable “Published”


Step 4: Set Up Online Booking in your PoS

  1. Enable Table Booking:
    • Go to PoS settings and enable “Table Booking” checkbox (please note that all sessions must be closed)
    • Select your Appointment type
  2. Test the Booking System on the Website:
    • Perform test bookings to ensure the system accurately reflects table availability and reservations.


Avatar
Discard
Best Answer

Hi,

You can refer to this official documantation for check payment methods: https://www.odoo.com/documentation/18.0/applications/finance/accounting/payments/pay_checks.html#pay-by-checks


  1. Enable Accounting -> Configuration -> Settings -> Vendor Payments -> Checks

  2. Pay your Vendor Bills with check

Hope it is helpful

Avatar
Discard
Related Posts Replies Views Activity
0
May 25
1
0
May 25
123
0
May 25
155
1
May 25
173
1
May 25
241