
Bestell- und Kassiervorgang
Odoo E-Commerce bietet mehrere Optionen zur Organisation von Bestell- und Bezahlvorgängen. Es stehen verschiedene Bestellschaltflächen und aufeinanderfolgende Kassierschritte zur Verfügung, von denen einige zusätzliche Funktionen unterstützen. Die zugehörigen Schaltflächen und Kassierseiten können mit dem Website-Editor angepasst werden.
Optionen für die Schaltfläche „In den Warenkorb“
Standardverhalten bei „In den Warenkorb“
When clicking the Add to Cart button, the customer remains on the product page by default.
On the e-commerce landing page (
/shop): if the selected product is configurable (i.e., it has configurable attributes and/or multiple packagings), a Configure pop-up opens to let the customer choose the desired options.On a specific product page: attributes/packagings configuration is done directly on the page.
If the product has linked optional products, a Configure pop-up opens on both the shop page and the product page. The customer can then choose between Add to Cart (to stay on the product page) and Go to Checkout (to be redirected to the cart).
Tipp
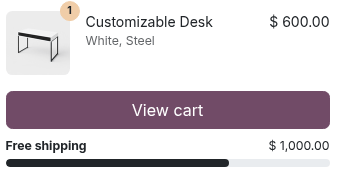
When loyalty programs with the Promotions program type are configured, a progress bar toward the reward is displayed when an item is added to the cart.
Example
Offer customers free shipping when they place a larger order. To do so:
Create a loyalty program and set the Program Type field to Promotions.
Set a conditional rule with the minimum order amount required to qualify for free shipping, e.g.,
$ 1,000.00.Define a Free shipping reward.
Jetzt kaufen
To let customers choose to go directly to the Order summary step, add an additional Buy now button. To do so, go to any product’s page, open the website editor, go to the Style tab, and click the Buy Now button next to the Purchase Options.

Produkte erneut bestellen
Kunden können Artikel aus einem früheren Verkaufsauftrag erneut bestellen:
über ihr Kundenportal mithilfe der Schaltfläche Nochmal bestellen. Alle Produkte aus der ausgewählten Bestellung werden automatisch in den Warenkorb gelegt, und Kunden können dann alle Artikel, die sie nicht erneut bestellen möchten, Entfernen.
aus dem Warenkorb, indem Sie im Bestellübersichtsschritt auf Schnell nochmal bestellen klicken. Kunden können dann die Mengen nach Bedarf anpassen und auf die Schaltfläche (Warenkorb) neben den Produkten klicken, die sie nachbestellen möchten.

Schritte des Kassiervorgangs
During checkout, customers are taken through the following steps:
Jeder Schritt kann mithilfe des Website-Editors angepasst werden, indem Sie Bausteine hinzufügen oder den Reiter Stil öffnen, um verschiedene Kassieroptionen zu aktivieren.
Bemerkung
Der durch Bausteine hinzugefügte Inhalt ist für jeden Schritt spezifisch.
Bestellübersicht
The Order summary step allows customers to see the items they added to their cart, adjust quantities, Remove products, and reorder products from a previous order. Information on product prices and the taxes applied is also displayed. Customers can then click the Checkout button to continue to the Address step.
Öffnen Sie den Website-Editor, um weitere Optionen zu aktivieren, wie z. B.:
Suggested Accessories: to showcase accessory products;
Promo Code: to allow customers to redeem gift cards and apply discount codes or promotional codes;
Add to Wishlist: Enable wishlists to allow signed-in users to remove a product from their cart and add it to their wishlist using the Save for Later option.
Bemerkung
Wenn eine Steuerposition automatisch erkannt wird, wird die Produktsteuer anhand der IP-Adresse des Kunden ermittelt.
Wenn der installierte Zahlungsanbieter den Express-Kassiervorgang unterstützt, wird eine gesonderte Schaltfläche angezeigt, über die Kunden direkt vom Warenkorb zur Bestätigungsseite gelangen können, ohne das Kontaktformular ausfüllen zu müssen.
Address
Sobald Sie ihre Bestellung überprüft haben:
Unsigned-in customers are prompted to Sign in or enter their Name and Email address, along with their delivery address and phone details;
Angemeldete Kunden können die entsprechende Lieferadresse auswählen.
Sie können dann eine Liefermethode auswählen, ihre Rechnungsadresse eingeben oder auswählen (oder den Schalter Entspricht Lieferadresse umschalten, wenn die Rechnungs- und Lieferadresse identisch sind) und auf Bestätigen klicken, um zum nächsten Schritt zu gelangen.
Tipp
Für B2B-Kunden können Sie außerdem im Website-Editor optionale B2B-Felder aktivieren.
Sie können ein Kontrollkästchen hinzufügen, damit sich Benutzer ohne Konto für einen Newsletter anmelden können. Gehen Sie dazu zu , scrollen Sie nach unten zum Abschnitt E-Commerce, aktivieren Sie die Funktion Newsletter und wählen Sie eine Newsletter-Liste aus.
When the Pick up in store delivery method is selected, the customer can Choose a pick-up point and, if applicable, filter them by country, provided several pick-up points are available.
When the Expected Delivery option is configured, the customer views the expected delivery date or can select a desired delivery date.
Automatic address validation
Use the Google Places API to ensure that partner delivery addresses are valid. Addresses are automatically validated as the user types during checkout.
To enable this feature, the Google Places API needs to be configured first. Then, go to . In the General section, enable Google Address Validation, then paste the Google Places API key in the API Key field.
Weitere Informationen
You can add an Extra Info step in the checkout process to collect additional customer information through an online form, which is then included in the sales order. To do so, enable the Extra Step option in the website editor. The form can be customized as needed.
Zahlung
At the Payment step, customers can choose a Payment method, enter their payment details, and click Pay now.
Bemerkung
The Pay now button label can be customized using the website editor.
Siehe auch
Allgemeine Geschäftsbedingungen
Um Kunden zu verpflichten, vor der Zahlung den Allgemeinen Geschäftsbedingungen zuzustimmen, öffnen Sie den Website-Editor und aktivieren Sie im Reiter Stil den Schalter Bedingungen akzeptieren.
Elektronische Geldbörsen und Geschenkkarten
Kunden können beim Kassiervorgang mit einer elektronischen Geldbörse oder einer Geschenkkarte bezahlen. Um diese Optionen anzubieten, gehen Sie zu und aktivieren Sie im Abschnitt E-Commerce. Gehen Sie anschließend zu und erstellen Sie ein Geschenkkarten- und/oder elektronisches Geldbörsenprogramm.

Bestellinformationen
The final step of the checkout process is the order confirmation page, which provides a summary of the customer’s purchase details. A sales order is automatically created in the backend.
To automatically send notification emails and documents, navigate to and scroll down to the eCommerce section. Then configure the following settings:
To send an order confirmation email: Under Order Confirmation, select an Email template, or, if the WhatsApp app is installed, a WhatsApp template from the dropdown list. To edit the selected template, click the (Internal link) arrow.
To send a product review request to the customer: Enable the Request ratings setting.
To send an invoice to the customer: Enable the Automatic Invoice setting.
Siehe auch