
Commander et payer
Odoo eCommerce offre plusieurs options pour organiser le processus de commande et de paiement. Il propose différentes options de bouton de commande et des étapes de paiement séquentielles, dont certaines prennent en charge des fonctionnalités supplémentaires. Les boutons et pages de paiement associés peuvent être personnalisés à l’aide de l”éditeur de site web.
Options d’ajout au panier
Comportement par défaut de l’ajout au panier
When clicking the Add to Cart button, the customer remains on the product page by default.
On the e-commerce landing page (
/shop): if the selected product is configurable (i.e., it has configurable attributes and/or multiple packagings), a Configure pop-up opens to let the customer choose the desired options.On a specific product page: attributes/packagings configuration is done directly on the page.
If the product has linked optional products, a Configure pop-up opens on both the shop page and the product page. The customer can then choose between Add to Cart (to stay on the product page) and Go to Checkout (to be redirected to the cart).
Astuce
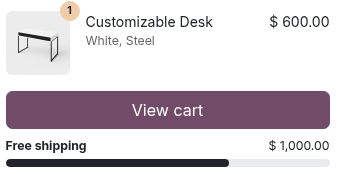
When loyalty programs with the Promotions program type are configured, a progress bar toward the reward is displayed when an item is added to the cart.
Example
Offer customers free shipping when they place a larger order. To do so:
Create a loyalty program and set the Program Type field to Promotions.
Set a conditional rule with the minimum order amount required to qualify for free shipping, e.g.,
$ 1,000.00.Define a Free shipping reward.
Acheter maintenant
To let customers choose to go directly to the Order summary step, add an additional Buy now button. To do so, go to any product’s page, open the website editor, go to the Style tab, and click the Buy Now button next to the Purchase Options.

Recommander des produits
Les clients peuvent recommander des articles d’une commande client précédente :
depuis leur portail client, en utilisant le bouton Commander à nouveau. Tous les produits de la commande sélectionnée sont automatiquement ajoutés au panier, et les clients peuvent ensuite Supprimer les articles qu’ils ne souhaitent pas recommander.

depuis le panier, en cliquant sur Recommande rapide à l”étape Récapitulatif de commande. Les clients peuvent ensuite ajuster les quantités selon leurs besoins et cliquer sur le bouton (panier) à côté du ou des produits qu’ils souhaitent recommander.

Étapes de paiement
During checkout, customers are taken through the following steps:
Chaque étape peut être personnalisée à l’aide de l’éditeur de site web en ajoutant des blocs de construction ou en ouvrant l’onglet Style pour activer diverses options de paiement.
Note
Le contenu ajouté via des blocs de construction est spécifique à chaque étape.
Résumé de la commande
The Order summary step allows customers to see the items they added to their cart, adjust quantities, Remove products, and reorder products from a previous order. Information on product prices and the taxes applied is also displayed. Customers can then click the Checkout button to continue to the Address step.
Ouvrir l’éditeur de site web pour activer les options de paiement telles que :
Suggested Accessories: to showcase accessory products;
Promo Code: to allow customers to redeem gift cards and apply discount codes or promotional codes;
Add to Wishlist: Enable wishlists to allow signed-in users to remove a product from their cart and add it to their wishlist using the Save for Later option.
Note
Si une position fiscale est détectée automatiquement, la taxe du produit est déterminée en fonction de l’adresse IP du client.
Si le fournisseur de paiement installé prend en charge le paiement express, un bouton dédié s’affiche, permettant aux clients de passer directement du panier à la page de confirmation sans remplir le formulaire de contact.
Address
Une fois qu’ils ont examiné leur commande :
Unsigned-in customers are prompted to Sign in or enter their Name and Email address, along with their delivery address and phone details;
Les clients connectés peuvent sélectionner l”Adresse de livraison appropriée.
Ils peuvent ensuite choisir un mode de livraison, sélectionner ou saisir leur adresse de facturation (ou activer le bouton identique à l’adresse de livraison si les adresses de facturation et de livraison sont identiques), puis cliquer sur confirmer pour passer à l’étape suivante.
Astuce
Pour les clients B2B, vous pouvez également activer des champs B2B optionnels dans l’éditeur de site web.
Vous pouvez ajouter une case à cocher permettant aux utilisateurs sans compte de s’inscrire à une newsletter. Pour ce faire, allez à , descendez jusqu’à la section eCommerce, activez la fonctionnalité Newsletter, et sélectionnez une Liste de newsletter.
When the Pick up in store delivery method is selected, the customer can Choose a pick-up point and, if applicable, filter them by country, provided several pick-up points are available.
When the Expected Delivery option is configured, the customer views the expected delivery date or can select a desired delivery date.
Automatic address validation
Use the Google Places API to ensure that partner delivery addresses are valid. Addresses are automatically validated as the user types during checkout.
To enable this feature, the Google Places API needs to be configured first. Then, go to . In the General section, enable Google Address Validation, then paste the Google Places API key in the API Key field.
Infos supplémentaires
You can add an Extra Info step in the checkout process to collect additional customer information through an online form, which is then included in the sales order. To do so, enable the Extra Step option in the website editor. The form can be customized as needed.
Paiement
At the Payment step, customers can choose a Payment method, enter their payment details, and click Pay now.
Note
The Pay now button label can be customized using the website editor.
Voir également
Conditions générales
Pour exiger des clients qu’ils acceptent les conditions générales avant le paiement, ouvrir l’éditeur de site web et activer le bouton Accepter les conditions dans l’onglet Style.
E-wallets et cartes-cadeaux
Les clients peuvent payer avec un portefeuille électronique ou une carte cadeau lors du paiement. Pour proposer ces options, aller à et activer dans la section eCommerce. Ensuite, aller à et créer un programme de cartes cadeaux et/ou de portefeuille électronique.

Confirmation de commande
The final step of the checkout process is the order confirmation page, which provides a summary of the customer’s purchase details. A sales order is automatically created in the backend.
To automatically send notification emails and documents, navigate to and scroll down to the eCommerce section. Then configure the following settings:
To send an order confirmation email: Under Order Confirmation, select an Email template, or, if the WhatsApp app is installed, a WhatsApp template from the dropdown list. To edit the selected template, click the (Internal link) arrow.
To send a product review request to the customer: Enable the Request ratings setting.
To send an invoice to the customer: Enable the Automatic Invoice setting.
Voir également