
Gehaltsabrechnungen
Payslips are individual records of payment, containing all the details of how the pay was calculated (hours, deductions, other inputs, etc.), and generated by payroll officers through the Payroll app. Payslips can be created and processed individually, or multiple payslips can be processed at one time, in a single batch, referred to in Odoo as pay runs.
Gehaltsabrechnung erstellen
To create a new payslip, navigate to , and the Employee Payslips dashboard loads. Click the New Off-Cycle button in the corner, and a blank payslip form loads. Fill out the following information on the payslip form:
Employee: Select the employee being paid using the drop-down menu. This field is required. Once a selection is made, other fields may auto-populate according to the employee record.
Bemerkung
It is recommended to only create payslips for employees that are already in the database. If there is no current employee record, and therefore no employee contract, it is recommended to create the new employee in the Employees application before creating payslips for that employee. Refer to the new employee documentation for instructions on how to add an employee.
Employee Record: The date the current contract began for the selected employee automatically populates this field. This field is required.
Wichtig
All employees are required to have a contract in order to generate payslips. Additionally, only one contract can be in the running stage for each employee. Therefore the current contract start date populates this field, and it is not recommended to make changes to this field.
Pay Run: Select the pay run this new payslip should be added to, if applicable, using the drop-down menu. For individual payslips not related to a pay run, leave this field blank.
Struktur: Die mit dem Vertrag des Mitarbeiters verknüpfte Struktur füllt dieses Feld standardmäßig automatisch aus. Wählen Sie bei Bedarf über das Dropdown-Menü eine andere Struktur aus.
Period: The start and end dates of the pay period. The first and last days of the current month auto-populate the two Period fields by default. The dates can be changed, if desired.
To change the start or end date, click on the first date in the Period field to reveal a pop-up calendar. Navigate to the desired month, and click on the desired day to select that specific date. These fields are required.
Wichtig
If modifications to auto-populated fields are made, it is recommended to check with the accounting department to ensure every entry that affects the Accounting app is correct.

Worked days tab
The Worked Days tab lists the number of days and hours the employee worked during the Period specified at the top portion of the payslip form. This tab is automatically populated with all the individual attendance records for the time period, including both worked time and any time off taken.
Each individual entry lists:
The Type of entry
A Description
The number of Days worked
The total Hours
The Amount earned
Additional records cannot be created for the Worked Days tab as it is auto-populated according to the employee’s attendance records or working schedule on their employee record.

Tipp
Adjusting work entries can be done on the Work Entry dashboard or in the Attendances app.
Salary inputs tab
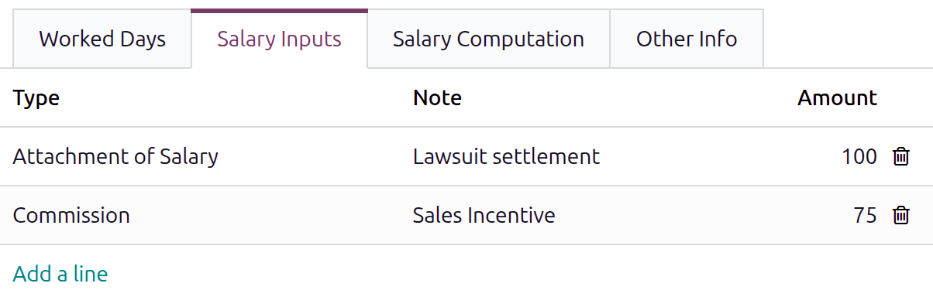
The Salary Inputs tab automatically lists all running salary adjustments and other additional inputs such as tips, bonuses, etc.
Each salary input lists:
The Type of input
The Note related to it
The Amount
To manually add an additional salary input, click Add a line, and a blank line appears in the tab. Select the Type using the drop-down menu. Add any relevant Notes to the corresponding field, then enter the Amount.
Reiter „Gehaltsberechnung“
The Salary Computation tab calculates each individual salary rule. This includes everything from the employee’s salary to all the deductions and allowances associated with the installed payroll localization, such as taxes, expenses, benefit contributions, and any other items.
When the payslip is first created, this tab remains blank. Click the Compute Sheet button in the corner, and the Salary Computation tab is populated.
Es ist nicht möglich, diesen Reiter zu bearbeiten, da die Berechnungen auf anderen Einträgen in der Gehaltsabrechnung basieren.
Wichtig
The Compute Sheet button does not disappear from view after it is clicked, so the payslip can be recalculated at any point prior to processing it.
If any changes need to be made to the Worked Days or Salary Inputs tabs, make the necessary changes, then click the Compute Sheet button to recalculate the payslip.

Reiter „Weitere Informationen“
The Other Info tab displays accounting details that are not used in the Salary Computation tab.
The Payslip Name is auto-populated according to the employee name and the time period
the payslip is for, in the following format: Salary Slip - (Employee) - (Month) (Year). Make any
desired edits to the name in this field. This field is required.
Das Feld Unternehmen wird ebenfalls automatisch entsprechend dem Mitarbeiterdatensatz ausgefüllt und kann nicht geändert werden.
Enter the Payment Date using the calendar selector in the corresponding field. This is the date payment is issued to the employee. The Date Account field is the date the payslip is recorded in the accounting journals. If left blank, the validation date of the payslip is used to determine when the payslip is logged in the accounting journals.
Das Feld Gehaltsjournal wird standardmäßig ausgefüllt und kann nicht bearbeitet werden. Dies ist das Buchhaltungsjournal, in dem der Gehaltsscheck erfasst wird.
If there are any additional notes or information needed for the payslip, add them to the Add an Internal Note field.

Gehaltsabrechnung verarbeiten
Before processing payslips, check for possible issues concerning payroll. To view all payroll issues, navigate to . The Payroll app dashboard loads, including a Warnings section that appears in the corner of the dashboard.

Die Warnungen sind nach Typ gruppiert, z. B. Mitarbeiter ohne laufende Verträge oder Mitarbeiter ohne Bankkontonummer. Klicken Sie auf eine Warnung, um alle Einträge zu sehen, die mit diesem speziellen Problem verbunden sind.
If the warnings are not resolved at any point in the payslip processing process, an error may occur. Errors appear in a pop-up window, providing details for each error and how to resolve them.
After all relevant warnings are resolved, and all the necessary information on the payslip is entered, the payslip can be processed. First, the payslip is validated, then a payment report is created, the journal entries are posted, and finally, the employee is paid.
Validate the payslip
Once everything on the payslip form is correct, and the payslip has been computed, click the Validate button. A Confirmation pop-up window appears, asking Are you sure you want to proceed? Click Ok to confirm.
Once the payslip is validated, the status changes from Draft to Validated, and a Journal Entry (Draft) smart button appears at the top. A PDF of the payslip appears in the sidebar, if the screen is wide enough to display it.
Tipp
To email a PDF payslip to the employee, click the Send By Email button. The email is sent, and logged in the chatter.
Generate a payment report
Once the payslip status has changed to Done, a payment report must be created. A payment report is a document that contains all the necessary information to transfer the pay earnings from the company’s bank account to the employee’s bank account. These are submitted by the payroll department to the appropriate institution.
Click the Create Payment Report button and a Generate a Payment Report pop-up window loads. Using the drop-down menu, select the Export Format for the payment report. The two default options available are CSV and NACHA. NACHA stands for the National Automated Clearing House Association, and this selection creates a compatible ACH file ,which is sent to the company’s bank.
Bemerkung
Weitere Optionen können je nach installierter Personalabrechnung-Lokalisierung in der Datenbank verfügbar sein.
Wenn CSV ausgewählt ist, werden alle anderen Felder ausgeblendet.
Next, set the date the paycheck is issued in the Payment Date field using the calendar selector. Lastly, select the desired Bank Journal the paycheck is logged to using the drop-down menu.
Once the Generate a Payment Report pop-up window is configured, click the Generate button, and the file appears on the payslip form, in a new Payment Report field.

Post the journal entry
Before the payment can be sent to the employee, the journal entry must be posted.
Click the Journal Entry (Draft) smart button, and the journal entry loads. Click Post to post the entry, then click the payslip breadcrumb to return to the payslip. The Journal Entry (Draft) smart button changes to Journal Entry (Posted).
Pay the employee
To pay the employee, click the Pay button in the corner. Doing so reveals a Pay pop-up window.
Wichtig
Employees cannot be paid until the journal entry is posted.
Alle erforderlichen Informationen werden gemäß der Gehaltsabrechnungskonfiguration im Formular vorausgefüllt. Bei Bedarf können jedoch Änderungen an allen Feldern vorgenommen werden, außer am Feld Betrag. Dieses wird gemäß den Gehaltsabrechnungsberechnungen ausgefüllt und kann nicht geändert werden.
Journal: Das Buchhaltungsjournal, in dem die Gehaltsabrechnung erfasst wird.
Zahlungsmethode: Wählen Sie im Dropdown-Menü aus, wie der Mitarbeiter bezahlt wird. Die Standardoptionen sind:
Manual Payment: Select this if paying the employee in a method other than Check or NACHA.
Scheck: Wählen Sie dies, wenn ein Scheck direkt an den Mitarbeiter ausgestellt wird.
NACHA: Wählen Sie dies, wenn Sie die National Automated Clearing House Association verwenden, um die Zahlung per Direktüberweisung an den Mitarbeiter zu überweisen.
Group Payments: If the employee has multiple payslips for the same time period (for example, separate payroll, reimbursement, and commission checks), click the checkbox to group all payments into one payment.
Zahlungsdatum: Wählen Sie über die Kalenderauswahl das Datum aus, an dem der Mitarbeiter bezahlt werden soll.
Once the Pay pop-up form is complete, click the Create Payments button, and the payment is processed.
After the payment is processed, and there is confirmation that the checks have been issued, or the funds have been directly deposited to the employee’s bank account, click the Mark as paid button, and the payslip’s status changes to Paid.
Wichtig
For a payslip to be paid, the employee must have a bank account entered in the private information tab of their employee record, and the bank account must be marked as Trusted.
Wenn keine Bankinformationen vorhanden sind oder die Bank nicht als Vertrauenswürdig aufgeführt ist, können Gehaltsabrechnungen nicht bezahlt werden. Beim Klicken auf die Schaltfläche Bezahlen erscheint eine Fehlermeldung. Bearbeiten Sie den Mitarbeiterdatensatz und fügen Sie bei Bedarf Bankinformationen hinzu oder markieren Sie das Bankkonto als vertrauenswürdig.

Gehaltsabrechnung erstatten
Bei der Erstattung einer Zahlung wird die Erstattung durch Erstellen einer Gehaltsabrechnung über einen negativen Betrag der ursprünglichen Gehaltsabrechnung durchgeführt.
Example
Ein Mitarbeiter erhält irrtümlich einen Gehaltsscheck über 5.000,00 USD. Bei der Erstattung der Gehaltsabrechnung wird eine neue Gehaltsabrechnung über -5.000,00 USD erstellt.
If a payment needs to be refunded, navigate to , and click on the individual payslip being refunded. Click the Revert button, located in the corner of the screen.
The Refund Payslip dashboard loads, with both the original payslip being refunded (with a status of Paid) and the newly created payslip in the negative amount of the original payslip, in a list view.
By default, the refund payslip has a status of Draft. This refund payslip is processed in the same way a regular payslip is processed.

Lohnabrechnung drucken
To print a payslip, navigate to , and click on the individual payslip being printed. Click the Print button in the corner of the payslip record, and a file explorer window opens in a new tab.
The name of the file is Payslip - (Employee).pdf by default. Modify the file name if desired,
navigate to where the payslip should be saved, and click Save.
A PDF file is downloaded to the selected location.
Tipp
Depending on the configured settings of the browser, the file may automatically download.
Alle Lohnabrechnungen anzeigen
To view all payslips, regardless of status, go to . The Employee Payslips dashboard loads, displaying all payslips in a default list view.
The Status for each individual payslip is displayed, indicating one of the following status options:
Draft: The payslip has not been validated yet, and edits can still be made.
Done: The payslip is calculated, validated, and ready to be paid.
Paid: The employee has been paid.
Canceled: The payslip has been canceled.
Warning: The payslip has errors that must be resolved before the payslip can be processed.
Error: The payslip is in the Draft stage, but an error prevents it from being processed further.

Klicken Sie auf eine einzelne Gehaltsabrechnung, um die Details zu dieser Gehaltsabrechnung auf einer separaten Seite anzuzeigen. Klicken Sie mit Hilfe des Brotkrümelmenüs auf Mitarbeiter-Gehaltsabrechnungen, um zur Listenansicht aller Gehaltsabrechnungen zurückzukehren.
Export payslips
All or a select number of payslips can be exported to an Excel spreadsheet.
All payslips
To export all payslips, navigate to . Click the (Actions) icon, then click Export All in the drop-down menu.
In the file explorer window that loads, select the desired location for the file, update the default
Pay Slip (hr.payslip).xlsx file name if desired, and click Save.
Select payslips
To export only specific payslips, first click the checkbox to the left of each individual payslip on the Employee Payslips dashboard to select the payslip. As payslips are selected, a # Selected smart button appears, indicating the number of selected payslips.
Click the Actions button at the top of the page, click Export, and an Export Data pop-up window loads. Configure the Export Data pop-up window, then click Export to export the data.
In the file explorer window that loads, select the desired location for the file, update the default
Pay Slip (hr.payslip).xlsx file name if desired, and click Save.