
Bewerber ablehnen
Ein Bewerber kann zu jedem Zeitpunkt des Einstellungsverfahrens für eine Stelle abgelehnt werden.
Um einen Bewerber abzulehnen, navigieren Sie zunächst zur Bewerberkarte in der Anwendung Personalbeschaffung. Dies erfolgt auf eine von zwei Arten:
Open the main Job Positions dashboard by navigating to . Next, click on the desired job position card, then click on the individual applicant card from the Applications page.
Navigieren Sie zu . Klicken Sie in der Liste Bewerbungen irgendwo auf die Zeile des gewünschten Bewerbers, um die Karte dieses Bewerbers zu öffnen
Oben auf der Karte des Bewerbers gibt es mehrere Schaltflächen. Klicken Sie auf die Schaltfläche Ablehnen.
Ablehnungsgründe
Ablehnungsgründe ermöglichen es Personalverantwortlichen, zu dokumentieren, warum ein Bewerber nicht passend war, und E-Mail-Vorlagen für bestimmte Ablehnungsgründe an den Bewerber zu senden.
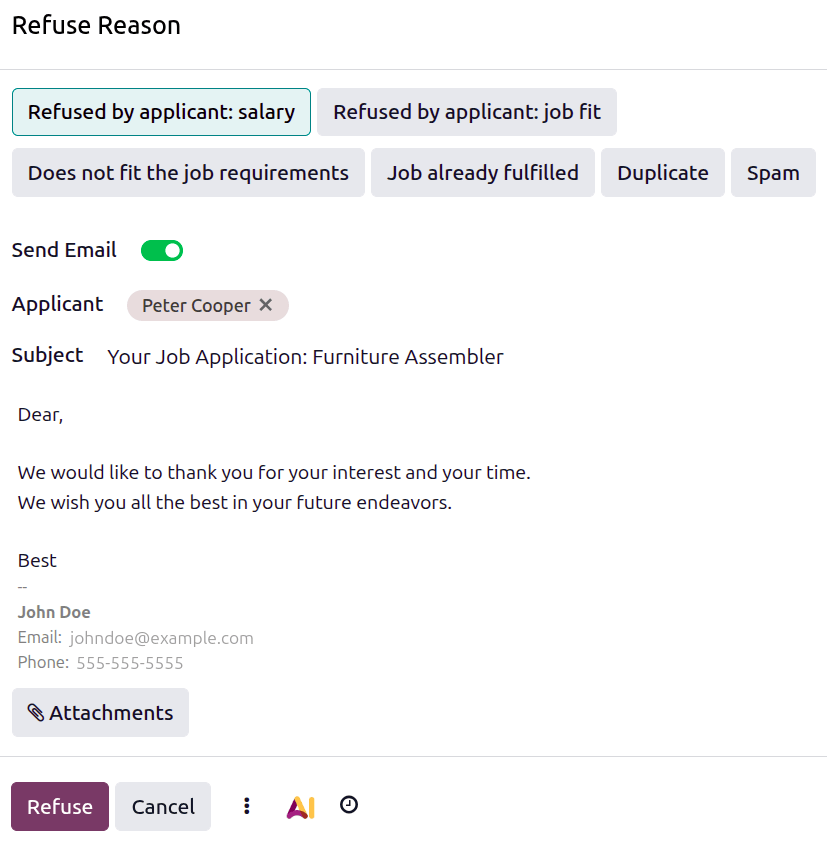
Clicking Refuse on an applicant’s form makes the Refuse Reason pop-up window appear.
The default refuse reasons in Odoo, and their corresponding refusal email templates, are:
E-Mail-Vorlage |
Ablehnungsgrund |
|---|---|
Personalbeschaffung: Absage |
Entspricht nicht den Stellenanforderungen
Stelle bereits besetzt
Duplikat
Spam
|
Personalbeschaffung: nicht mehr interessiert |
Vom Bewerber abgelehnt: Stellenpassung
Vom Bewerber abgelehnt: Gehalt
|
Additional refusal reasons can be created, and existing ones can be modified (or deleted).
Ablehnungsgründe erstellen oder bearbeiten
To view and configure refuse reasons, navigate to . Doing so reveals the Refuse Reasons page, where all the existing refusal reasons are listed.
To create a new refuse reason from the Refuse Reasons page, click the New button. A blank line appears at the bottom of the list, with an empty field present in the Description column.
Geben Sie den neuen Ablehnungsgrund in das Feld ein. Es wird empfohlen, einen kurzen und prägnanten Grund einzugeben, z. B. Angebot abgelaufen oder Bewerbung zurückziehen.
Then, click in the Email Template field to reveal a drop-down menu. Select the desired email template from the list to be used when the new refuse reason is selected.
If a new email template is desired, type in the name for the new template in the field. Then, click Create and edit…, and a Create Email Template pop-up window appears.
The Template Name field is populated with the name entered in the Email Template column by default, but can be modified if desired. Enter the email Subject in the corresponding field, and add the email content in the Body tab. To include attachments, click the Options tab, and add the attachment using the Attachments button. To assign an Owner for the template, select a user in the drop-down menu. Enter a Template Description in the corresponding field.
Click Save, and Odoo returns to the Refuse Reasons list.
Die neue Vorlage erscheint im Feld der E-Mail-Vorlage des neuen Ablehnungsgrunds.
Bemerkung
Vorkonfigurierte E-Mail-Vorlagen für die Ablehnung von Bewerbungen in Odoo verwenden dynamische Platzhalter, d. h. personalisierte Platzhalter, die Daten aus dem Datensatz des Bewerbers in den E-Mail-Text einfügen.
For example, if the applicant’s name is used in a dynamic placeholder, the applicant’s name appears anytime that dynamic placeholder appears on the email template.
Weitere Einzelheiten zu E-Mail-Vorlagen finden Sie in der Dokumentation E-Mail-Vorlagen.
Ablehnungsmail senden
After clicking the Refuse button on an applicant form, a refuse reason is selected from the Refuse Reason pop-up window.
The applicant’s email address automatically populates the Applicant field. The Subject and email body are populated according to the corresponding email
To send the refusal email to the applicant, click Refuse at the bottom of the Refuse Reason pop-up window. The refusal email is sent to the applicant, and a red Refused banner appears on the applicant’s card in the corner.
Tipp
If an application should be refused but an email should not be sent (if, for example, the application was spam), click the Send Email toggle to deactivate it, and click Refuse at the bottom of the Refuse Reason pop-up window.
Refuse duplicate applicant
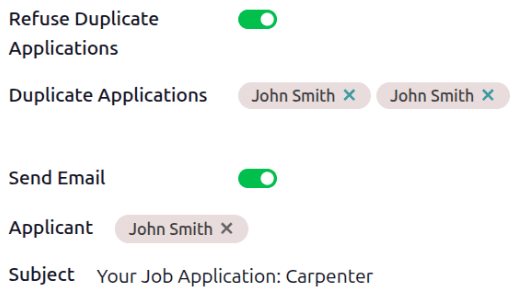
Occasionally, applicants apply multiple times for the same job position. When this occurs, it is possible to refuse all their applications at once, instead of individually.
In this situation, a Refuse Duplicate Applications toggle appears on the Refuse Reason pop-up window. Enable the toggle, and a Duplicate Applications field appears beneath it, listing the applicant’s name for each duplicate application in the system.
To refuse all applications for that applicant, click the Refuse button.
The applicant is only sent one email, and all their applications for the job position are marked as Refused.
Abgelehnte Bewerber anzeigen
After refusal, the applicant’s card is hidden by default. However, it is still possible to view applicants who have been refused by job position, or view all refused applicants.
By job position
To view the refused applicants for a specific job position, navigate to , then click the desired job position Kanban card.
On the Applications page, click the (Toggle Search Panel) button in the search bar, then click Refused in the Filters column.
All applicants that have been refused for the job position appear in the stage they were in when they were refused, and all other applicants are hidden.

All refused applicants
To view all refused applicants across all job positions, navigate to . Every applicant record is displayed in a default list view.
Click the (Toggle Search Panel) button in the search bar, then click Refused in the Filters column.
All applicants that have been refused appear, with the text in red. Along with the applicant’s Name, the date they Applied on, the Job Position, Stage they were in when refused, their Matching percentage, any Tags, and the Recruiter responsible for the job position are listed.
