Search, filter, and group records
Odoo allows for the searching, filtering, and grouping of records in a view to display only the most relevant records. The search bar is located at the top of the view, start typing to search for values, or click the 🔽 (down arrow) icon to access the Filter, Group By, and Favorites drop-down menus.
Buscar valores
Use the search field to quickly look for specific values, and add them as a filter. Type the value to search for, and select the desired option from the drop-down menu to apply the search filter.
Example
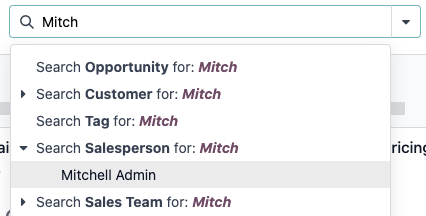
Instead of adding a custom filter to select records where
Mitchell Admin is the salesperson on the Sales Analysis report (), search for Mitch, and click the ⏵ (right arrow) next to
Search Salesperson for: Mitch, and select Mitchell Admin.
Nota
Using the search field is equivalent to using the contains operator when adding a custom filter. If a partial value is entered, and the desired field is directly selected (without selecting the ⏵ (right arrow)), all records containing the typed characters for the selected field are included.
Filters
Filters are used to select records that meet specific criteria. The default selection of records is specific to each view, but can be modified by selecting one (or several) preconfigured filters, or by adding a custom filter.
Filtros preconfigurados
Modify the default selection of records by clicking the 🔽 (down arrow) icon from the search bar, and selecting one (or several) preconfigured filters from the Filters drop-down menu.
Example
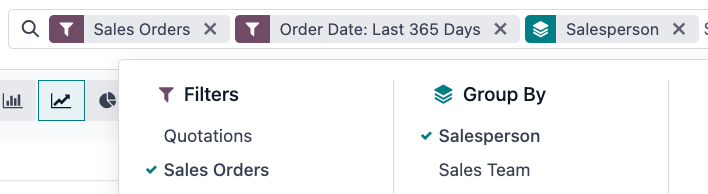
On the Sales Analysis report (), only records that are at the sales order stage, with an order date within the last 365 days, are selected by default.
To also include records at the quotation stage, select Quotations from the Filters.
Furthermore, to only include sales order and quotation records from a specific year, like
2024, for example, first remove the existing Order Date: Last 365 Days filter, by clicking the
❌ (remove) icon, then select .

Nota
The preconfigured Filters are grouped, and each group is separated by a horizontal line. Selecting preconfigured filters from the same group allows records to match any of the applied conditions. However, selecting filters from different groups requires records to match all of the applied conditions.
Filtros personalizados
If the preconfigured filters are not specific enough, add a custom filter. To do so, click the 🔽 (down arrow) icon in the search bar, then select .
The Add Custom Filter pop-up window displays the matching option, filter rule, and a toggle to Include archived records.
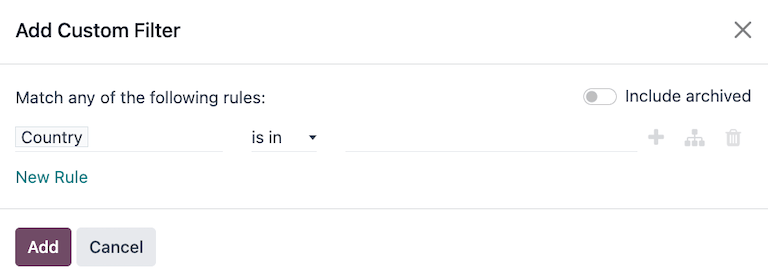
The default matching configuration is to Match any of the following rules, indicating that each filter rule is applied independently. To change the matching configuration to Match all of the following rules, at least two filter rules must be added to the custom filter.
Match all 🔽 of the following rules: all of the filter rules must be met. Logically, this is an AND (
&) operation.Match any 🔽 of the following rules: any of the filter rules can be met. Logically, this is an OR (
|) operation.
By default, a single filter rule is added to the custom filter. The following describes the structure of a filter rule:
The first inline field is the field name to filter by. Some fields have refined parameters that are nested within another field. These fields have an > (arrow) icon beside them, which can be selected to reveal the nested fields.
The second inline field is the conditional operator used to compare the field name to the value. The available conditional operators are specific to the field’s data type.
The third inline field is the variable value of the field name. The value input may appear as a drop-down menu, a text input, a number input, a date/time input, a boolean selector, or it may be blank, depending on the operator used and the field’s data type.
Three inline buttons are also available to the right of the rule’s filter criteria:
➕ (plus sign): adds a new rule below the existing rule.
(Add branch): adds a new group of rules below the existing rule, with the any and all matching options available to define how each rule within this branch is applied to the filter. If the matching option is set to the same as the parent group, the fields are moved to join the parent group.
Example
If the matching option is set to Match all 🔽 of the following rules, and a new branch is added with its matching option changed from any 🔽 of to all 🔽 of, the newly-added branch disappears, and its group of rules are moved to the parent group.
🗑️ (garbage can): deletes the node. If a branch node is deleted, all children of that node are deleted, as well.
A new filter rule can be added to the custom filter by clicking the New Rule button.
Once the filter criteria are defined, click Add to add the custom filter to the view.
Example
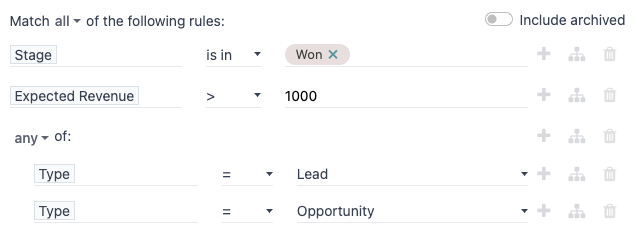
To target all leads and opportunities from the app that are in the Won stage, and have an expected revenue greater than $1,000, the following should be entered:
Match all 🔽 (down arrow) of the following rules:
Stage is in Won
Expected Revenue >
1,000any 🔽 (down arrow) of:
Type = Lead
Type = Opportunity
Truco
Activate Modo de desarrollador (modo depuración) to reveal each field’s technical name and data type, as well as the # Code editor text area below the filter rules, to view and edit the domain manually.
Agrupar registros
The display of records in a view can be clustered together, according to one of the preconfigured groups. To do so, click the 🔽 (down arrow) icon in the search bar, then select one of the Group By options from the drop-down menu.
Example
To group the records by salesperson on the Sales Analysis report (), click the Salesperson option from the Group By drop-down menu. The view changes to group the records by salesperson, without filtering out any records.
It is possible to customize groups by using a field present on the model. To do so, click , and select a field from the drop-down menu.
Nota
Several groups can be used at the same time. The first group that is selected is the main cluster, the next one that is added further divides the main group’s categories, and so on. Furthermore, filters and groups can be used together to refine the view even more.
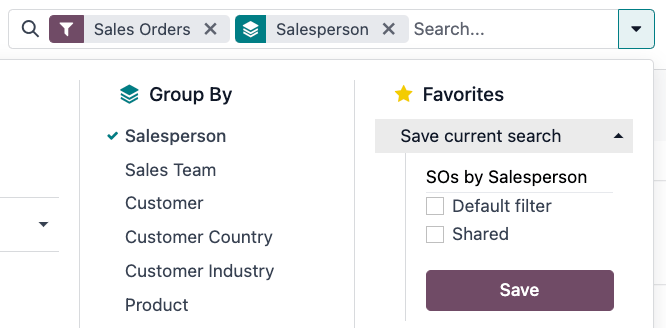
Favorites
Favorites are a way to save a specific search for future use, or as the new default filter for the view.
To save the current view as a favorite, click the 🔽 (down arrow) icon in the search bar, then select the Save current search drop-down menu to display the following options:
Filter name: name of the favorited search.
Default filter: sets the favorited search as the default filter for the view.
Shared: makes the favorited search available to all users. By default, the favorited search is only available to the user who created it.
Once the options are set, click Save to save the favorited search.
Saved favorites can be accessed by clicking the 🔽 (down arrow) icon in the search bar, then selecting the saved filter in the Favorites drop-down menu. To remove a saved favorite, click the 🗑️ (garbage can) icon next to the favorited search.
Truco
To view all favorited searches, first activate Modo de desarrollador (modo depuración), and navigate to . From here, all favorited searches can be viewed, edited, archived, or deleted.