Create surveys
To create a survey in the Odoo Surveys application, navigate to to reveal a blank survey form.
Nota
The New button is not present on the Surveys dashboard if in the Activities view.
Survey form
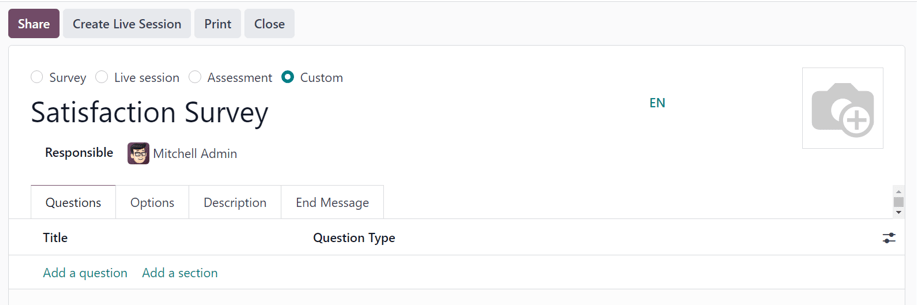
At the top of the survey form are four radio buttons, each representing a survey style. The radio button options are:
Survey
Live Session
Assessment
Custom (selected by default)
These options are here to streamline the survey-making process, by providing users with automated settings and options that are ideally specific to those types of surveys. Each of those survey type options comes equipped with its own specific selection of options.
The Custom option, selected by default, offers all the options from every potential survey type (located in the Options tab).
Beneath those radio survey type options is a blank field in which a name for the survey must be entered.
Below the survey name field, is the Responsible field. Choose a user from the drop-down menu to be in charge of the survey. By default, the user who initially created the survey is selected as the default Responsible.
To the right of those fields, and above the tabs, is the option to add a background image, represented by a 📷 (camera) icon. When clicked, the option to upload an image becomes available. This image would be used as the background image for the entire survey. This is not a required option.
Below those fields and options are four tabs: Questions, Options, Description, and End Message.
Pestaña de preguntas
View, access, add, and/or delete questions and sections to the survey in the Questions tab.
By default, two columns are present in the Questions tab: Title (i.e. the question) and Question Type.
If the Randomized per Section option is enabled in the Options tab of the survey form, a column titled, # Questions Randomly Picked appears in the Questions tab.
Indicate whether questions require a mandatory answer by clicking the (optional columns) icon to the far-right of the column titles. Then, select Mandatory Answer from the drop-down menu to reveal the Mandatory Answer column in the Questions tab.

Add a question
To add a question to a survey, click Add a question in the Questions tab, and proceed to fill out the Create Sections and Questions pop-up window that appears.
To learn how to create and customize questions, refer to the create questions documentation.
Importante
There must be a survey title entered in order for the Create Sections and Questions pop-up window to appear. If no title is entered for the survey, an error pop-up message appears in the upper-right corner, instructing the user to enter a survey title.
Add a section
A section divides the survey into organized parts, in order to visually group similar questions together. To make a section, click Add a section at the bottom of the Questions tab, proceed to type in a desired name for the section, then either press Enter or click away.
The section line appears in dark gray in the Questions tab.
Then, drag-and-drop desired questions beneath a section, or drag-and-drop a section title on top of (i.e. before) the desired question(s) in the survey. Doing so populates the section with questions that align with its theme.
If the Randomized per Section option is enabled in the Options tab of the
survey form, the number 1 appears, by default, on the section line, beneath the #
Questions Randomly Picked column.
This indicates that 1 question from that section will be picked at random for each participant
taking the survey, bypassing every other, non-chosen question from that section. To change that
number, select that figure, and type in the desired number in its place. Then, either press
Enter, or click away.
Pestaña de opciones
In the Options tab of the survey form, there are many options to choose from, separated in four different sections: Questions, Time & Scoring, Participants, and Live Session.
The options available in this tab vary on the survey type chosen, via the radio buttons at the top of the survey form: Survey, Live Session, Assessment, or Custom.
The Custom survey type showcases all the possible options in the Options tab. So, if any of the following options do not appear in the Options tab, it is likely because the selected survey type does not offer it.
Questions section
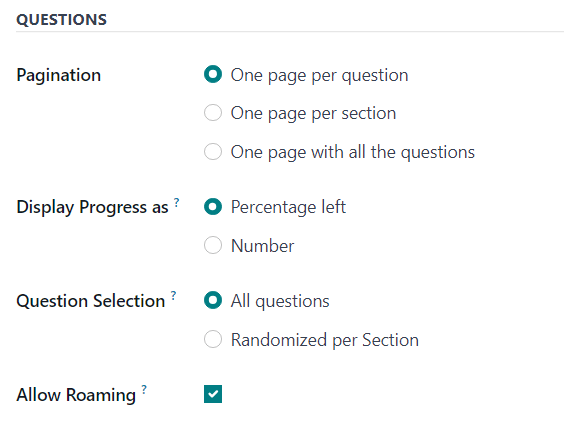
The first field in the Questions section revolves around the Pagination, or overall layout, of the survey.
Choose between One page per question, One page per section, or One page with all the questions in the Pagination field.
Nota
If One page with all the questions is selected, all the remaining options in the Questions field, apart from Question Selection is removed, as they are no longer needed.
Next, select one of the following options in the Display Progress as field:
Percentage left: displays the percentage of the survey remaining to participants.
Number: display the number of questions answered along with the total number of questions to answer.
In the Question Selection field choose to have the survey show All questions or Randomized per Section. If Randomized per Section a new column appears in the Questions tab, titled: # Questions Randomly Picked.
In the # Questions Randomly Picked column, designate how many questions, in that particular section, should be chosen at random to the participant.
Lastly, there is the Allow Roaming option. When enabled, participants are able to navigate back to previous pages in the survey.
Time & Scoring section
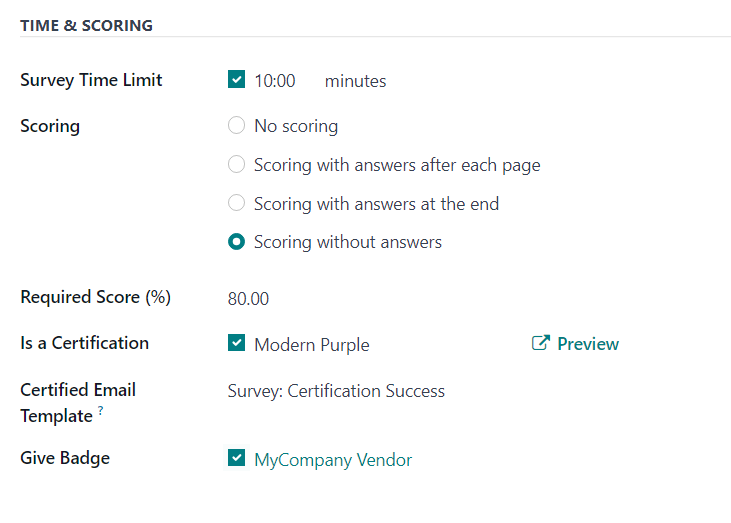
The first option in the Time & Scoring section is the Survey Time Limit option. If enabled, proceed to enter in an amount of time (in minutes) to be set as the time limit for the survey.
Next, in the Scoring section, determine whether there should be: No scoring, Scoring with answers after each page, Scoring with answers at the end, or Scoring without answers.
If the No scoring option is selected, no other options are available in this section. However, if any other Scoring option is selected, two additional fields appear: Required Score (%) and Is a Certification.
In the Required Score (%) field, enter the minimum percentage participants must earn in order to pass the survey. Scores below this threshold are considered fails. This figure is also used to determine if a participant is “certified” or not, if the Is a Certification option is enabled.
If the Is a Certification option is enabled, that makes the survey a Certification, which is represented on the main Surveys app dashboard via a half-tropy image behind the survey title, while in the default Kanban view. Or, via a full-trophy icon, while in list view.
When the Is a Certification option is enabled, three additional fields appear – one beside the option, and two below.
In the field that appears beside the option, users can select (and Preview) a certification template.
Beneath that, in the Certified Email Template field, users can select a preconfigured email template, or create one on-the-fly, to be sent to certified participants of the survey upon completion.
Lastly, if the Give Badge field is enabled, a preconfigured badge is then displayed on the contact page for that certified survey participant.
Participants section
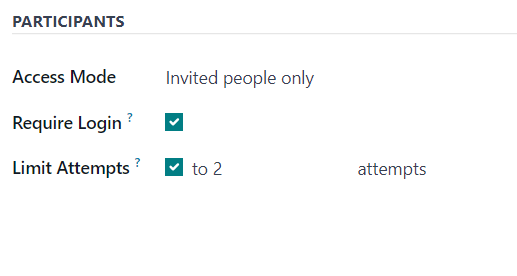
The first available option in the Participants section is the Access Mode field. This is where users can determine who has access to the survey. Users can select either: Anyone with the link or Invited people only.
Next, there is the option to Require Login. Enabling this feature means users must login before being able to take the survey, even if they have a valid token.
Lastly, in there is the Limit Attempts field. If enabled, an additional field appears beside it, in which users can determine how many times users can attempt this survey.
Live Session section
Nota
The Live Session section in the Options tab of the survey form only pertains to Live Session surveys.
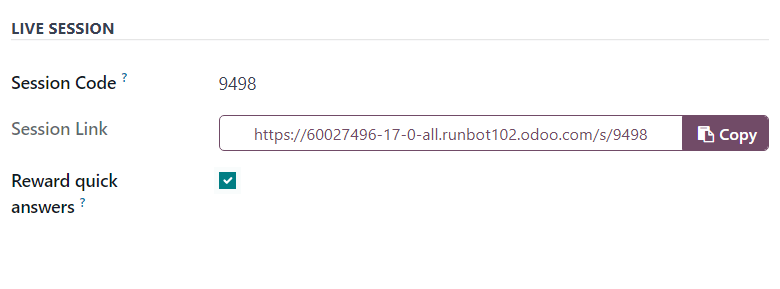
The first option in the Live Session section is the Session Code field. In this field, enter a custom code, consisting of letters, numbers, and/or symbols, to be used by participants in order to access the live session survey.
Next, is the Session Link field, which cannot be customized, but it can be sent out to potential participants.
Nota
If a Session Code has been entered, the URL in the Session Link field ends with that specific Session Code.
If that complete Session Link (ending in the custom Session Code) is used by participants to access the live session survey, that link would already be entered for them. At that point, they’d simply have to wait until the host of the live session begins the survey, and then they’d be able to enter.
If the Session Link (ending in the custom Session Code) is sent without including the Session Code ending, participants trying to access the live session, via that link, will need to enter the custom Session Code to gain access.
If the Session Code field is empty, a slightly longer, more complicated URL populates the Session Link field. When participants attempt to access the live session via that link (without a configured Session Code), all they have to do is wait for the host of the live session to begin the survey, and they’d be able to participate.
Lastly, in the Live Session section, there is the option to Reward quick answers. If that option is enabled, participants who submit their answer quickly receive more points.
Pestaña de descripción
In this non-required tab, users can enter a custom description about the survey, along with any explanations or guidance that a survey participant may need in order to properly participate (and complete) the survey.
End Message tab
In this non-required tab, users can enter a custom message that participants see upon completing the survey.
Survey form buttons
Once the survey has been configured properly, and questions have been added, the user can utilize any of the available buttons in the upper-left corner of the survey form.

Those buttons are the following:
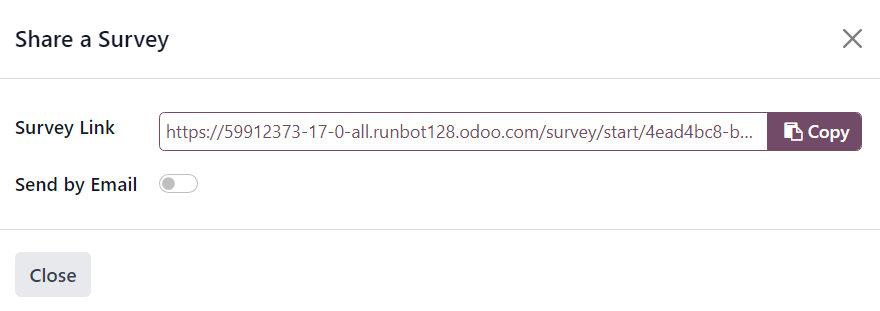
Share: click to reveal a Share a Survey pop-up form that can be used to invite potential participants to the survey — complete with a Survey Link that can be copied and sent to potential participants, and a Send by Email toggle switch.
When the Send by Email toggle is in the “on” position, indicated by a green switch, additional fields appear, in which Recipients and a Subject can be added to the email. Below that, a dynamic email template, complete with a Start Certification button appears, which can also be modified.
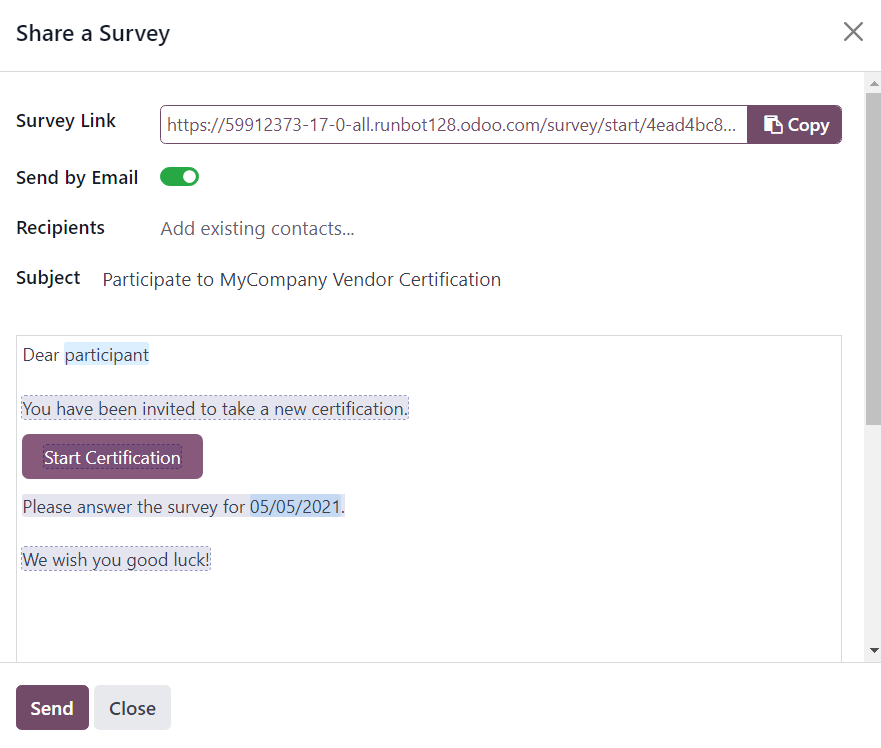
Once modifications are complete, click Send to send that email invite to all the email addresses/contacts listed in the Recipients field.
See results: this button only appears if there has been at least one participant who has completed the survey. Clicking See results reveals a separate tab containing a visual analysis of the survey questions and responses. For more information, check out the scoring surveys documentation.
Create Live Session: clicking this button opens the Session Manager in a separate tab. It also allows participants to access the live session, but the actual survey does not begin until the user hosting the live session survey clicks the Start button on the Session Manager window.
Additionally, when Create Live Session has been clicked, and the Session Manager tab has been opened, the Create Live Session button on the survey form is replaced with two new buttons: Open Session Manager and Close Live Session.
Clicking Open Session Manager opens another separate tab to the Session Manager, and clicking Close Live Session closes, and subsequently ends, the live session.
Test: clicking this button opens a new tab to a test version of the survey, in order for the user to check for errors or inconsistencies, from the point-of-view of a participant. Users can tell if they are in a test version of the survey if there is a blue banner at the top of the screen, reading:
This is a Test Survey --> Edit Survey.If the link in the blue banner is clicked, Odoo returns the user to the survey form.
Print: clicking this button opens a new tab to a printable version of the survey that the user can proceed to print for their records.
Close: clicking this button closes the survey (i.e. archives it), which is represented by a red Archived banner across the top-right corner of the survey form.
When this button is clicked, and the survey is closed, a single button appears in the upper-right corner of the survey form, titled: Reopen. When Reopen is clicked the survey is reopened (i.e. unarchived), and the Archived banner is removed from the survey form.
Ver también