Landed costs
When shipping products to customers, the landed cost is the total price of a product or shipment, including all expenses associated with shipping the product.
In Odoo, the Landed Costs feature is used to take additional costs into account when calculating the valuation of a product. This includes the cost of shipment, insurance, customs duties, taxes, and other fees.
Configuración
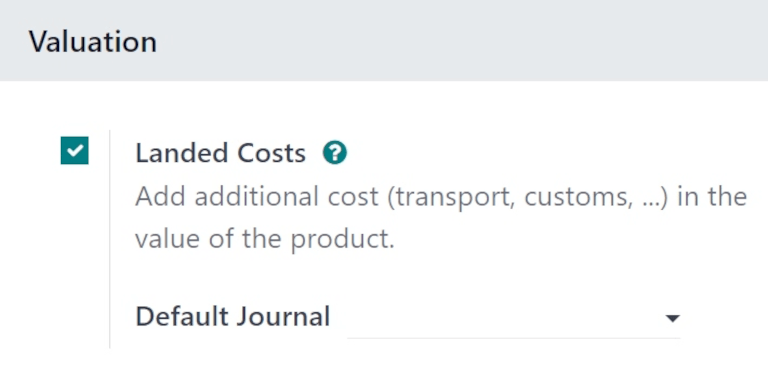
To add landed costs to products, the Landed Costs feature must first be enabled. To enable this feature, navigate to , and scroll to the Valuation section.
Tick the checkbox next to the Landed Costs option, and click Save to save changes.
Once the page refreshes, a new Default Journal field appears below the Landed Costs feature in the Valuation section.
Click the Default Journal drop-down menu to reveal a list of accounting journals. Select a journal for which all accounting entries related to landed costs should be recorded.
Create landed cost product
For charges that are consistently added as landed costs, a landed cost product can be created in Odoo. This way, a landed cost product can be quickly added to a vendor bill as an invoice line, instead of having to be manually entered every time a new vendor bill is created.
To do this, create a new product by going to , and clicking New.
Assign a name to the landed cost product in the Product Name field (i.e. International
Shipping). In the Product Type field, click the drop-down menu, and select
Service as the Product Type.
Importante
Landed cost products must have their Product Type set to Service.
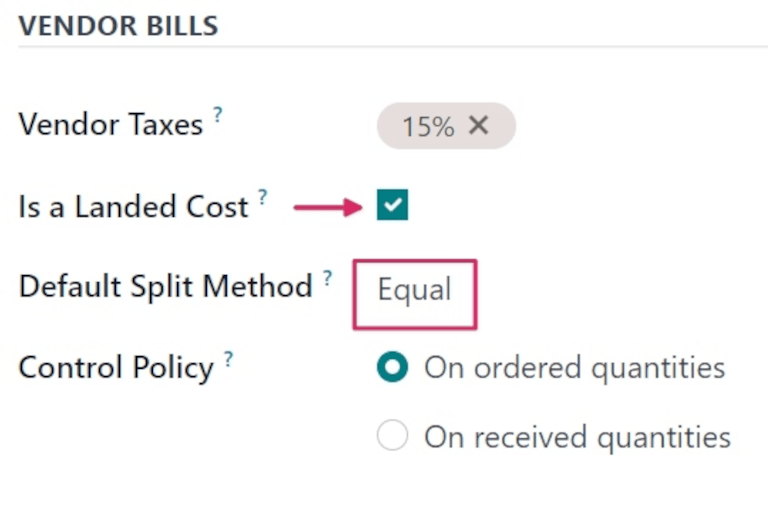
Click the Purchase tab, and tick the checkbox next to Is a Landed Cost in the Vendor Bills section. Once ticked, a new Default Split Method field appears below it, prompting a selection. Clicking that drop-down menu reveals the following options:
Equal: splits the cost equally across each product included in the receipt, regardless of the quantity of each.
By Quantity: splits the cost across each unit of all products in the receipt.
By Current Cost: splits the cost according to the cost of each product unit, so a product with a higher cost receives a greater share of the landed cost.
By Weight: splits the cost, according to the weight of the products in the receipt.
By Volume: splits the cost, according to the volume of the products in the receipt.
When creating new vendor bills, this product can be added as an invoice line as a landed cost.
Importante
To apply a landed cost on a vendor bill, the products included in the original PO must belong to a Product Category with its Force Removal Strategy set to FIFO, and its Costing Method set to AVCO.
Crear una orden de compra
Navigate to to create a new request for quotation (RfQ). In the Vendor field, add a vendor to order products from. Then, click Add a product, under the Products tab, to add products to the RfQ.
Once ready, click Confirm Order to confirm the order. Then, click Receive Products once the products have been received, followed by Validate.
Create vendor bill
Once the vendor fulfills the PO and sends a bill, a vendor bill can be created from the PO in Odoo.
Navigate to the , and click into the PO for which a vendor bill should be created. Then, click Create Bill. This opens a new Vendor Bill in the Draft stage.
In the Bill Date field, click the line to open a calendar popover menu, and select the date on which this draft bill should be billed.
Then, under the Invoice Lines tab, click Add a line, and click the drop-down menu in the Product column to select the previously created landed cost product. Click the Save manually (cloud with arrow) icon to update the draft bill.
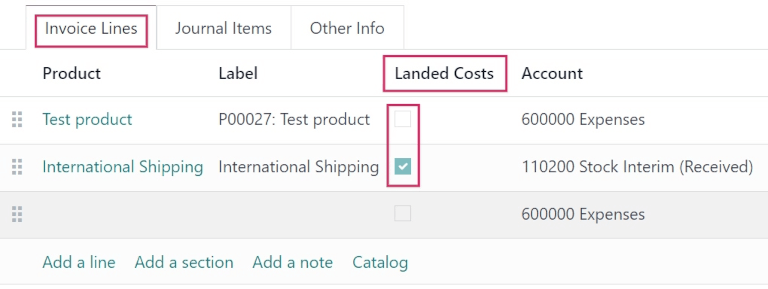
In the Landed Costs column, the product ordered from the vendor does not have its checkbox ticked, while the landed cost product’s checkbox is ticked. This differentiates landed costs from all other costs displayed on the bill.
Additionally, at the top of the form, a Create Landed Costs button appears.

Add landed cost
Once a landed cost is added to the vendor bill, click Create Landed Costs at the top of the vendor bill.
Doing so automatically creates a landed cost record, with a set landed cost pre-filled in the product line in the Additional Costs tab.
From the Landed Cost form, click the Transfers drop-down menu, and select which transfer the landed cost belongs to.
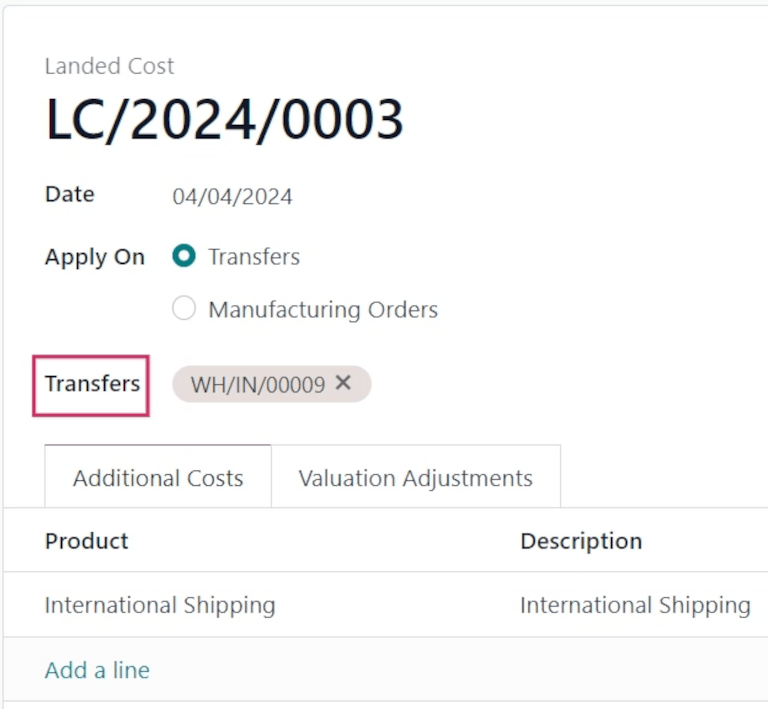
Truco
In addition to creating landed costs directly from a vendor bill, landed cost records can also be created by navigating to , and clicking New.
After setting the picking from the Transfers drop-down menu, click Compute (at the bottom of the form, under the Total: cost).
Click the Valuation Adjustments tab to see the impact of the landed costs. The Original Value column lists the original price of the PO, the Additional Landed Cost column displays the landed cost, and the New Value displays the sum of the two, for the total cost of the PO.
Once ready, click Validate to post the landed cost entry to the accounting journal.
This causes a Valuation smart button to appear at the top of the form. Click the Valuation smart button to open a Stock Valuation page, with the product’s updated valuation listed.
Nota
For a Valuation smart button to appear upon validation, the product’s Product Type must be set to Storable.
To view the valuation of every product, including landed costs, navigate to .
Nota
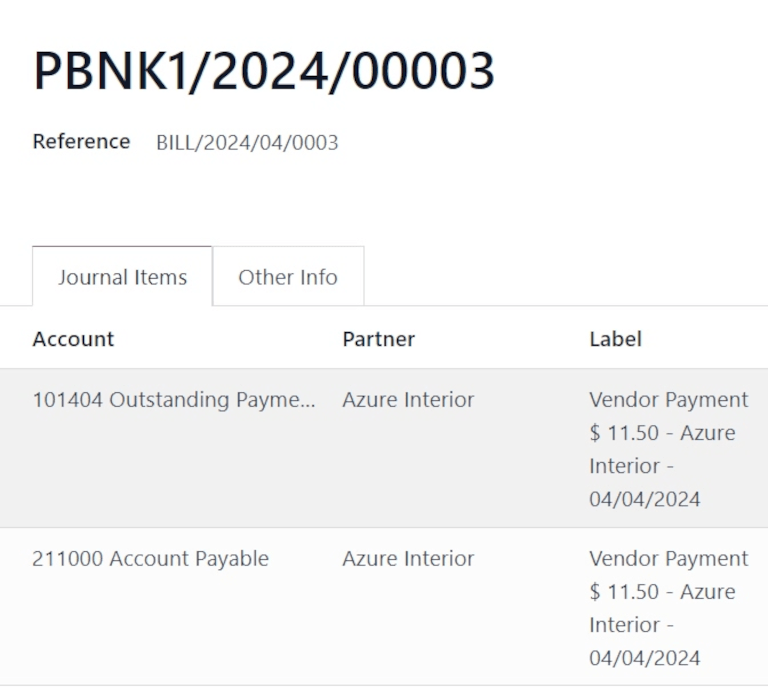
Each journal entry created for a landed cost on a vendor bill can be viewed in the Accounting app.
To locate these journal entries, navigate to , and locate the correct entry, by number (i.e. PBNK1/2024/XXXXX).
Click into the journal entry to view the Journal Items, and other information about the entry.