New vehicles
Odoo’s Fleet app manages all vehicles, and the accompanying documentation that comes with vehicle maintenance, and drivers records.
Upon opening the application, all vehicles are organized within the Vehicles dashboard, which is the default dashboard for the Fleet application. Each vehicle is displayed in its corresponding Kanban stage, based on its status. The default stages are New Request, To Order, Registered, and Downgraded.
To add a new vehicle to the fleet from the Vehicles page, click the New button in the top-left corner, and a blank vehicle form loads. Then, proceed to enter the vehicle information on the vehicle form.
The form auto-saves as data is entered. However, the form can be saved manually at any time by clicking the save manually option, represented by a (cloud upload) icon, located in the top-left corner of the page.
Campos del formulario de vehículo
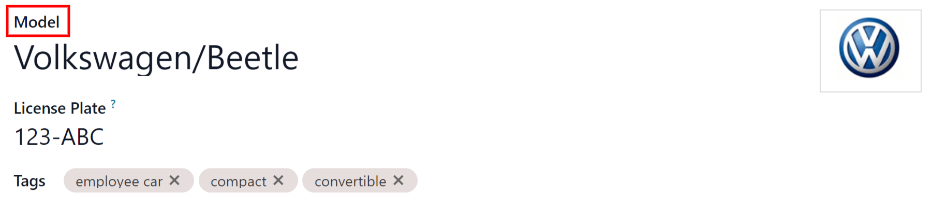
Model: select the vehicle’s model from the drop-down menu. Once a model is selected, additional fields may appear on the form.
If the model is not listed, type in the model name, and click either Create «model», or Create and edit… to create a new model and edit the model details.
Matrícula: ingrese el número de matrícula del vehículo en este campo.
Etiquetas: seleccione las etiquetas en el menú desplegable o escriba una nueva. Puede seleccionar la cantidad de etiquetas que desee.
Nota
The Model is the only required field on the new vehicle form. When a model is selected, other fields appear on the vehicle form, and relevant information auto-populates the fields that apply to the model. If some of the fields do not appear, this may indicate there is no model selected.
Sección sobre el conductor
Esta sección del formulario del vehículo está relacionada con la persona que en este momento conduce el automóvil, así como cualquier cambio futuro de conductor y cuándo ocurrirá.
Driver: select the driver from the drop-down menu, or type in a new driver and click either Create «driver» or Create and edit… to create a new driver, and edit the driver details.
Importante
A driver does not have to be an employee. When creating a new driver, the driver is added to the Fleet application, not the Employees application.
If the Contacts application is installed, the driver information is also stored in the Contacts application.
Mobility Card: if the selected driver has a mobility card listed on their employee card in the Employees application, the mobility card number appears in this field. If there is no mobility card listed, and one should be added, edit the employee record in the Employees application.
Future Driver: if the next driver for the vehicle is known, select the next driver from the drop-down menu. Or, type in the next driver and click either Create «future driver» or Create and edit… to create a new future driver, and edit the driver details.
Plan To Change Car: if the current driver set for this vehicle plans to change their vehicle - either because they are waiting on a new vehicle that is being ordered, or this is a temporary vehicle assignment, and they know which vehicle they are driving next - check this box. Do not check this box if the current driver does not plan to change their vehicle.
Assignment Date: using the drop-down calendar, select when the vehicle is available for another driver. Select the date by navigating to the correct month and year using the ⬅️ (left arrow) and ➡️ (right arrow) icons. Then, click on the specific day. If this field is left blank, that indicates the vehicle is currently available, and can be reassigned to another driver. If it is populated, the vehicle is not available for another driver until the selected date.
Company: select the company from the drop-down menu. This field only appears in a multi-company database.
Create a new driver
If a driver is not already in the system, the new driver should first be configured and added to the database. A new driver can be added either from the Driver or Future Driver fields on the vehicle form.
First, type in the name of the new driver in either the Driver or Future Driver field, then click Create and edit…. A Create Driver or Create Future Driver form appears, depending on which field initiated the form.
Both the Create Driver and Create Future Driver forms are identical.
Nota
Depending on the installed applications, different tabs or fields may be visible on the Create Driver and Create Future Driver forms.
Información general
Fill out the following information on the top-half of the form:
Individual or Company: choose if the driver being added is an individual driver or a company. Click the radio button to make a selection.
When a selection is made, some fields may disappear from the form. If any of the fields below are not visible, that is because Company was selected instead of Individual.
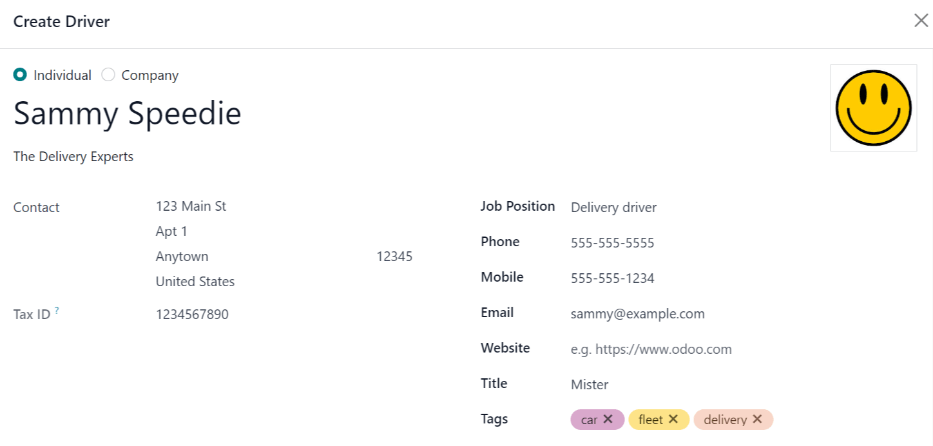
Name: enter the name of the driver or company in this field.
Company Name…: using the drop-down menu, select the company the driver is associated with.
If the Company radio button is selected at the top of the form, this field does not appear.
Contact: enter the contact information in this section.
If desired, the Contact field can be changed to a different type of contact. Click on Contact to reveal a drop-down menu. The available options to select are Contact, Invoice Address, Delivery Address, Follow-up Address, or Other Address.
If desired, select one of these other options for the Contact field, and enter the corresponding information.
If the Company radio button is selected at the top of the form, this field is labeled Address and cannot be modified.
Tax ID: enter the driver or company’s tax ID in this field.
Job Position: enter the driver’s job position in this field. If the Company radio button is selected at the top of the form, this field does not appear.
Phone: enter the driver or company’s phone number in this field.
Mobile: enter the driver or company’s mobile number in this field.
Email: enter the driver or company’s email address in this field.
Website: enter the driver or company’s website address in this field.
Title: using the drop-down menu, select the driver’s title in this field. The default options are Doctor, Madam, Miss, Mister, and Professor.
If the Company radio button is selected at the top of the form, this field does not appear.
Tags: using the drop-down menu, select any tags that apply to the driver or company.
To add a new tag, type in the tag, then click Create «tag».
There is no limit to the number of tags that can be selected.
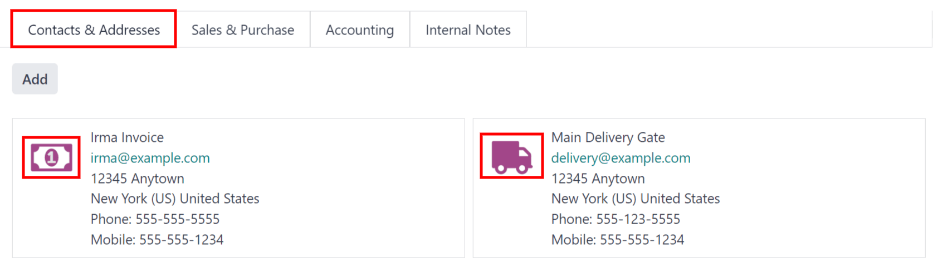
Contacts & Addresses tab
After completing the top-half of the Create Driver or Create Future Driver form, add any other contacts and addresses associated with the driver or company in this tab.
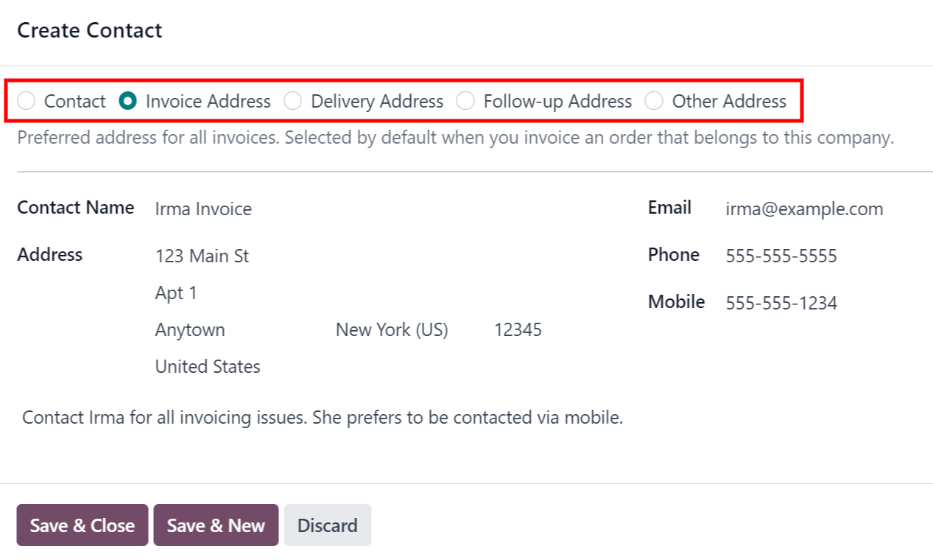
To add a new contact, click the Add button, and a Create Contact pop-up window appears.
Before entering the necessary information on the form, select the type of contact being added from a series radio button options located at the top of the form. Those options are:
Contact: select this option to add general contact details for employees of the associated company.
Invoice Address: select this option to add a preferred address for all invoices. When added to the form, this address is selected by default when sending an invoice to the associated company.
Delivery Address: select this option to add a preferred address for all deliveries. When added to the form, this address is selected by default when delivering an order to the associated company.
Follow-up Address: select this option to add a preferred address for all follow-up correspondence. When added to the form, this address is selected by default when sending reminders about overdue invoices.
Other Address: select this option to add any other necessary addresses for the company or driver.
Depending on the Contact Type, some optional fields may not be visible. The available fields are identical to the fields in the general information section of the new driver form.
Add any notes to the Internal notes… section of the form.
After entering all of the information, click either Save & Close to add the one new contact, or Save & New to add the current address record and create another address record.
As contacts are added to this tab, each contact appears in a separate box, with an icon indicating what type of contact is listed.
Example
An Invoice Address displays a 💲 (dollar sign) icon inside that specific address box, whereas a Delivery Address displays a 🚚 (truck) icon inside.
Sales & Purchase tab
Enter the following sales and purchasing information, in the Sales & Purchase tab of the Create Driver or Create Future Driver pop-up form for the various sections below.
Depending on the other installed applications, additional fields and sections may appear. The following are all default fields for the Fleet application only.
Sales section
Salesperson: using the drop-down menu, select the user who is the main point of contact for sales with this driver’s company.
This person must be an internal user of the company, meaning they can log into the database as a user.
Misc
Company ID: if the company has an ID number, other than its tax ID, enter it in this field.
Reference: enter any text to give more information regarding the contact person. This is an internal note to provide any additional information.
Example
A company has several people with the same name, John Smith. The Reference field could state
John Smith at X205 - purchaserto provide additional details.
Internal Notes tab
Add any notes that pertain to the driver, or any other necessary information, in this tab.
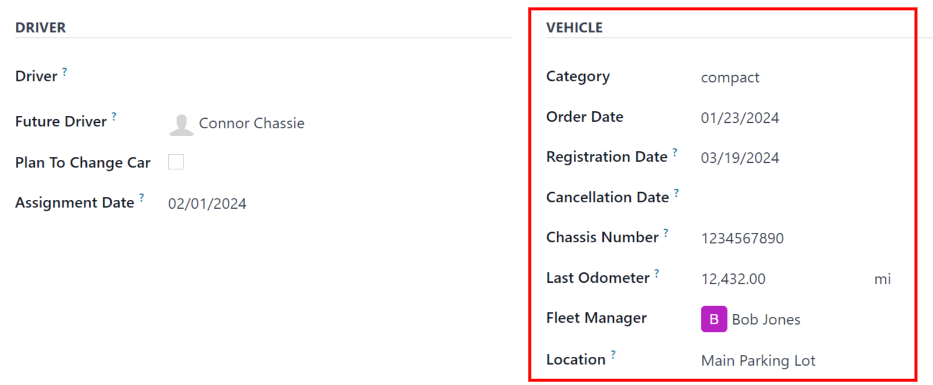
Sección sobre el vehículo
This section of the vehicle form relates to the physical details of the vehicle.
If a preexisting vehicle in the database was selected for the Model field in the top portion of the form, some fields may auto-populate, and additional fields may also appear.
Fill in the following fields on the form:
Category: using the drop-down menu, select the vehicle category from the available options. To create a new category, type in the new category name, then click Create «category».
Order Date: using the drop-down calendar, select the date the vehicle was ordered.
Registration Date: using the drop-down calendar, select the date the vehicle was registered.
Cancellation Date: using the drop-down calendar, select the date the vehicle lease expires, or when the vehicle is no longer available.
Número de chasis: escriba el número de chasis en este campo. En algunos países, a esto se le conoce como el VIN o NIV.
Último odómetro: proporcione la última lectura conocida del odómetro en el campo numérico. Con el menú desplegable ubicado junto al campo numérico seleccione si la lectura del odómetro está en kilómetros (km) o en millas (mi).
Fleet Manager: select the fleet manager from the drop-down menu, or type in a new fleet manager, and click either Create or Create and Edit.
Location: type in the specific location where the vehicle is typically located in this field. The entry should clearly explain where the vehicle can be found, such as
Main GarageorBuilding 2 Parking Lot.
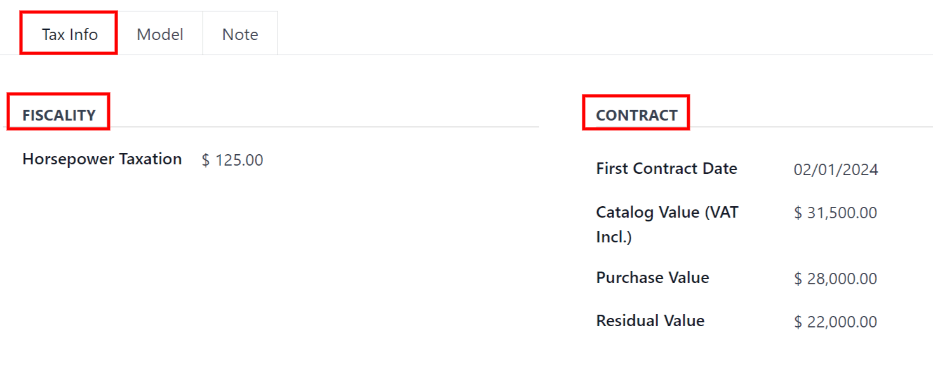
Pestaña de información fiscal
Depending on the localization setting for the database, and what additional applications are installed, other fields may be present on the form.
The sections below are default and appear for all vehicles, regardless of other installed applications or localization settings.
Fiscalidad
Impuestos sobre caballos de fuerza: proporcione el importe gravado en función del tamaño del motor del vehículo. Esto se determina a través de los impuestos y regulaciones locales, además varía según la ubicación. Le recomendamos que consulte a su departamento de contabilidad para asegurarse de que el valor es correcto.
Contrato
Fecha del primer contrato: con el calendario desplegable seleccione la fecha de inicio del primer contrato del vehículo. Por lo general es el día en que lo compró o alquiló.
Valor del catálogo (IVA incluido): proporcione el precio de venta sugerido del vehículo por el fabricante en el momento de la compra o el alquiler.
Valor de compra: proporcione el precio de compra o el valor del alquiler del vehículo.
Valor residual: escriba el valor actual del vehículo.
Nota
The values listed above affect the accounting department. It is recommended to check with the accounting department for more information and/or assistance with these values.
Pestaña de modelo
If the model for the new vehicle is already configured in the database, the Model tab will be populated with the corresponding information. If the model is not already in the database and the Model tab needs to be configured, configure the new vehicle model.
Check the information in the Model tab to ensure it is accurate. For example, the color of the vehicle, or if a trailer hitch is installed, are examples of common information that may need updating.

Pestaña de nota
Escriba cualquier nota relacionada con el vehículo en esta sección.