
الحقول والعناصر
Fields structure the models of a database. If you think of a model as a table or spreadsheet, fields are the columns and records are the individual rows. Fields also define the type of data that is stored within them. The way in which a field's data is presented and formatted on the UI is controlled by its widget.
With Studio, it is possible to:
add new fields to your database. From a technical point of view, there are 15 field types in Odoo. However, you can choose from 21 field types in Studio, as some field types are available more than once with a different default widget;
add existing fields, i.e., fields that already exists on a model, to any view of that model;
Studio fields vs. property fields
Fields created using Studio are saved as columns in your Odoo database. Property fields, on the other hand, act as pseudo-fields; they are shared by all records that are linked to the same parent record (e.g., for tasks, the project, or for a product, the product category), but they are not saved as columns in your database.
Example
Adding a Deadline field to the form view of a task using Studio makes that field visible in every task in your database. Adding a Special instructions property field to a task makes the field visible in all tasks within the same project (i.e., its parent) while other projects’ tasks remain unaffected.
Field types
Fields can be broadly divided into two categories:
Simple fields, which contain basic values, such as text, numbers, files, etc.
Relational fields, which are used to link and display the data from records on another model.
AI fields
AI fields are essentially standard Odoo fields with added AI capabilities that allow their values to be generated automatically through prompts.
الحقول البسيطة
ملاحظة
Non-default widgets, when available, are presented as bullet points or sub-headings.
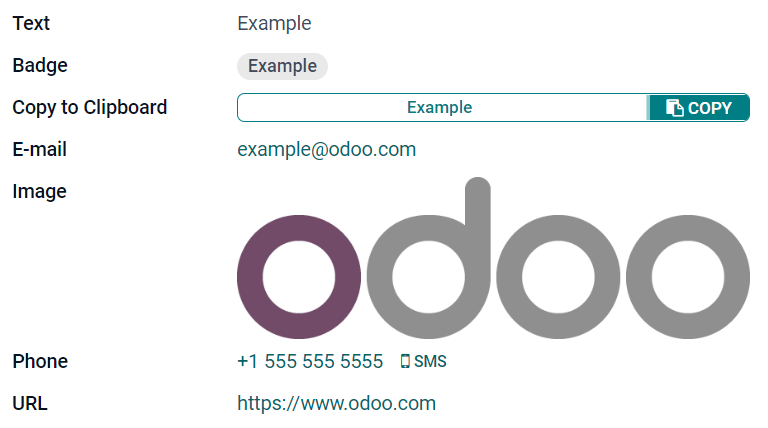
النص (char)
يُستخدم حقل النص للنصوص القصيرة التي تحتوي على أي حرف. يتم عرض سطر نص واحد عند ملء الحقل.
شارة: يعرض القيمة داخل شكل دائري، مشابه للوسم. لا يمكن تعديل القيمة في واجهة المستخدم، لكن يمكن تعيين قيمة افتراضية.
نسخ إلى الحافظة: يمكن للمستخدمين نسخ القيمة بالنقر على زر.
البريد الإلكتروني: تصبح القيمة رابط mailto قابلاً للنقر.
صورة: يعرض صورة باستخدام عنوان URL. لا يمكن تعديل القيمة يدوياً، لكن يمكن تعيين قيمة افتراضية.
ملاحظة
This works differently from selecting the Image field directly, as the image is not stored in Odoo when using a Text field with the Image widget. For example, it can be useful if you want to save disk space.
رقم الهاتف: تصبح القيمة رابط tel قابلاً للنقر.
نصيحة
ضع علامة على تمكين الرسائل القصيرة لإضافة خيار لإرسال رسالة قصيرة مباشرةً من Odoo بجانب الحقل.
عنوان URL: تصبح القيمة عنوان URL قابلاً للنقر.
Example
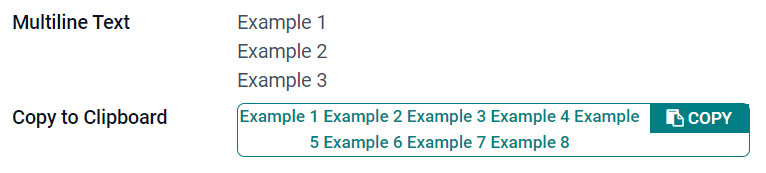
نص متعدد الأسطر (text)
يُستخدم حقل نص متعدد الأسطر للنصوص الأطول التي تحتوي على أي نوع من الأحرف. يتم عرض سطرين نصيين في واجهة المستخدم عند ملء الحقل.
نسخ إلى الحافظة: يمكن للمستخدمين نسخ القيمة بالنقر على زر.
Example
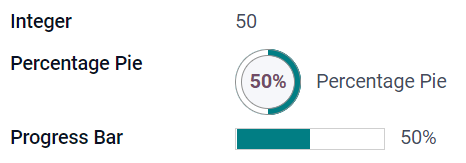
عدد صحيح (integer)
يُستخدم حقل عدد صحيح لجميع الأعداد الصحيحة (موجبة أو سالبة أو صفر، بدون فاصلة عشرية).
مخطط دائري نسبي: يعرض القيمة داخل دائرة نسبة مئوية، عادةً لقيمة محسوبة. لا يمكن تعديل القيمة في واجهة المستخدم، لكن يمكن تعيين قيمة افتراضية.
شريط التقدم: يعرض القيمة بجانب شريط نسبة مئوية، عادةً لقيمة محسوبة. لا يمكن تعديل الحقل يدوياً، لكن يمكن تعيين قيمة افتراضية.
مقبض: يعرض رمز مقبض السحب لترتيب السجلات يدوياً في عرض القائمة.
Example
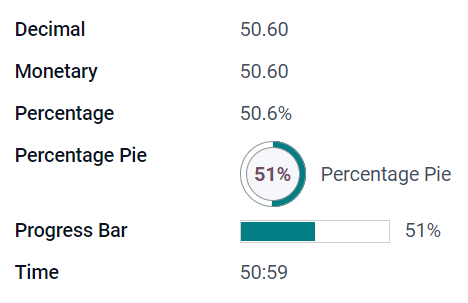
عدد عشري (float)
يُستخدم حقل عدد عشري لجميع الأعداد العشرية (موجبة أو سالبة أو صفر، مع فاصلة عشرية).
ملاحظة
يتم عرض الأعداد العشرية بمنزلتين عشريتين بعد الفاصلة العشرية في واجهة المستخدم، لكن يتم تخزينها في قاعدة البيانات بدقة أكبر.
نقدي: يشبه استخدام حقل نقدي. يُنصح باستخدام الأخير لأنه يوفر وظائف أكثر.
نسبة مئوية: يعرض رمز النسبة المئوية
%بعد القيمة.دائرة نسبة مئوية: يعرض القيمة داخل دائرة نسبة مئوية، عادةً لقيمة محسوبة. لا يمكن تعديل الحقل يدويًا، لكن يمكن تعيين قيمة افتراضية.
شريط التقدم: يعرض القيمة بجانب شريط نسبة مئوية، عادةً لقيمة محسوبة. لا يمكن تعديل الحقل يدوياً، لكن يمكن تعيين قيمة افتراضية.
وقت: يجب أن تتبع القيمة تنسيق hh:mm، بحد أقصى 59 دقيقة.
Example
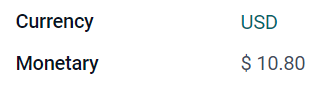
نقدي (monetary)
يُستخدم حقل نقدي لجميع القيم النقدية.
ملاحظة
عند إضافة حقل نقدي لأول مرة، ستُطالب بإضافة حقل عملة إذا لم يكن موجودًا بالفعل في النموذج. يعرض Odoo إضافة حقل عملة لك. بمجرد إضافته، أضف حقل نقدي مرة أخرى.
Example
Html (html)
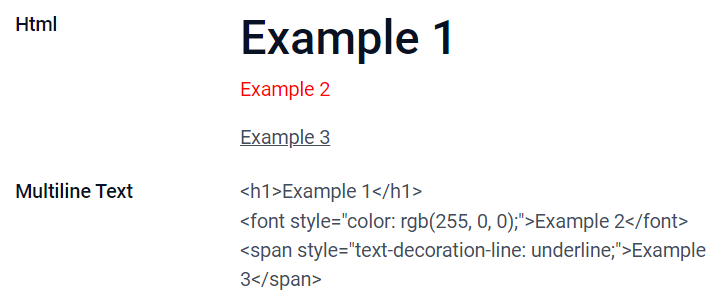
يُستخدم حقل Html لإضافة نص يمكن تعديله باستخدام محرر HTML في Odoo.
نص متعدد الأسطر: يعطل محرر HTML في Odoo للسماح بتعديل HTML الأولي.
Example
تاريخ (date)
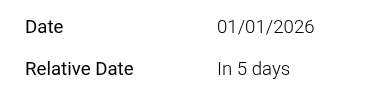
يُستخدم حقل تاريخ لاختيار تاريخ في التقويم.
Relative Date: expresses the field value in relation to the current date using relative terms such as Yesterday, Today, In 3 days, 2 months ago, etc. This field should be set to Read only.
Example
تاريخ ووقت (datetime)
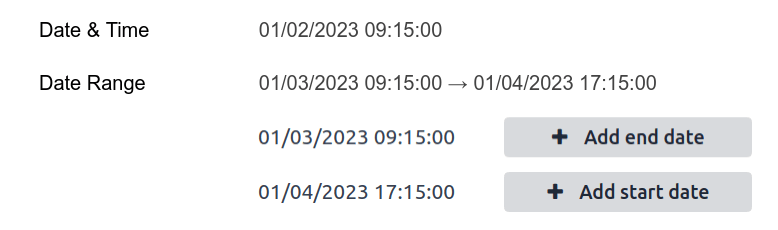
يُستخدم حقل تاريخ ووقت لاختيار تاريخ في التقويم ووقت في الساعة. يُستخدم الوقت الحالي للمستخدم تلقائيًا إذا لم يتم تعيين وقت.
نصيحة
بالإضافة إلى الخصائص العامة، تتوفر بعض الخصائص المحددة لحقول تاريخ ووقت التي تحتوي على واجهة تاريخ ووقت أو نطاق تاريخ.
النطاق الزمني (daterange)
تُستخدم أداة النطاق الزمني لعرض فترة زمنية محددة بتاريخ بداية وتاريخ نهاية في سطر واحد. يمكن أن يكون للنطاق الزمني تاريخ بداية ونهاية إلزاميان، مثلاً لحدث متعدد الأيام، أو يسمح بتاريخ بداية أو نهاية اختياري، مثلاً لتدخل الخدمة الميدانية أو مهمة مشروع.
تتطلب إضافة نطاق زمني حقلين: حقل التاريخ والوقت مع تعيين أداة النطاق الزمني وحقل آخر يتم اختياره كتاريخ بداية أو تاريخ نهاية. يمكن أن يكون هذا الحقل الأساسي حقل تاريخ أو التاريخ والوقت موجوداً، أو حقلاً يتم إنشاؤه خصيصاً لهذا الغرض.
لإضافة نطاق زمني:
حدد حقل تاريخ أو التاريخ والوقت موجوداً يمكن استخدامه كحقل تاريخ البداية/النهاية الأساسي، أو أضف حقلاً جديداً. إذا كان النطاق الزمني:
يحتوي على تاريخ بداية ونهاية إلزاميين، فيمكن أن يكون هذا الحقل إما تاريخ البداية أو تاريخ النهاية؛ النتيجة هي نفسها.
يسمح بتاريخ بداية أو نهاية اختياري، فإن هذا الحقل هو تاريخ البداية أو تاريخ النهاية، على التوالي.
نصيحة
لتجنب عرض نفس المعلومات مرتين، يمكن جعل حقل تاريخ البداية/النهاية الأساسي غير مرئي بتفعيل غير مرئي أو إزالته من العرض بالنقر على إزالة من العرض.
أضف حقل التاريخ والوقت وعيّن حقل الأداة إلى النطاق الزمني.
أدخل تسمية مناسبة.
اختر حقل تاريخ البداية/النهاية الأساسي من القائمة المنسدلة حقل تاريخ البداية أو حقل تاريخ النهاية، حسب الصلة.
إذا كان يجب أن يحتوي النطاق الزمني على تاريخ بداية ونهاية إلزاميين، فعّل نطاق دائماً.
حدّث أي خصائص عامة أخرى أو خصائص محددة لحقول التاريخ والوقت حسب الحاجة، ثم انقر على إغلاق في الزاوية العلوية اليمنى من الشاشة.
Example
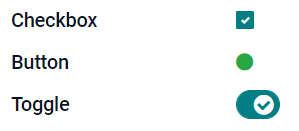
خانة اختيار (boolean)
يُستخدم حقل خانة الاختيار عندما يجب أن تكون القيمة صحيحة أو خاطئة فقط، ويتم الإشارة إلى ذلك بتحديد أو إلغاء تحديد خانة الاختيار.
زر: يعرض زر اختيار دائري. تعمل الأداة دون التبديل إلى وضع التحرير.
تبديل: يعرض زر تبديل. تعمل الأداة دون التبديل إلى وضع التحرير.
Example
اختيار (selection)
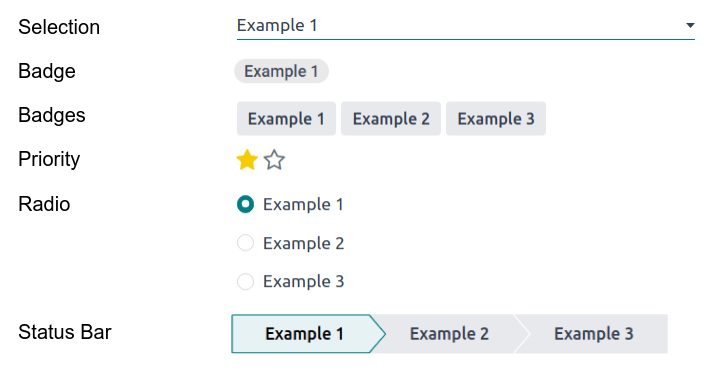
يُستخدم حقل الاختيار عندما يجب على المستخدمين تحديد قيمة واحدة من مجموعة قيم محددة مسبقًا.
شارة: يعرض القيمة داخل شكل دائري، مشابه للوسم. لا يمكن تعديل القيمة في واجهة المستخدم، لكن يمكن تعيين قيمة افتراضية.
شارات: يعرض جميع القيم القابلة للتحديد في وقت واحد داخل أشكال مستطيلة، منظمة أفقيًا.
الأولوية: يعرض رموز نجمية بدلاً من القيم، والتي يمكن استخدامها للإشارة إلى مستوى الأهمية أو الرضا، على سبيل المثال. له نفس تأثير تحديد حقل الأولوية، على الرغم من أن الأخير يحتوي على أربع قيم أولوية محددة مسبقًا.
زر اختيار: يعرض جميع القيم القابلة للتحديد في نفس الوقت كأزرار اختيار.
نصيحة
بشكل افتراضي، يتم تنظيم أزرار الاختيار عموديًا. فعّل عرض أفقي لتبديل طريقة عرضها.
شريط الحالة: يعرض جميع القيم القابلة للتحديد في نفس الوقت كشريط تقدم سهمي.
نصيحة
بشكل افتراضي، تكون القيم في شريط الحالة قابلة للتحديد. عطّل قابل للنقر لمنع تعديل القيمة في واجهة المستخدم.
Example
الأولوية (selection)
يُستخدم حقل الأولوية لعرض نظام تقييم بثلاث نجوم، والذي يمكن استخدامه للإشارة إلى مستوى الأهمية أو الرضا. هذا النوع من الحقول هو حقل اختيار مع تحديد واجهة الأولوية بشكل افتراضي وأربع قيم أولوية محددة مسبقًا. وبالتالي، فإن واجهات شارة، و:guilabel:شارات، و:guilabel:زر اختيار، و:guilabel:الاختيار لها نفس التأثيرات الموضحة في الاختيار.
نصيحة
لتغيير عدد النجوم المتاحة عن طريق إضافة أو إزالة القيم، انقر فوق تحرير القيم. لاحظ أن القيمة الأولى تساوي 0 نجوم (أي عند عدم إجراء تحديد)، لذا فإن وجود أربع قيم ينتج عنه نظام تقييم بثلاث نجوم، على سبيل المثال.
Example

ملف (binary)
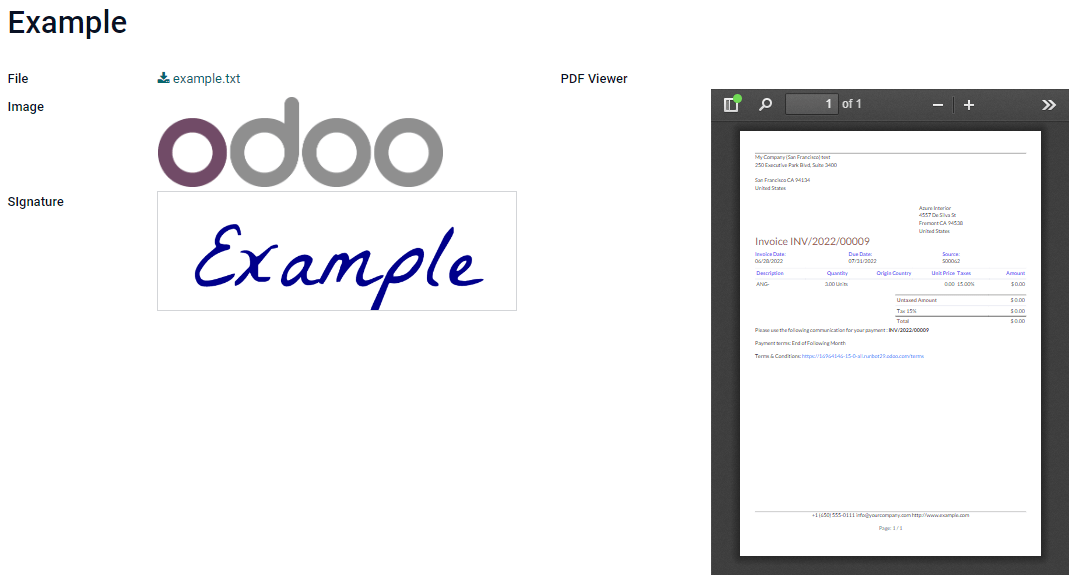
يُستخدم حقل الملف لتحميل أي نوع من الملفات، أو لتوقيع نموذج (واجهة توقيع).
صورة: يمكن للمستخدمين تحميل ملف صورة، والذي يتم عرضه بعد ذلك في طريقة عرض النموذج. له نفس تأثير استخدام حقل الصورة.
عارض PDF: يمكن للمستخدمين تحميل ملف PDF، والذي يمكن تصفحه بعد ذلك من طريقة عرض النموذج.
توقيع: يمكن للمستخدمين التوقيع إلكترونيًا على النموذج. له نفس تأثير تحديد حقل توقيع.
Example
صورة (binary)
يُستخدم حقل صورة لرفع صورة وعرضها في عرض النموذج. نوع الحقل هذا هو حقل ملف مع تحديد عنصر واجهة صورة بشكل افتراضي. وبالتالي، فإن عناصر واجهة ملف و:guilabel:عارض PDF و:guilabel:توقيع لها نفس التأثيرات الموضحة ضمن ملف.
نصيحة
لتغيير حجم عرض الصور المرفوعة، حدد صغير أو متوسط أو كبير ضمن خيار الحجم.
توقيع (binary)
يُستخدم حقل توقيع للتوقيع على النموذج إلكترونياً. نوع الحقل هذا هو حقل ملف مع تحديد عنصر واجهة توقيع بشكل افتراضي. وبالتالي، فإن عناصر واجهة ملف و:guilabel:صورة و:guilabel:عارض PDF لها نفس التأثيرات الموضحة ضمن ملف.
نصيحة
لمنح المستخدمين خيار تلقائي عند الحاجة إلى رسم توقيعهم، حدد أحد حقول الإكمال التلقائي بـ المتاحة (نص و:ref:Many2One <studio/fields/relational-fields-many2one> و:ref:حقل مرتبط <studio/fields/relational-fields-related-field> في النموذج فقط). يتم إنشاء التوقيع تلقائياً باستخدام البيانات من الحقل المحدد.
حقول علائقية
ملاحظة
Non-default widgets, when available, are presented as bullet points or sub-headings.
Many2One (many2one)
يُستخدم حقل Many2One لربط سجل آخر (من نموذج آخر) بالسجل الذي يتم تحريره. يتم بعد ذلك عرض اسم السجل من النموذج الآخر على السجل الذي يتم تحريره.
Example
في نموذج أمر البيع، حقل العميل هو حقل Many2One يشير إلى نموذج جهة الاتصال. يتيح هذا ربط العديد من أوامر البيع بجهة اتصال واحدة (العميل).

نصيحة
لمنع المستخدمين من إنشاء سجل جديد في النموذج المرتبط، ضع علامة في تعطيل الإنشاء.
لمنع المستخدمين من فتح السجلات في نافذة منبثقة، ضع علامة في تعطيل الفتح.
لمساعدة المستخدمين على تحديد السجل الصحيح فقط، انقر على النطاق لإنشاء مرشح.
لتشغيل البحث عن سجل مرتبط فقط بعد إدخال الحد الأدنى من الأحرف، أدخل الرقم المطلوب في حقل البحث بالكتابة المسبقة. في الحالات التي تكون فيها مجموعة البيانات كبيرة، يمكن أن يحسن ذلك من صلة البحث والأداء.
شارة: يعرض القيمة داخل شكل مستدير، مشابه للعلامة. لا يمكن تحرير القيمة في واجهة المستخدم.
زر اختيار: يعرض جميع القيم القابلة للتحديد في نفس الوقت كأزرار اختيار.
One2Many (one2many)
يُستخدم حقل One2Many لعرض العلاقات الموجودة بين سجل في النموذج الحالي وسجلات متعددة من نموذج آخر.
Example
يمكنك إضافة حقل One2Many في نموذج جهة الاتصال للاطلاع على أوامر البيع العديدة لعميل واحد.

ملاحظة
لاستخدام حقل One2Many، يجب أن يكون النموذجان قد تم ربطهما بالفعل باستخدام حقل Many2One. علاقات One2Many غير موجودة بشكل مستقل: يتم إجراء بحث عكسي عن علاقات Many2One الموجودة.
الخطوط (one2many)
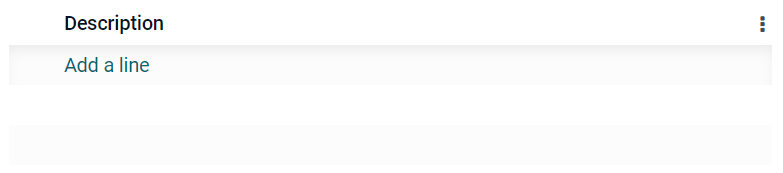
يُستخدم حقل الخطوط لإنشاء جدول يحتوي على صفوف وأعمدة (مثل خطوط المنتجات في أمر البيع).
نصيحة
لتعديل الأعمدة، انقر على حقل الخطوط ثم تحرير عرض القائمة. لتحرير النموذج الذي يظهر عندما ينقر المستخدم على إضافة خط، انقر على تحرير عرض النموذج بدلاً من ذلك.
Example
متعدد لمتعدد (many2many)
يُستخدم حقل متعدد لمتعدد لربط سجلات متعددة من نموذج آخر بسجلات متعددة في النموذج الحالي. يمكن لحقول متعدد لمتعدد استخدام تعطيل الإنشاء، و:guilabel:تعطيل الفتح، و:guilabel:النطاق، تماماً مثل حقول متعدد لواحد.
Example
في نموذج المهمة، حقل المعينون هو حقل متعدد لمتعدد يشير إلى نموذج جهة الاتصال. يتيح ذلك تعيين مستخدم واحد إلى عدة مهام وتعيين عدة مستخدمين إلى مهمة واحدة.

نصيحة
لتشغيل البحث عن السجل المرتبط فقط بعد إدخال الحد الأدنى من الأحرف، أدخل الرقم المطلوب في حقل البحث بالكتابة المسبقة. في الحالات التي تكون فيها مجموعة البيانات كبيرة، يمكن أن يحسن ذلك من صلة البحث والأداء.
خانات الاختيار: يمكن للمستخدمين تحديد عدة قيم باستخدام خانات الاختيار.
الوسوم: يمكن للمستخدمين تحديد عدة قيم تظهر في أشكال مستديرة، والمعروفة أيضاً باسم الوسوم. هذا له نفس تأثير تحديد حقل الوسوم.
الوسوم (many2many)
يُستخدم حقل الوسوم لعرض عدة قيم من نموذج آخر تظهر في أشكال مستديرة، والمعروفة أيضاً باسم الوسوم. نوع الحقل هذا هو حقل متعدد لمتعدد مع تحديد أداة الوسوم افتراضياً. وبالتالي، فإن أدوات خانات الاختيار و:guilabel:متعدد لمتعدد لها نفس التأثيرات الموضحة في متعدد لمتعدد.
نصيحة
لعرض وسوم بألوان خلفية مختلفة، حدد استخدام الألوان.
Example

Add a field to a view
With Studio, it is possible to add:
a new field to a form or list view of a model
an existing field, i.e., a field that already exists on the model in question, to any view of that model
نصيحة
Add a new field to a form or list view to save it to the model and make it available as an existing field in other views of the same model.
Add a new field
نصيحة
Activate developer mode before adding a new field to see, and be able to edit, the field's technical name during configuration.
To add a new field, follow these steps:
Navigate to the relevant form or list view, then click the (Toggle Studio) icon in the upper-right corner. Alternatively, with any app open, click the (Toggle Studio) icon, then navigate to the relevant form or list view.
In the Add tab, drag the relevant field type from the New Fields section and drop it in the desired position. If the new field is a relational field, select the relevant reciprocal field, model, or related field in the pop-up.
In the Properties tab, configure the field's properties:
Enter the Label to be displayed as the field name on the UI; this is also used to generate the default technical name of the field.
Click anywhere outside the Label field to see the Technical Name updated with the default technical name.
ملاحظة
The Technical Name of a new field can be edited in Studio during the configuration process. At any other time, a field's technical name can only be modified via the technical settings of the database.
The technical name of a new field added using Studio is by default prefixed by
x_studio_.
Optionally, select a different Widget via the dropdown; the default widget for the field type is selected by default.
Optionally, configure any other field properties.
Click Close in the top-right corner to close Studio.
انظر أيضًا
Add an existing field
To add a field that exists on the model but that is not present on the current view, follow these steps:
Navigate to the relevant view, then click the (Toggle Studio) icon in the upper-right corner. Alternatively, with any app open, click the (Toggle Studio) icon, then navigate to the relevant view.
In the Add tab, in the left panel, click Existing Fields to reveal a list of all the model's fields that are not currently present in the view.
Drag the relevant field and drop it in the desired position.
In the Properties tab, configure the relevant properties for the field in the current view.
ملاحظة
Various properties can be configured independently for different views, if needed, such as the Label, the Widget, the visibility of the field for certain user groups, as well as whether or not the field is Invisible, Required, or Readonly.
Click Close in the top-right corner to close Studio.
Field properties
A series of general properties can be configured for most combinations of field type and widget. Additional properties are available depending on the specific field type and widget selected. For example, Date & Time fields using the Date & Time or Date Range widget have various specific properties that can be configured.
الخصائص العامة
Class: Use Bootstrap or other custom classes defined in Odoo to customize how the field is styled and displayed on the UI.
غير مرئي: فعّل هذه الخاصية عندما لا يكون من الضروري أن يشاهد المستخدمون حقلاً في واجهة المستخدم. يساعد هذا في تنظيم واجهة المستخدم من خلال عرض الحقول الأساسية فقط بناءً على حالة معينة.
مطلوب: فعّل هذه الخاصية إذا كان يجب على المستخدم إكمال حقل دائماً قبل أن يتمكن من المتابعة.
للقراءة فقط: فعّل هذه الخاصية إذا كان يجب ألا يتمكن المستخدمون من تعديل الحقل.
نصيحة
The Invisible property also applies inside Studio. To view hidden fields in Studio, click on a view's View tab and enable Show Invisible Elements.
The Invisible, Required, and Readonly properties can be enabled for specific records only by clicking on Conditional and creating a filter.
Example
On the form view of the Contact model, the Title field only appears when Individual is selected, as that field would not be helpful for a Company contact.
Label: This is the field name on the UI; the label is used to generate the technical name of the field.
تلميح المساعدة: لشرح الغرض من الحقل، أضف وصفًا. يظهر النص داخل مربع تلميح عند تمرير الفأرة فوق علامة الاستفهام بجانب تسمية الحقل.
Technical Name: To view a field's technical name in Studio (and, during the configuration of a new field, edit it if desired), activate developer mode.
نصيحة
If this field needs to be updated but is no longer editable via Studio, the technical name can be modified via the technical settings of the database.
الأداة: لتغيير المظهر أو الوظيفة الافتراضية للحقل، اختر إحدى الأدوات المتاحة.
Placeholder: To provide an example of how a field should be completed, add a fixed placeholder text. The text appears in light gray until a value is entered.
Dynamic Placeholder: To provide the value of the selected field as an example of how a field should be completed. The text appears in light gray until a value is entered.
القيمة الافتراضية: لعرض قيمة افتراضية في حقل عند إنشاء سجل، أضف قيمة.
السماح بالرؤية للمجموعات: لتحديد المستخدمين الذين يمكنهم عرض الحقل، اختر مجموعة وصول المستخدم واحدة أو أكثر.
منع الرؤية للمجموعات: لمنع مستخدمين معينين من رؤية الحقل، اختر مجموعة وصول المستخدم واحدة أو أكثر.
خصائص حقول التاريخ والوقت
For Date & Time fields using the Date & Time or Date Range widget, some specific properties are available:
Minimal precision: Determine the smallest date unit that must be selected in the date selector. The possible values are
Day,Month,YearorDecade. If no value is selected, the user must select a day in the date selector.Maximal precision: Determine the largest date unit that can be used to navigate the date selector. The possible values are
Day,Month,YearorDecade. If no value is selected, the user can navigate the date selector by decade.تحذير للتواريخ المستقبلية: فعّل هذه الخاصية لعرض رمز تحذير إذا تم تحديد تاريخ مستقبلي.
تنسيق التاريخ: بشكل افتراضي، سيظهر التاريخ كـ
2 أبريل 2025، 08:05 صباحًا. فعّل هذه الخاصية لإظهار التاريخ بالتنسيق4/2/2025 08:05:00. الوضع الرقمي هو التنسيق المعين للغة الحالية. في هذا الوضع تظهر الثواني دائمًا.إظهار التاريخ: هذه الخاصية مفعّلة بشكل افتراضي لحقول التاريخ والوقت. عطّل هذه الخاصية لإظهار الوقت فقط.
إظهار الوقت: هذه الخاصية مفعّلة بشكل افتراضي لحقول التاريخ والوقت. في حقل للقراءة فقط، عطّل الخاصية لإظهار التاريخ فقط. يمكن أن يساعد هذا في جعل عرض القائمة أقل ازدحامًا، على سبيل المثال.
إظهار الثواني: هذه الخاصية معطّلة بشكل افتراضي لحقول التاريخ والوقت. فعّل الخاصية لإظهار الثواني.
الفاصل الزمني: أدخل قيمة لتحديد فترات الدقائق المعروضة في محدد الوقت. على سبيل المثال، أدخل 15 للسماح بفترات ربع ساعة. القيمة الافتراضية محددة على 5 دقائق.
أقدم تاريخ مقبول: أدخل أقدم تاريخ يمكن تحديده في محدد التاريخ بتنسيق ISO، أي
YYYY-MM-DD. إذا كان التاريخ الحالي دائمًا هو أقدم تاريخ مقبول، أدخلtoday. في محدد التاريخ، تظهر التواريخ السابقة لأقدم تاريخ مقبول باللون الرمادي.أحدث تاريخ مقبول: أدخل أحدث تاريخ يمكن تحديده في محدد التاريخ بتنسيق ISO، أي
YYYY-MM-DD. إذا كان التاريخ الحالي دائمًا هو أحدث تاريخ مقبول، أدخلtoday. في محدد التاريخ، تظهر التواريخ اللاحقة لأحدث تاريخ مقبول باللون الرمادي.
Modify a field's properties
To modify the properties of a field, follow these steps:
Navigate to the relevant view, then click the (Toggle Studio) icon in the upper-right corner. Alternatively, with any app open, click the (Toggle Studio) icon, then navigate to the relevant view.
Click on the relevant field.
In the Properties tab, make any desired changes to the field properties.
نصيحة
Various properties can be configured independently for different views, such as the Label, the Widget, the visibility of the field for certain user groups, as well as whether or not the field is Invisible, Required, or Readonly.
Click Close in the top-right corner to close Studio.
ملاحظة
The Technical Name of a field (visible in Studio with developer mode activated) cannot be modified in Studio; this can be done via the technical settings of the database.
Modify a field's technical name
To modify the technical name of a field, activate developer mode, then follow these steps:
With the field open in Studio, copy the technical name of the field.
Remove the field from all views in Studio, then click Close to close Studio.
Navigate to .
Paste the copied technical name into the search bar, then open the relevant field.
Modify the Field Name as needed.
Once the field's technical name has been updated, the field can then be added (back) to the relevant view(s) from the list of existing fields.
مهم
When updating the technical name of a field, make sure to keep at least the x_ prefix, which is
required for any custom field; for fields created using Studio, keep the x_studio_ prefix to
allow such fields to be more easily identified.
Remove a field from a view
To remove a field from a view, follow these steps:
Navigate to the relevant view, then click the (Toggle Studio) icon in the upper-right corner. Alternatively, with any app open, click the (Toggle Studio) icon, then navigate to the relevant view.
Click on the relevant field.
Scroll to the bottom of the Properties tab, then click Remove from view.
Click Ok to confirm the action.
نصيحة
A removed field can be easily added back to the view at a later stage, if needed.
If the intention is to declutter the view, it is also possible to modify a field and make it Invisible on the view in question.