Terms and conditions
Specifying terms and conditions is essential to establish important contractual points, such as payment terms, limitations of liability, and delivery terms between customers and sellers.
Sellers must declare all formal information concerning products and company policy. Conversely, customers must take note of all these conditions before committing to a purchase.
With Odoo Sales, it’s very easy to include default terms and conditions on every quotation, sales order, and invoice.
Default terms and conditions
Configuration
Go to , scroll to the Customer Invoices heading, and check the box beside the Default Terms & Conditions feature to activate it.

Note
Please note that this feature is activated via the settings of the Accounting app, and not in the settings of the Sales app.
In the Settings of the application, after activating the Default Terms & Conditions feature, a field appears beneath the feature. In this field, specific terms and conditions can be entered.

Click Save to save the terms and conditions.
These terms and conditions appear on every quotation, sales order, and invoice.
Quotation templates
Default terms and conditions can be applied to quotation templates, as well, depending on the specific needs of the business. This is useful when various terms and conditions are used within a company.
Note
When a quotation template is used on a quotation, the quotation uses the terms and conditions specified on that template, over the terms and conditions specified in the settings.
First, navigate to the to view all the quotation templates. From here, either select a template or create a new one, via the Create button.
Once on the desired quotation template form, click Edit, and enter in specific terms and conditions that should be applied to this quotation template, at the bottom of the Lines tab. Once done, click Save to save all changes.

See also
Attachment on confirmation emails
Terms and conditions can also be sent as an attachment on the confirmation email of a quotation template.
To do so, navigate to and create a new quotation template (via the Create button), or modify an existing one.
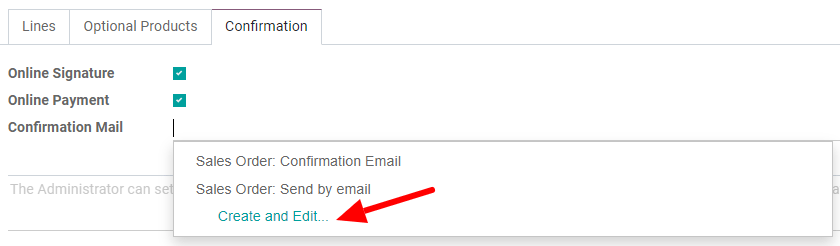
On the desired quotation template form, click Edit. Under the Confirmation tab, there are options to activate an Online Signature, Online Payment, and Confirmation Mail.
Click on the Confirmation Mail field to reveal a drop-down menu from which an email template can be chosen or created. To create a new email template from here, start typing the name of this new template, and then select Create and Edit…, which reveals a Create: Confirmation Mail pop-up form.
On this pop-up form, customize the email message in a number of different ways, but be sure to click Attachments at the bottom of the Content tab to add the desired terms and conditions attachment to the mailing. Once done, click Save to save all changes.
Website page
Use the Odoo Website application to create a terms and conditions page. To do that, first navigate to the front-end of the website, via . From here, click + New in the top right corner of the page, then select Page. Give the terms and conditions page a title in the pop-up form that appears.
Then, decide if this page should be accessible via the main website header menu, using the Add to menu toggle in the pop-up form, and click Continue to create the new page.
Doing so reveals a blank page on the website that can be fully customized and edited with Odoo’s drag-and-drop building blocks. Use those building blocks to add the terms and conditions to the page, and click Save to save all changes.
Don’t forget to publish the page, via the Unpublished / Published toggle at the top of the page. Unpublished pages will not be accessible to website visitors.

This terms and conditions page can be linked in the footer of all documents, if desired. To do that, access the document layout by navigating to the app. In the General Settings, under the Business Documents heading, click Configure Document Layout (located beneath Document Layout).
Doing so reveals a Configure your document layout pop-up form. On this form, in the Footer field, enter the URL for the terms and conditions page on the website.
It’s good practice to also provide a brief title prefacing the URL, so customers know what the link leads to when they see it on the footer of documents.

Email attachments
Odoo provides the ability to attach an external document, such as one containing terms and conditions, when quotations are sent by email to customers.
On a quotation, sales order, or other document, click the Send by Email button to send an email to the customer. Then, on the email form, click Attach a File to attach the terms and conditions document.
