Selecting a replenishment strategy
In Odoo, there are two strategies for automatically replenishing inventory: reordering rules and the make to order (MTO) route. Although these strategies differ slightly, they both have similar consequences: triggering the automatic creation of a PO or MO. The choice of which strategy to use depends on the business’s manufacturing and delivery processes.
Terminology
Replenishment report and reordering rules
The replenishment report is a list of all products that have a negative forecast quantity.
Reordering rules are used to ensure there’s always a minimum amount of a product in-stock, in order to manufacture products and/or fulfill sales orders. When the stock level of a product reaches its minimum, Odoo automatically generates a purchase order with the quantity needed to reach the maximum stock level.
Reordering rules can be created and managed in the replenishment report, or from the product form.
Make to order
Make to order (MTO) is a procurement route that creates a draft purchase order (or manufacturing order) each time a sales order is confirmed, regardless of the current stock level.
Unlike products replenished using reordering rules, Odoo automatically links the sales order to the PO or MO generated by the MTO route.
Another difference between reordering rules and MTO is, with MTO, Odoo generates a draft PO or MO immediately after the SO is confirmed. With reordering rules, Odoo generates a draft PO or MO when the product’s forecasted stock falls below the set minimum quantity.
In addition, Odoo automatically adds quantities to the PO or MO as the forecast changes, so long as the PO or MO is not confirmed.
The MTO route is the best replenishment strategy for products that are customized, and/or for products that have no stock kept on-hand.
Configuration
Replenishment report and reordering rules
To access the replenishment report, go to
By default, the replenishment report dashboard shows every product that needs to be manually
reordered. If there is no specific rule for a product, Odoo assumes the Min Quantity and
Max Quantity stock are both 0.00
Note
For products that don’t have a set reordering rule, Odoo calculates the forecast based on confirmed sales orders, deliveries, and receipts. For products that have a set reordering rule, Odoo calculates the forecast normally, but also takes into account the purchase/manufacturing lead time and security lead time.
Important
Before creating a new reordering rule, make sure the product has a vendor or a bill of materials configured on the product form. To check this, go to , and select the product to open its product form. The vendor, if configured, is listed in the Purchase tab, and the bill on materials, if configured, is found in the Bill of Materials smart button at the top of the form.
The Product Type, located in the General Information tab on the product form, must be set to Storable Product. By definition, a consumable product does not have its inventory levels tracked, so Odoo cannot account for a consumable product in the replenishment report.

To create a new reordering rule from the replenishment report, go to , click Create, and select the desired product from the drop-down menu in the Product column. If necessary, a Min Quantity and a Max Quantity can be configured in the corresponding columns on the Replenishment report page, as well.
To create a new reordering rule from the product form, go to , and select a product to open its product form. Click the Reordering Rules smart button, click Create, and fill out the fields.
Replenishment report fields
The following fields are on the Replenishment report. If any of these fields are not visible, click the ⋮ (additional options) icon on the far right side of the report, then click the checkbox next to a field to make it visible.
Product: the product that requires a replenishment.
Location: the specific location where the product is stored.
Warehouse: the warehouse where the product is stored.
On Hand: the amount of product currently available.
Forecast: the amount of product available after all current orders (sales, manufacturing, purchase, etc.) are taken into account.
Preferred Route: how the product is procured, either Buy, Manufactured, Dropship, etc.
Vendor: the company from which the product is acquired.
Bill of Materials: the bill of materials for the product (if one is configured).
Trigger: how the replenishment is created, either Auto (automatically, once the On Hand quantity goes below the Min Quantity) or Manual (only when the replenishment is requested).
Procurement Group: the reference number for how the product is being acquired, such as a sales order, purchase order, or manufacturing order.
Min Quantity: the minimum amount of product that should be available. When inventory levels goes below this number, the replenishment is triggered.
Max Quantity: the amount of product that should be available after replenishing the product.
Multiple Quantity: if the product should be ordered in specific quantities, enter the number that should be ordered. For example, if the Multiple Quantity is set to
5, and only 3 are needed, 5 products are replenished.To Order: the amount of product that is currently needed, and will be ordered, if the Order Once or Automate Orders button is clicked.
UoM: the unit of measure used to acquire the product.
Company: the company for which the product is acquired.
By default, the quantity in the To Order field is the quantity required to reach the set Max Quantity. However, the To Order quantity can be adjusted by clicking on the field and, changing the value, and clicking Save. To replenish a product manually, click Order Once.
To automate a replenishment from the Replenishment page, click Automate Orders on the right-side of the line, represented by a 🔄 (circular arrow) icon.
When this button is clicked, Odoo will automatically generate a draft PO/MO every time the forecasted stock level falls below the set Min Quantity of the reordering rule.
On the Replenishment page, a reordering rule or manual replenishment can be temporarily deactivated for a given period, by clicking the 🔕 (snooze) icon on the far-right of the line.

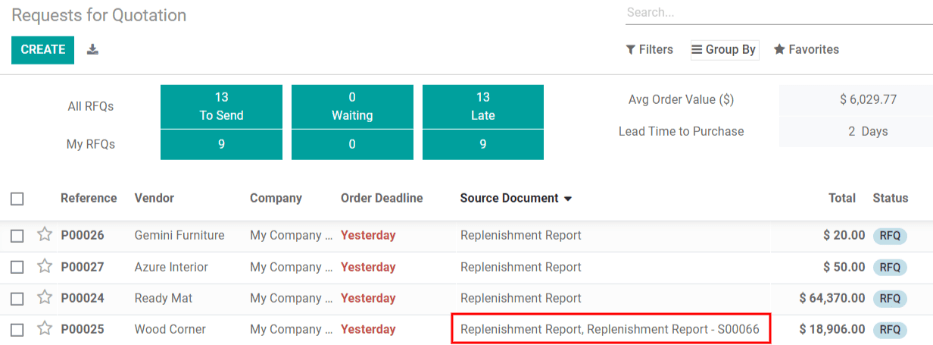
A PO or MO created by a manual replenishment has a Replenishment Report as the source document. A PO or MO created by an automated reordering rule has the SO reference number(s) that triggered the rule as the source document.
Make to order (MTO) route
Since the MTO route is recommended for customized products, the route is hidden by default.
- To activate the MTO route in Odoo:
Go to .
Activate the Multi-Step Routes setting, located under the Warehouse section, and click Save.
Then, go to .
Click on to show archived routes.
Select the checkbox next to Replenish on Order (MTO), and click on .
Note
Activating the Multi-Step Routes setting also activates Storage Locations. If these features aren’t applicable to the warehouse, disable these settings after unarchiving the MTO route.
To set a product’s procurement route to MTO, go to , click on the desired product to open its product form, and click Edit.
Then, click the Inventory tab, and in the Routes section of options, select Replenish on Order (MTO).
For products purchased directly from a vendor, make sure the Buy route is selected, in addition to the Replenish on Order (MTO) route. Also, make sure a vendor is configured in the Purchase tab of the product form.
For products manufactured in-house, make sure the Manufacture route is selected, in addition to the Replenish on Order (MTO) route. Also, make sure a bill of materials is configured for the product, which is accessible via the Bill of Materials smart button on the product form.
Finally, when all configurations are complete, click Save.
Note
The MTO route cannot be selected alone. MTO only works if the Manufacture or Buy route is also selected.
