Allocations
Allocations are amounts of time off given to employees, either granted immediately or earned as the employee works, through an accrual plan.
Once time off types and accrual plans have been configured, the next step is to allocate, or give, time off to employees.
The Allocations page of the Time Off app is only visible to users who have either Time Off Officer or Administrator access rights for the Time Off application. For more information on access rights, refer to the access rights documentation.
Allocate time off
To create a new allocation, navigate to . This loads the Allocations dashboard.
The dashboard displays a Kanban view of all allocation requests for the user’s team, awaiting approval.

Click New to allocate time off. This opens a blank Allocations form. Enter the following information on the form:
Name: Enter a name for the allocation, typically containing the type of time off, and the period of time it is available (example:
Annual Vacation Time Off - 2025).Time Off Type: Using the drop-down menu, select the type of time off that is being allocated to the employees.
Allocation Type: Select how the allocation is granted. The two options are:
Regular Allocation: The time off is given immediately, all at once.
Accrual Allocation: The time off is earned through an accrual plan.
Accrual Plan: If Accrual Allocation is selected for the Allocation Type, the Accrual Plan field appears. Using the drop-down menu, select the accrual plan associated with the allocation. An accrual plan is required when using the Accrual Allocation type.
Validity Period/Start Date: If Regular Allocation is selected for the Allocation Type, this field is labeled Validity Period. If Accrual Allocation is selected for the Allocation Type, this field is labeled Start Date.
The current date populates the first date field, by default. To select another date, click on the pre-populated date to reveal a popover calendar window. Navigate to the desired start date for the allocation, and click on the date to select it.
If the allocation expires, select the expiration date in the next date field. If the time off does not expire, leave the second date field blank.
If Accrual Allocation is selected for the Allocation Type, this second field is labeled Run until.
Allocation: Enter the amount of time that is being allocated to the employees. This field displays the time in either Hours or Days, depending on how the selected Time Off Type is configured.
Employee: Using the drop-down menu, select the employee being allocated the time off.
Add a reason…: If any description or note is necessary to explain the time off allocation, enter it in this field at the bottom of the form.

Accrual start date behavior
If the Start Date is in the middle of an accrual period, Odoo adjusts it to the start or end of that period based on the Accrued Gain Time entered on the accrual plan.
Example
At the start of the accrual period: A Start Date of
06/16/25applies from06/01/25At the end of the accrual period: A Start Date of
06/18/25applies from07/01/25
Automatic adjustments on the start date to either the beginning or end of an accrual period ensures accruals align with the defined period boundaries, rather than the exact date entered.
Group allocations
When allocating time off, it is common to allocate time to multiple employees at once, instead of creating individual allocations.
To allocate time to multiple employees in a single allocation, navigate to . Click the New Group Allocation button, and a New Group Allocation pop-up window loads.
This form is identical to the individual allocation form, with two additional fields to determine how the employees are selected.
Using the drop-down menu, select one of the following options for the Grant field:
By Employee: This option allows for the selection of multiple individual employees that are unrelated in terms of department, company, or tags. Selecting this reveals an Employees field. Using the drop-down menu, select the employees to receive the allocation in the Employees field. There is no limit to the amount of employees that can be selected.
By Company: This option allows for the selection of all employees within a specific company. Selecting this reveals a Company field. Using the drop-down menu, select the Company to assign the allocation to. Only one company can be assigned in the Company field. When a company is selected, all employees within the company receive the allocation.
By Department: This option allows for the selection of all employees within a specific department. Selecting this reveals a Department field. Select the Department to assign the allocation to. Only one department can be assigned in the Department field. When a department is selected, all employees within the department receive the allocation.
By Employee Tag: This option allows for the selection of all employees with a specific tag. Selecting this reveals an Employee Tag field. Select the desired Employee Tag to select all employees with that tag. Only one tag can be assigned in the Employee Tag field. When a tag is selected, all employees with that tag receive the allocation.
Fill out the remainder of the New Group Allocation form, then click Allocate Time Off when done. The Generated Allocations dashboard loads, displaying all the employees granted an allocation on the form.

Example
A company wants to give their accounting department two days of training. The training is happening over one week. Since it is a work-related event, the company wants to grant time off to the accountants and let them decide which two training days they will attend.
The time off officer creates multiple allocations, and configures the New Group Allocation form as follows:
The Grant field is set to By Department, and the Department field is set to Accounting.
The Time Off Type is set to Training Time Off, with the Allocation Type set to Regular Allocation, since the time off is given up front, and is not earned through an accrual plan.
The Validity Period is set to June 22 June 30, since the training event is happening that week, and the employees can pick any two days they want to attend during that time.
The Allocation is set to 2.00 Days, and Annual accounting training.
appears in the details at the bottom to provide information on why the time off is being
allocated.

Request allocation
If an employee has used all their time off, or will run out of time off, they can request an allocation for additional time. Allocations can be requested in one of two ways: either from the main Time Off dashboard or the My Allocations dashboard.
Note
Both options open a new Allocation Request form, but when requested from the main Time Off Dashboard, the form appears in a pop-up window, and the Validity Period field does not appear.
When requested from the My Allocations dashboard, the screen navigates to a new allocation request page instead of presenting a pop-up window.
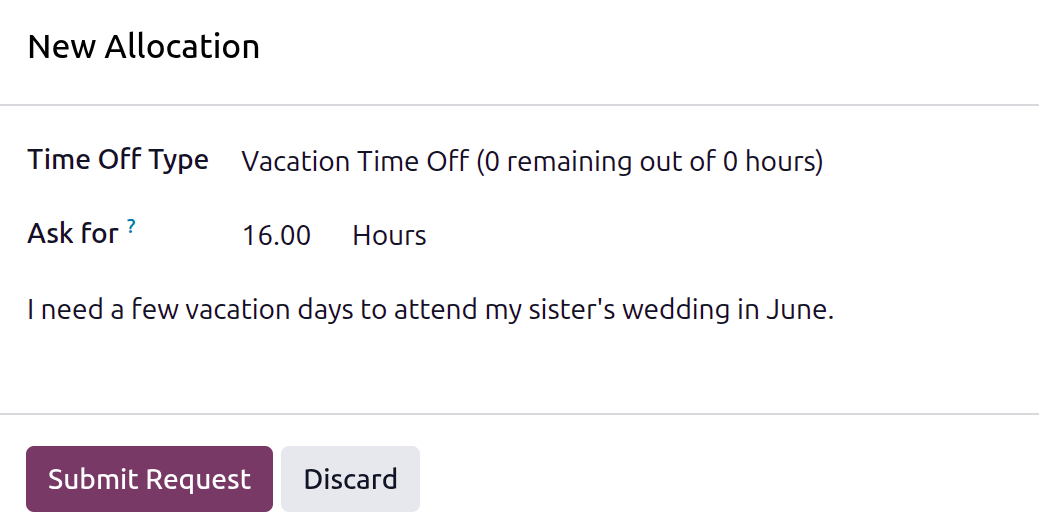
Time off dashboard
To request an allocation from the Time Off dashboard, open the Time Off app, or navigate to . On the Dashboard, click New allocation request beneath Pending Requests, and a New Allocation pop-up window loads.
Configure the following fields on the form:
Time Off Type: Select the type of time off being requested using the drop-down menu.
Ask for: Enter the amount of time being requested, either in Days or Hours. The unit of time is determined by the selected Time Off Type.
Add a reason…: Enter a brief description why the time off is being requested.
My allocations dashboard
To request an allocation from the My Allocations dashboard, navigate to . Click the New button on the My Allocations dashboard, and an Allocation Request form loads.
Enter the following information on the Allocation Request form:
Name: The name for the allocation request is populated based on the default time off type, and displays both the time off type and the amount of hours by default. As selections are made, the name of the request is updated to reflect the request. The name cannot be manually modified.
Time Off Type: Using the drop-down menu, select the type of time off being requested for the allocation. After a selection is made, the Name updates with the time off type.
Validity Period: By default, the current date populates the first field and the second field displays No Limit. To change the time frame for the request, click on the date, and select the desired date on the calendar popover. If there is an expiration date for the request, select the end date in the second field.
Allocation: Enter the amount of time being requested in this field. The format is presented in either Days or Hours, depending on how the Time Off Type is configured. Once this field is populated, the name of the allocation request is updated to include the amount of time being requested.
Add a reason…: Enter a description for the allocation request in this field. This should include any details that approvers may need to approve the request.
The information is automatically saved as it is entered. To view the request, click the My Allocations breadcrumb, or navigate to . The allocation request appears along with any other allocation requests awaiting approval.
