Onboarding
The Attendances application allows for various ways to check-in and check-out of work. Managers or HR workers may need to train employees on the various methods available. Odoo’s Attendances application has an onboarding feature to aid with employee training.
To open the Onboarding screen, navigate to . The screen loads an onboarding dashboard, with three options to check-in: manually, with a barcode, or with an RFID token.
Note
This can be done on either a PC or tablet.

Important
When onboarding employees using the Onboarding interface, any attendance logs created are reflected in the database. This means that employees who check-in during onboarding training are logged into work in the Attendances app.
If managers want to use the Onboarding dashboard as a training only, they must check attendance records and make any necessary modifications, so all attendance records are accurate and reflect the correct working hours.
Manual selection
On the Onboarding screen, click or tap on the image above the text Select on Tablet. A dashboard loads with all employees listed in a default Kanban view. All Kanban cards indicate the employee’s current status with either a red Absent or a green On Site text in the upper-right corner of the card.
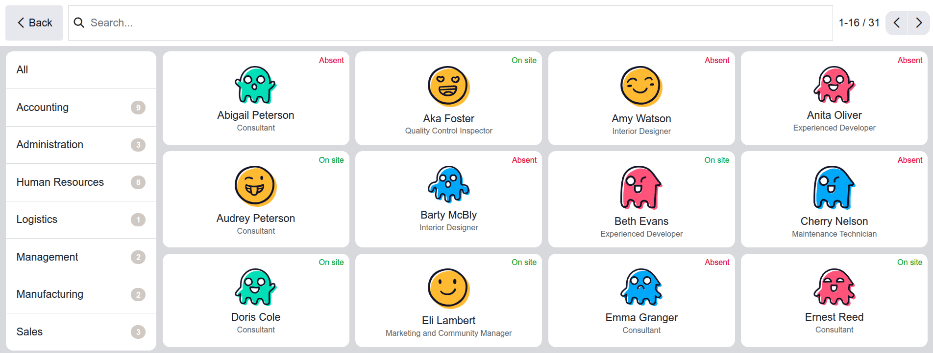
Navigate to the desired employee, then click or tap their Kanban card. The employee is automatically checked-in or checked-out depending on their status in the Attendances app. The screen briefly displays a Welcome or Goodbye screen with the current date and time, along with any previously logged attendance hours.
After the specified period of time designated in the kiosk settings has elapsed, the screen reverts to the main Onboarding dashboard. To exit the screen sooner, click the OK button.
Note
The list of departments on the left-side or the search bar at the top can be used to navigate to the desired employee.
Badge with barcode
The second option available to check-in or check-out is to use an ID badge that has a barcode on it. Click or tap on the center image above the text Badge with Barcode on Tablet, and a dashboard loads displaying two options: Scan your badge and New Set-up (Employee/Badge).
If the employee has an ID badge with a barcode, click the Scan your badge button to scan the barcode using either the device’s camera or a dedicated barcode scanner. A Barcode Scanner pop-up window loads and displays the area being scanned. Scan the barcode to check in or check out of the database.

Note
The Barcode app does not need to be installed to use the barcode option.
Create a new barcode
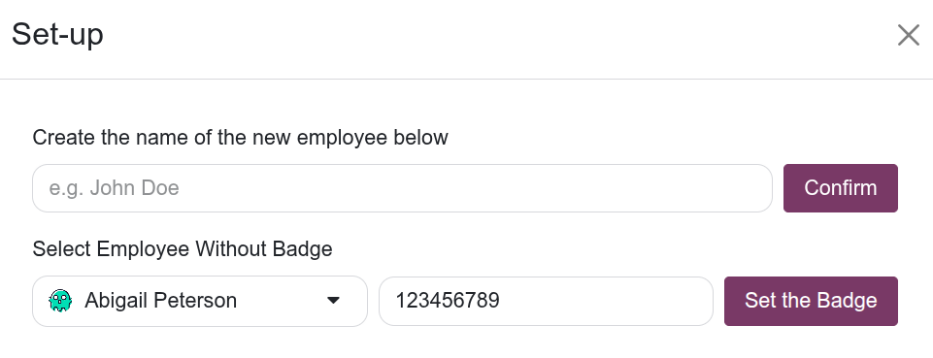
If the employee does not have a barcode, click the New Set-up (Employee/Badge) button to bring up the Set-up pop-up window. Using the drop-down menu beneath the text Select Employee Without Badge, select the existing employee who does not have a barcode. Next, enter the new barcode in the corresponding field.
Once completed, click the Set the Badge button. The Set-up pop-up window closes, and a
notification stating Badge assigned successfully! appears in the upper-right corner of the
Onboarding dashboard.
The new badge number appears in the RFID/Badge Number field in the Settings tab on the employee’s form.
Important
The Set-up pop-up window only creates a new barcode and stores the number on the employee’s record. The barcode must be printed to scan it with the Badge with Barcode on Tablet option.
If the employee already has a barcode on their profile, the current barcode is replaced with the newly entered one.
Create a new employee
If an employee has not been created in the system, a new employee can be added to the database from the Set-up pop-up window. Type in the employee’s name in the field below Create the name of the new employee below, then click the Confirm button.
The Set-up pop-up window closes, and a notification stating Employee created successfully!
appears in the upper-right corner of the Onboarding dashboard.
Important
The Set-up pop-up window only creates a new employee record in the Employees app. A barcode must be created and printed to scan it with the Badge with Barcode on Tablet option.
RFID token
The third option available to check in on the Onboarding dashboard is to use an RFID token. Click the button above the text RFID Token with reader on tablet to bring up a dashboard with two options: Scan your badge, or New Set-up (Employee/Badge).
If the employee has an RFID token, click the Scan your badge button to scan the RFID token using a connected RFID reader.
Important
To use this feature, both RFID key fobs and an RFID reader must be purchased. Follow the manufacturer’s directions to install the RFID reader and set up the RFID key fob.