México
Nota
Esta documentación se ha hecho asumiendo que sigue y conoce la documentación oficial sobre facturación, ventas y contabilidad y que tiene experiencia trabajando con Odoo en tales área. No se pretende poner aquí los procedimientos que ya están explicados en esos documentos, sólo la información necesaria para permitir usar Odoo en una empresa con sede fijada en «México».
Introducción
La localización mexicana es un grupo de 3 módulos:
l10n_mx: All basic data to manage the accounting, taxes and the chart of account, this proposed chart of account installed is a intended copy of the list of group codes offered by the SAT.
l10n_mx_edi: Todo sobre las transacciones electrónicas, CFDI 3.2 y 3.3, complemento de pago, adición de factura.
l10n_mx_reports: todos los informes obligatorios para la contabilidad electrónica están aquí (se requiere aplicación de contabilidad).
Con la localización mexicana en Odoo no solo podrá cumplir con las características requeridas por ley en México, sino también utilizarlo como su sistema de contabilidad y facturación debido a todos los requisitos normales para este mercado, cosa que hace de Odoo la solución perfecta para administrar su empresa en México.
Configuración
Truco
Después de la configuración, te daremos el proceso para probar todo, trata de seguir el proceso paso a paso para evitar perder el tiempo en solucionar problemas. En cualquier paso puede retroceder y volver a intentarlo.
1. Instala la localización contable mexicana
Para esto, vaya a aplicaciones y busque México. Después, haga clic en Instalar.
Truco
Al crear una base de datos desde www.odoo.com, si se elige México como país al crear la cuenta, la localización mexicana se instalará automáticamente.
2. Facturación electrónica (formato CDFI 3.2 y 3.3)
Para habilitar este requisito en México, vaya a configuración en contabilidad en:menuselection:Contabilidad --> Configuración y habilite la opción en la imagen. Con esto podrá generar la factura firmada (CFDI 3.2 y 3.3) y generar también el complemento de pago firmado (3.3 solamente); todo se integra completamente con el flujo de facturación normal en Odoo.

3. Establece tu información legal en la empresa
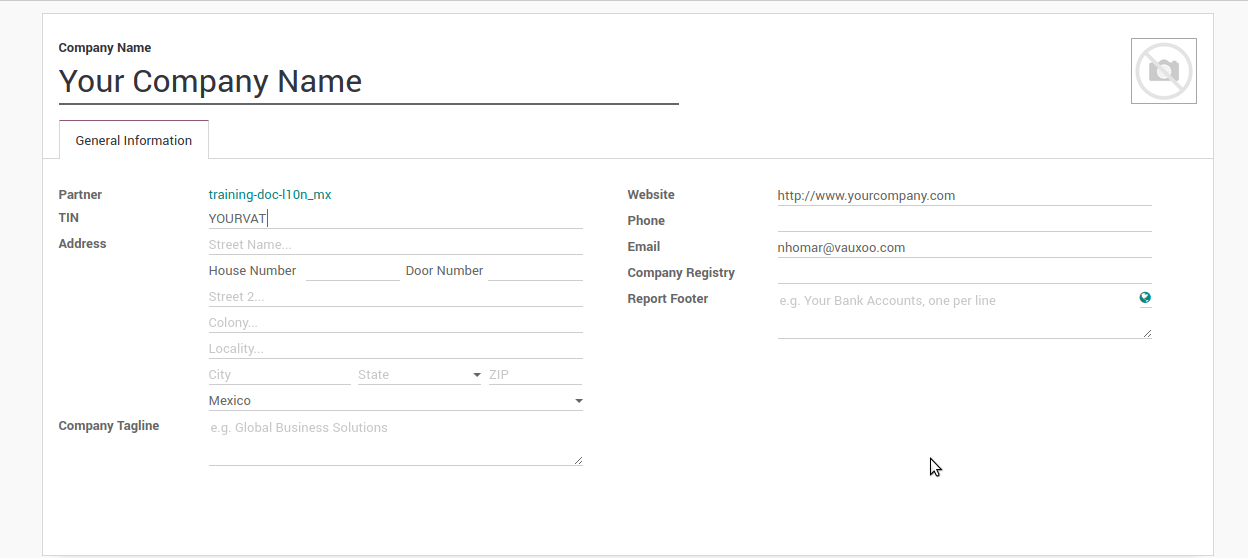
Primero, asegúrate de que tu empresa esté configurada con los datos correctos. Ingresa en e ingrese una dirección válida y el IVA. No olvides definir una posición fiscal mexicana en la información contacto de tu empresa.
Truco
If you want use the Mexican localization on test mode, you can put any known address inside Mexico with all fields for the company address and set the vat to EKU9003173C9.
Advertencia
From a legal point of view, a Mexican company must use the local currency (MXN). Therefore, Odoo does not provide features to manage an alternative configuration. If you want to manage another currency, let MXN be the default currency and use price list instead.
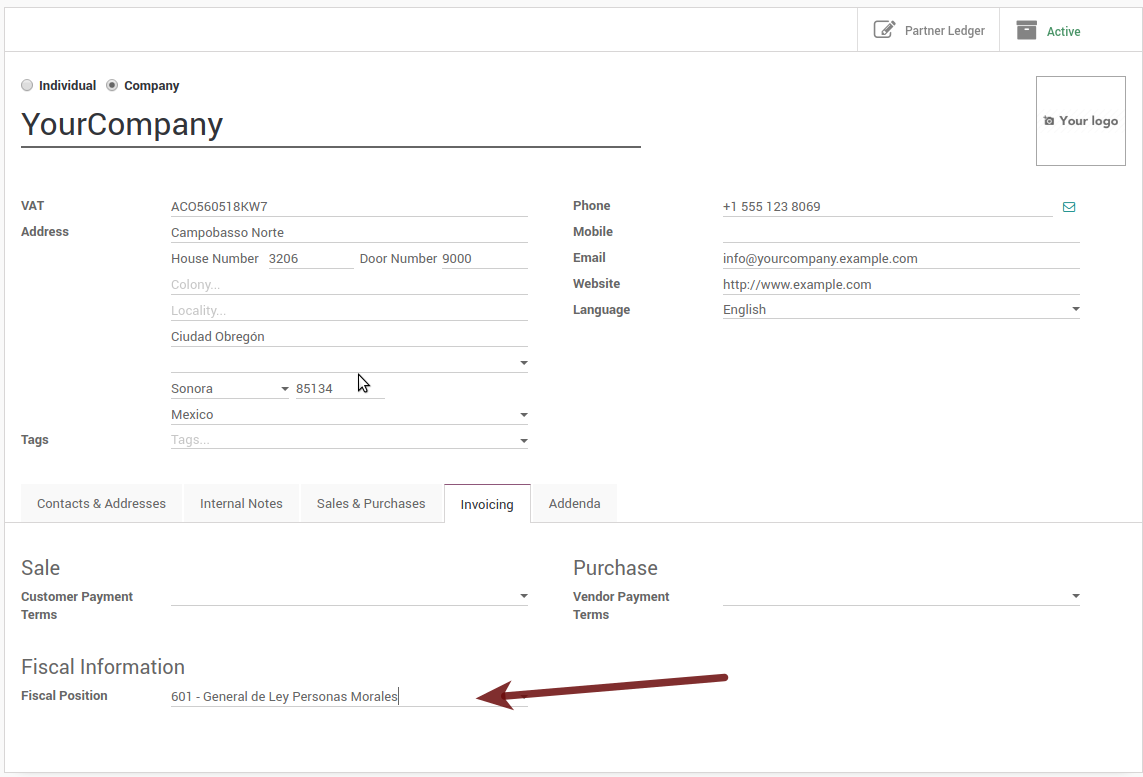
4. Establezca la «Posición fiscal» adecuada en el tipo de socio que representa la empresa
Vaya a la carta de la información general de la compañía, y configure la Posición Fiscal correcta. (para el ** Entorno de prueba ** debe seleccionar * 601 - General de Ley Personas Morales *, simplemente búsquelo como un campo en la barra de búsqueda de Odoo si no encuentra la opción).
5. Habilitación de la nueva localización mexicana 3.3 CFDI
Advertencia
Estos pasos solo son necesarios cuando habilita la localización mexicana CFDI 3.3 (solo disponible para V11.0 y versiones superiores). Si no tiene la versión 11.0 en su instancia de SaaS, solicite una actualización. Para enviar un ticket a soporte, diríjase a https://www.odoo.com/help.
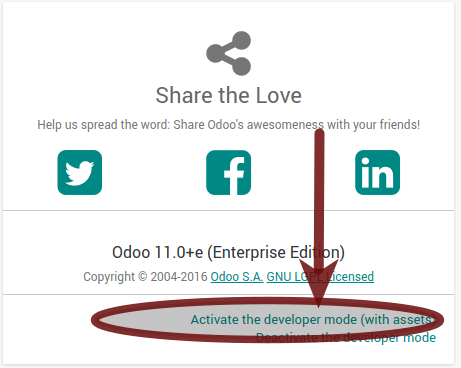
Habilite el modo desarrollador:
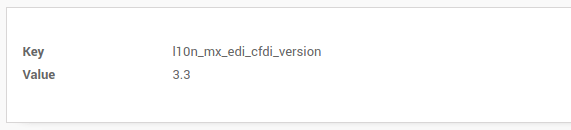
Vaya y observe el siguiente parámetro técnico, en: menuselection: `-> Ajustes-> Parámetros-> Parámetros del sistema ` y configure el parámetro llamado * l10n_mx_edi_cfdi_version * a 3.3 (créelo si la entrada con este nombre no existe ).
Advertencia
El CFDI 3.2 será legalmente posible hasta el 30 de noviembre de 2017. La versión 3.3 será un paso obligatorio para cumplir con la nueva resolución SAT en cualquier base de datos nueva creada desde la versión v.11.0. CFDI 3.3 es el comportamiento predeterminado.
Consideraciones importantes al habilitar el CFDI 3.3
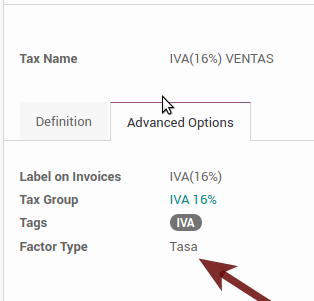
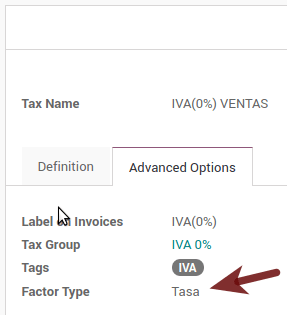
Su impuesto, que representa el 16% de IVA y el 0%, debe tener el campo «Tipo de factor» establecido en «Tasa».
Debe ir a la configuración de Posición fiscal y configurar el código correcto (son los primeros 3 números en el nombre), por ejemplo, para el test, debe establecer 601, se verá como la imagen.

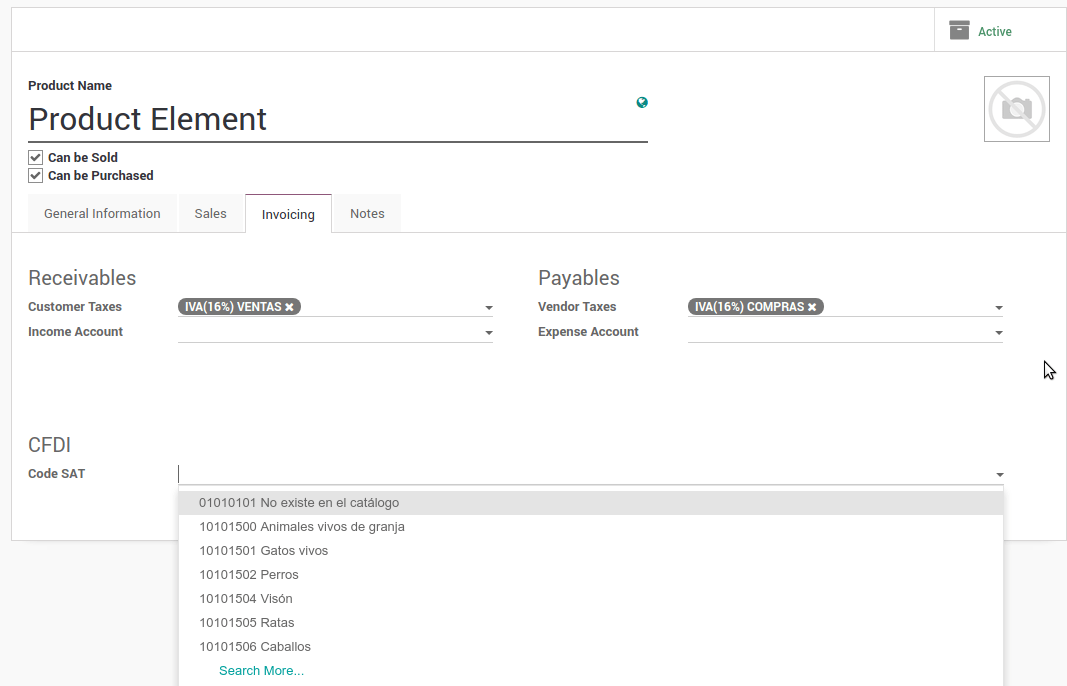
Todos los productos deben tener para el CFDI 3.3 el «Código SAT» y el campo «Referencia» correctamente configurados, puede exportarlos y volver a importarlos para hacerlo más rápido.
6. Configure el PAC para firmar correctamente las facturas.
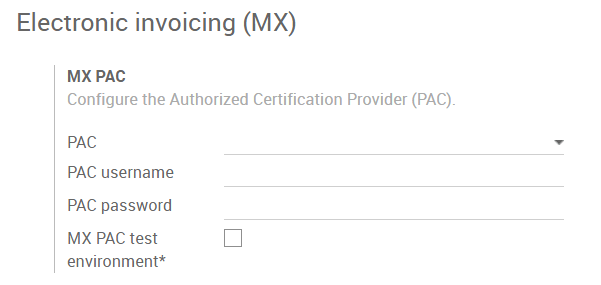
Para configurar el EDI con los ** PAC **, puede ir a: menuselection: Contabilidad-> Ajustes-> Electronic Invoicing (MX). Puede elegir un PAC dentro de la ** Lista de PAC admitidos ** en el campo * PAC * y luego ingresar su nombre de usuario de PAC y la contraseña de PAC.
Advertencia
Recuerde que debe registrarse en el PAC arbitrado de antemano, ese proceso se puede hacer con el PAC mismo en este caso, tendremos dos (2) Finkok`_ y Solución Factible disponibles.
Debe procesar su ** Clave privada (CSD) ** con la institución SAT antes de seguir estos pasos. Si no tiene dicha información, intente todos los «Pasos para el examen» y vuelva a este proceso cuando finalice el proceso propuesto para el SAT con el fin de establecer esta información para su entorno de producción con transacciones reales.
Truco
Si marcó la casilla * entorno de prueba MX PAC * no es necesario ingresar un nombre de usuario o contraseña de PAC.
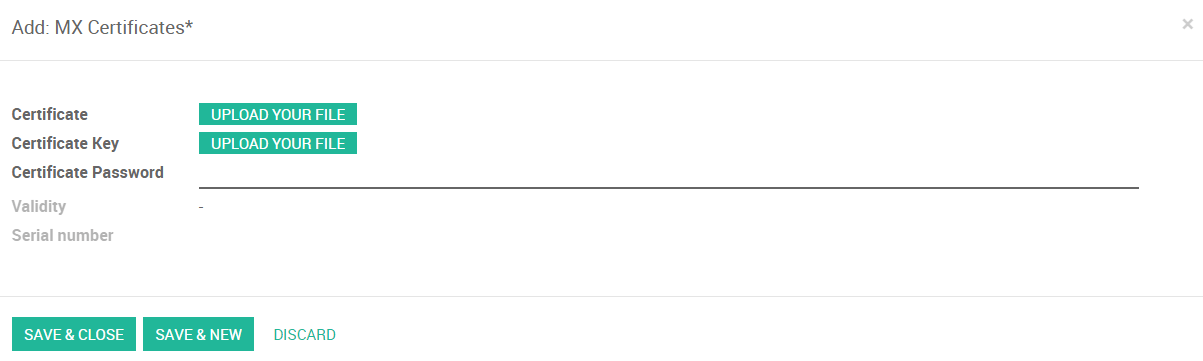
Truco
Aquí puede encontrar un certificado del SAT para usar el Ambiente de Prueba para la localización contable mexicana.
:download:` Certificate <files/certificate.cer>` :download:` Certificate Key <files/certificate.key>` - Password: 12345678a
7. Configure la etiqueta en impuestos de ventas
Esta etiqueta se utiliza para establecer el código de tipo de impuesto, transferido o retenido, aplicable al concepto en el CFDI. Por lo tanto, si el impuesto es un impuesto de venta, el campo «Etiqueta» debería ser «IVA», «ISR» o «IEPS».
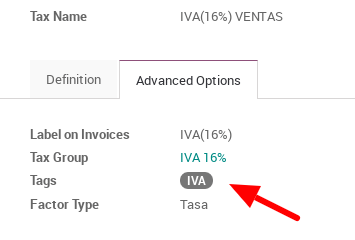
Tenga en cuenta que los impuestos predeterminados ya tienen una etiqueta asignada, pero cuando cree un nuevo impuesto, debe elegir una etiqueta.
Uso y prueba
Facturación / Contabilidad
Para usar la facturación mexicana solo necesita crear una factura estándar siguiendo los procesos normales dentro de Odoo.
Una vez que valide su primera factura, una factura firmada correctamente debe tener este aspecto:
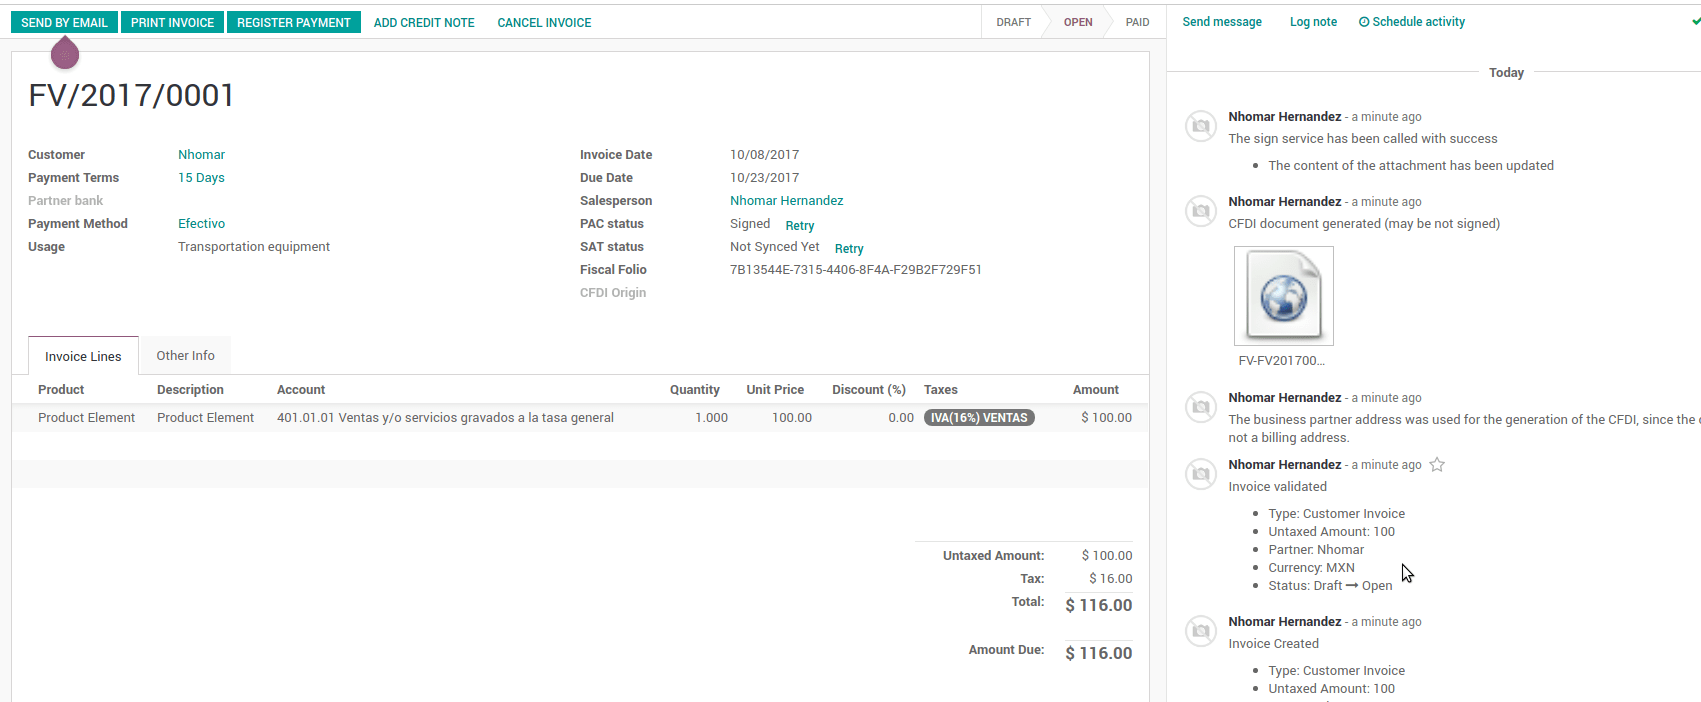
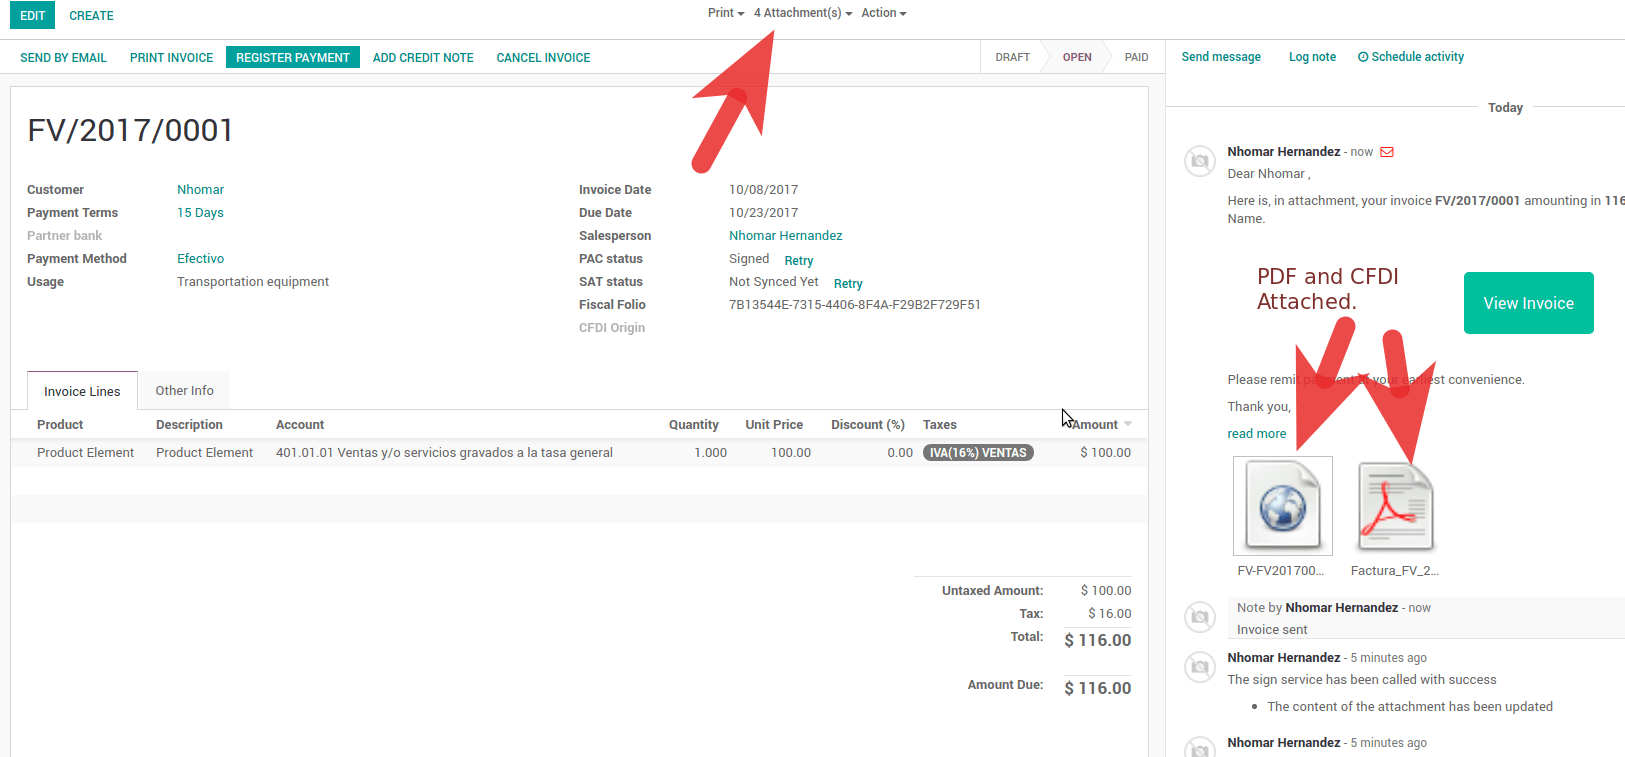
Puede generar el PDF simplemente haciendo clic en el botón Imprimir en la factura o enviándolo por correo electrónico siguiendo el proceso normal en odoo para enviar su factura por correo electrónico.

Una vez que envíe la factura electrónica por correo electrónico, esta es la forma en que debería verse.
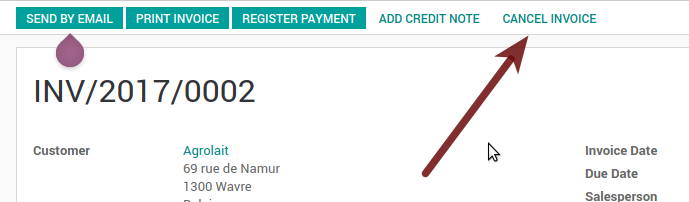
Cancelando facturas
El proceso de cancelación está completamente vinculado a la cancelación normal en Odoo.
Si la factura no esta pagada.
Vaya al diario de facturas del cliente al que pertenece la factura.

Marque el campo «Permitir cancelación de asientos»
Vuelva a su factura y haga clic en el botón «Cancelar factura»
For security reasons it is recommendable return the check on the to allow cancelling to false again, then go to the journal and un check such field.
Consideraciones legales
Una factura cancelada se cancelará automáticamente con el SAT.
Si vuelve a intentar usar la misma factura después de la cancelación, tendrá la cantidad de CFDI cancelada que intentó, entonces todos esos XML son importantes para mantener un buen control de los motivos de cancelación.
You must unlink all related payment done to an invoice on odoo before cancel such document, this payments must be cancelled to following the same approach but setting the «Allow Cancel Entries» in the payment itself.
Pagos (Solo disponible para CFDI 3.3)
Para generar el complemento de pago solo necesitas seguir el proceso de pago normal en Odoo, estas consideraciones para entender el comportamiento son importantes.
Para generar complemento de pago el plazo de pago en la factura debe ser PPD, ya que es el comportamiento esperado legalmente requerido para el «Pago en efectivo».
1.1. ¿Cómo puedo generar una factura con un término de pago `PUE`?
According to the SAT documentation a payment is classified as
PUEif the invoice was agreed to be fully paid before the 17th of the next calendar month (the next month of the CFDI date), any other condition will generate aPPDinvoice.1.2. ¿Cómo puedo conseguir esto con Odoo?
Para establecer el plazo de pago CFDI adecuado (PPD o PUE), puede establecerse fácilmente utilizando los
Términos de pagodefinidos en la factura.Si se genera una factura sin
Plazo de pagoel atributoMetodoPagoseráPUE.Hoy, si es el primer día del mes y se genera una factura con
Plazo de Pago30 Días Netos”, laFecha de Vencimientocalculada será el primer día del mes siguiente, este significa que es antes del día 17 del mes siguiente, entonces el atributoMetodoPagoserá `` PUE “”.Hoy, si se genera una factura con
Plazo de Pago30 Días Netosy laFecha de Vencimientoes mayor que el día 17 del mes siguiente, elMetodoPagoseráPPD.If having a
Payment Termwith 2 lines or more, for example30% Advance End of Following Month, this is an installments term, then the attributeMetodoPagowill bePPD.
To test a normal signed payment just create an invoice with payment term
30% Advance End of Following Monthand then register a payment to it.Necesita imprimir el pago para poder obtener el PDF correctamente.
Con respecto a los «Pagos por adelantado», debe crear una factura adecuada con el pago por adelantado como una línea de productos que establezca el código de SAT adecuado siguiendo el procedimiento de la documentación oficial dada por el SAT en la sección ** Apéndice 2 Procedimiento Para la emisión de los CFDI en el caso de anticipos recibidos **.
Related to topic 4 it is blocked the possibility to create a Customer Payment without a proper invoice.
Contabilidad
La contabilidad para México en Odoo es compuesta por 3 reportes:
Chart of Account (Called and shown as COA).
Balanza de Comprobación Electrónica.
Reporte DIOT
1 and 2 are considered as the electronic accounting, and the DIOT is a report only available on the context of the accounting.
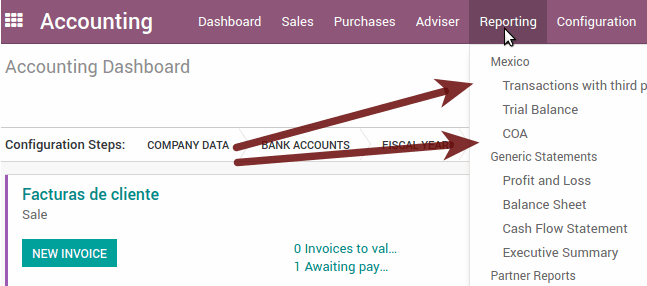
You can find all those reports in the original report menu on Accounting app.
Contabilidad Electrónica (Requiere Aplicación de Contabilidad)
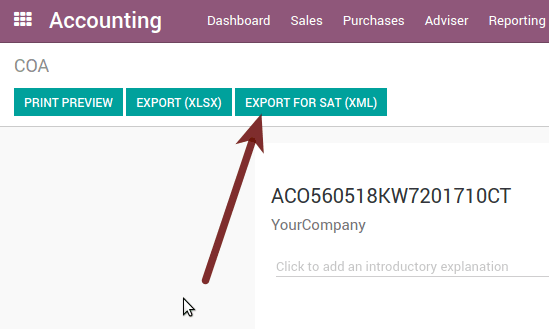
Electronic Chart of account CoA
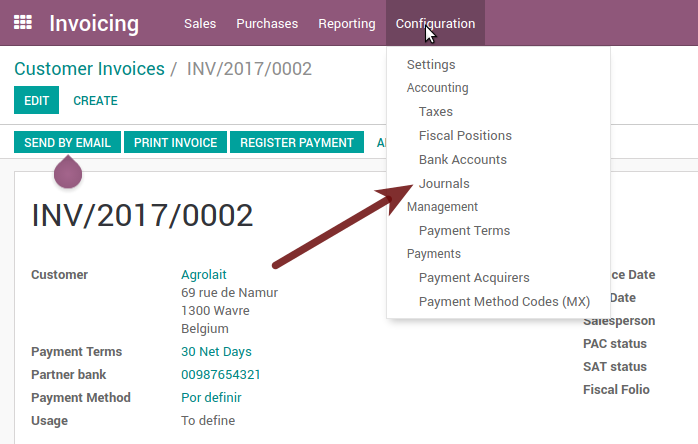
La facturación electrónica nunca ha sido tan fácil, solo tiene que ir a :menuselection:’Contabilidad –> Informes –> México –> COA’ y darle clic en el botón Exportar para SAT (XML)
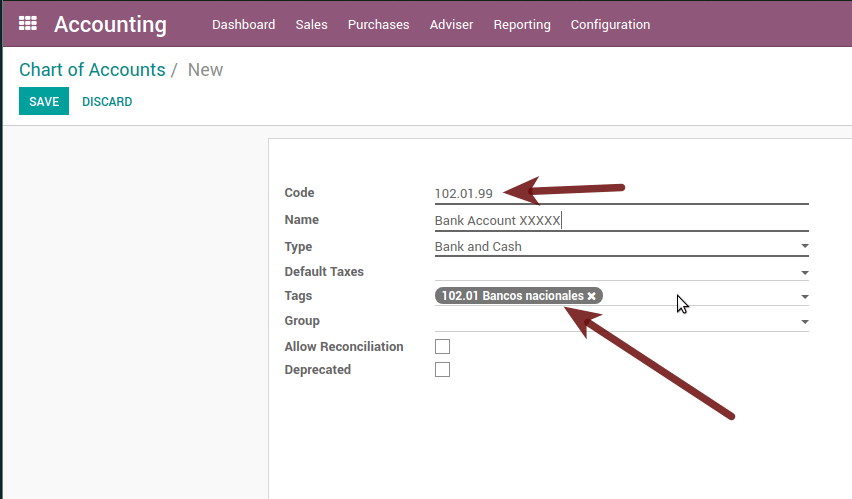
¿Como agregar nuevas cuentas?
If you add an account with the coding convention NNN.YY.ZZ where NNN.YY is a SAT coding group then your account will be automatically configured.
Example to add an Account for a new Bank account go to and then create a new account on the button «Create» and try to create an account with the number 102.01.99 once you change to set the name you will see a tag automatically set, the tags set are the one picked to be used in the COA on xml.
¿Cuál es el significado de la etiqueta?
Para conocer todas las etiquetas posibles, puede leer el Anexo 24 en el sitio web del SAT en la sección llamada ** Código agrupador de cuentas del SAT **.
Truco
Cuando instala el módulo l10n_mx y su plan contable depende de él (esto sucede automáticamente cuando instala la configuración de México como país en su base de datos), tendrá por defecto las etiquetas más comunes. Si la etiqueta que necesita no está creada, puede crearla.
Balanza de Comprobación Electrónica
Exactamente como el COA pero con el saldo y débito del saldo inicial, una vez que haya configurado correctamente su COA, puede ir a: menuselection: Contabilidad-> Informes-> México-> Balanza de Comprobación esto se genera automáticamente y puede ser exportado a XML usando el botón en la parte superior ** Exportar para SAT (XML) ** con la selección previa del período que desea exportar.
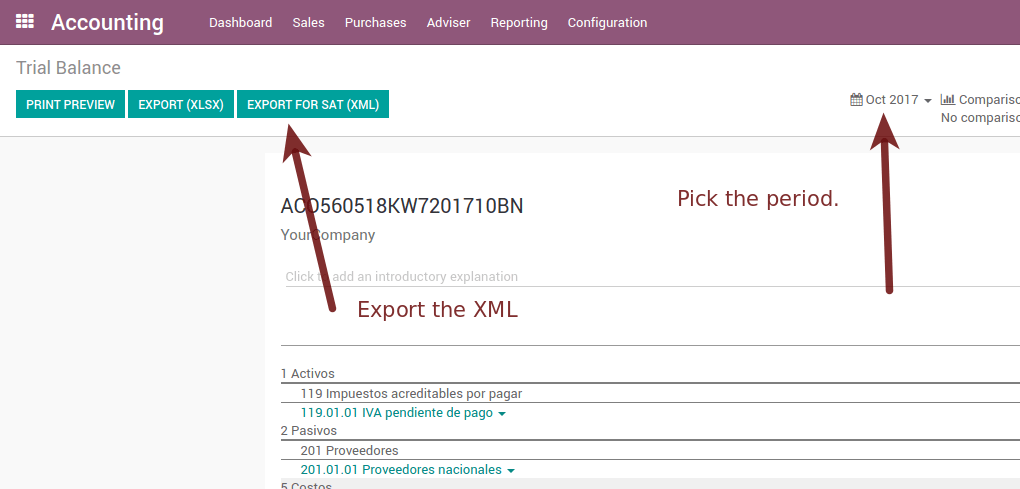
All the normal auditory and analysis features are available here also as any regular Odoo Report.
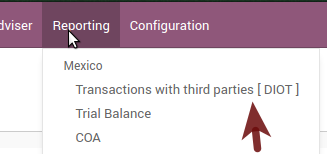
Informe DIOT (Requiere Contabilidad App)
** ¿Qué es el DIOT y la importancia de presentarlo al SAT **
Cuando se trata de procedimientos con el Servicio de Administración de SAT, sabemos que no debemos descuidar lo que presentamos. Para que las cosas no pasen en Odoo.
The DIOT is the Informational Statement of Operations with Third Parties (DIOT), which is an an additional obligation with the VAT, where we must give the status of our operations to third parties, or what is considered the same, with our providers.
This applies both to individuals and to the moral as well, so if we have VAT for submitting to the SAT and also dealing with suppliers it is necessary to. submit the DIOT:
When to file the DIOT and in what format?
Es sencillo presentar el DIOT, ya que, como todos los formatos, puede obtenerlo en la página del SAT, es el formato electrónico A-29 que puede encontrar en el sitio web del SAT.
Every month if you have operations with third parties it is necessary to present the DIOT, just as we do with VAT, so that if in January we have deals with suppliers, by February we must present the information pertinent to said data.
Where the DIOT is presented?
You can present DIOT in different ways, it is up to you which one you will choose and which will be more comfortable for you than you will present every month or every time you have dealings with suppliers.
The A-29 format is electronic so you can present it on the SAT page, but this after having made up to 500 records.
Once these 500 records are entered in the SAT, you must present them to the Local Taxpayer Services Administration (ALSC) with correspondence to your tax address, these records can be presented in a digital storage medium such as a CD or USB, which once validated you will be returned, so do not doubt that you will still have these records and of course, your CD or USB.
One more fact to know: the Batch load?
When reviewing the official SAT documents on DIOT, you will find the Batch load, and of course the first thing we think is what is that ?, and according to the SAT site is:
The «batch upload» is the conversion of records databases of transactions with suppliers made by taxpayers in text files (.txt). These files have the necessary structure for their application and importation into the system of the Informative Declaration of Operations with third parties, avoiding the direct capture and consequently, optimizing the time invested in its integration for the presentation in time and form to the SAT.
You can use it to present the DIOT, since it is allowed, which will make this operation easier for you, so that it does not exist to avoid being in line with the SAT in regard to the Information Statement of Operations with Third Parties.
You can find the official information here.
¿Como generar este reporte en Odoo?
Vaya a :menuselection:’Contabilidad –> Informes –> Mexico –> Transacciones con terceras partes (DIOT)’.
A report view is shown, select last month to report the immediate before month you are or left the current month if it suits to you.

Click on «Export (TXT).
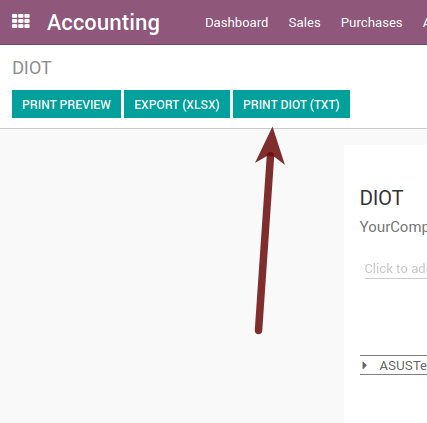
Guarda en un lugar seguro el archivo descargado, vaya al sitio web de SAT y sigue los pasos necesarios para declararlo.
Important considerations on your Supplier and Invice data for the DIOT
Todos los proveedores deben tener configurado los campos en la pestaña de contabilidad llamada «Información DIOT», el campo L10N MX Nacionalidad se completa con solo seleccionar el país apropiado en la dirección, no necesita hacer nada más allí, pero el L10N MX tipo de operación deber ser configurado en todos sus proveedores.

There are 3 options of VAT for this report, 16%, 0% and exempt, an invoice line in odoo is considered exempt if no tax on it, the other 2 taxes are properly configured already.
Remember to pay an invoice which represent a payment in advance you must ask for the invoice first and then pay it and reconcile properly the payment following standard odoo procedure.
You do not need all you data on partners filled to try to generate the supplier invoice, you can fix this information when you generate the report itself.
Remember this report only shows the Supplier Invoices that were actually paid.
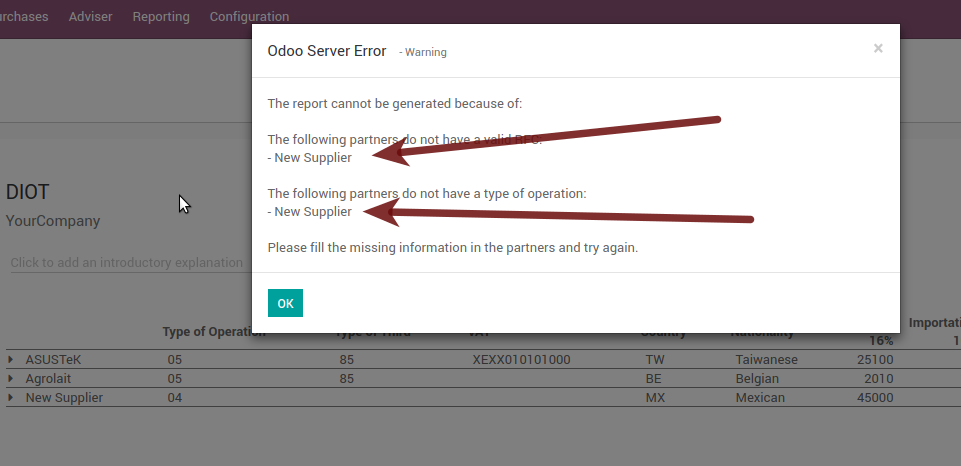
If some of this considerations are not taken into account a message like this will appear when generate the DIOT on TXT with all the partners you need to check on this particular report, this is the reason we recommend use this report not just to export your legal obligation but to generate it before the end of the month and use it as your auditory process to see all your partners are correctly set.
Funciones adicionales recomendadas
Módulo de Contactos (Gratis)
If you want to administer properly your customers, suppliers and addresses this module even if it is not a technical need, it is highly recommended to install.
Multi moneda (Requiere de aplicación de Contabilidad)
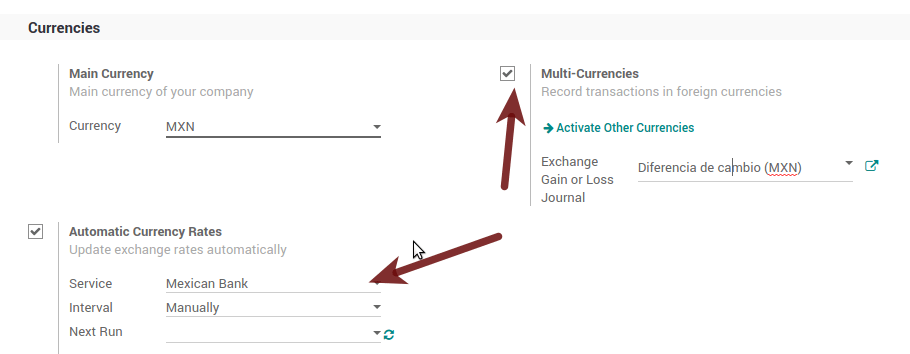
En México, casi todas las empresas mandan y reciben pagos en diferentes monedas. Si quiere hacer esto puede habilitar el uso de multi-divisas. También debería habilitar la sincronización con Banxico, ya que esto le dejara bajar el tipo de cambio automáticamente del SAT sin necesidad de configurar esta información todos los días manualmente en el sistema.
Go to settings and enable the multi currency feature.
Habilitación de errores explícitos en el CFDI utilizando el validador local XSD (CFDI 3.3)
Frequently you want receive explicit errors from the fields incorrectly set on the xml, those errors are better informed to the user if the check is enable, to enable the Check with xsd feature follow the next steps (with debug mode enabled).
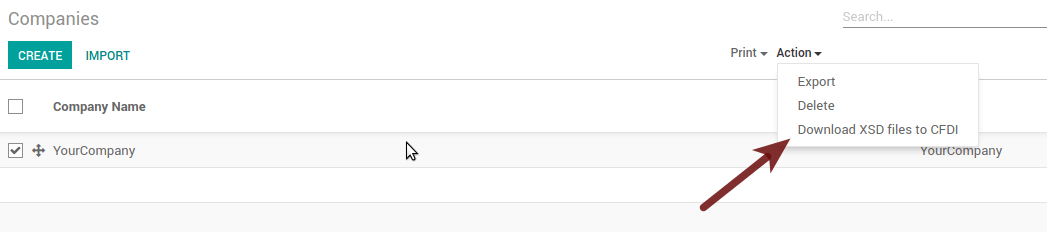
Vaya a
Busque la acción llamada «Descargar archivos XSD a CFDI»
Haga clic en el botón «Crear acción contextual»
Vaya al formulario de la empresa
Abre cualquier empresa que tengas.
Haga clic en «Acción» y luego en «Descargar archivo XSD a CFDI».
Ahora puede hacer una factura con cualquier error (por ejemplo, un producto sin código que es bastante común) y se mostrará un error explícito en su lugar, uno genérico sin explicación.
Nota
Si ves un error como este:
El CFDI generado no es válido.
attribute decl. “TipoRelacion”, attribute “type”: The QName value “{http://www.sat.gob.mx/sitio_internet/cfd/catalogos}c_TipoRelacion” does not resolve to a(n) simple type definition., line 36
This can be caused because of a database backup restored in another server, or when the XSD files are not correctly downloaded. Follow the same steps as above but:
Ve a la empresa en donde ocurre el error.
Haga clic en «Acción» y luego en «Descargar archivo XSD a CFDI».
FAQ
Mensaje de error (Solo aplica en el CFDI 3.3):
:9:0:ERROR:SCHEMASV:SCHEMAV_CVC_MINLENGTH_VALID: Element “{http://www.sat.gob.mx/cfd/3}Concepto”, attribute “NoIdentificacion”: [facet “minLength”] The value “” has a length of “0”; this underruns the allowed minimum length of “1”.
:9:0:ERROR:SCHEMASV:SCHEMAV_CVC_PATTERN_VALID: Element “{http://www.sat.gob.mx/cfd/3}Concepto”, attribute “NoIdentificacion”: [facet “pattern”] The value “” is not accepted by the pattern “[^|]{1,100}”.
Truco
Solución: Olvidaste asignar el campo «Referencia» en el producto, ve al formulario del producto y asígnalo correctamente.
Mensaje de error:
:6:0:ERROR:SCHEMASV:SCHEMAV_CVC_COMPLEX_TYPE_4: Element “{http://www.sat.gob.mx/cfd/3}RegimenFiscal”: The attribute “Regimen” is required but missing.
:5:0:ERROR:SCHEMASV:SCHEMAV_CVC_COMPLEX_TYPE_4: Element “{http://www.sat.gob.mx/cfd/3}Emisor”: The attribute “RegimenFiscal” is required but missing.
Truco
** Solución: ** Olvido establecer la «Posición fiscal» adecuada en el socio de la empresa, vaya a los clientes, elimine el filtro del cliente y busque el socio llamado como su empresa y establezca la posición fiscal adecuada, que es el tipo de negocio que hace su empresa en cuanto a la lista de valores posibles de SAT. Una opción adicional es que se le olvidó seguir las consideraciones sobre las posiciones fiscales.
Yo must go to the Fiscal Position configuration and set the proper code (it is the first 3 numbers in the name) for example for the test one you should set 601, it will look like the image.
Truco
For testing purposes this value must be 601 - General de Ley Personas Morales which is the one required for the demo VAT.
Mensaje de error:
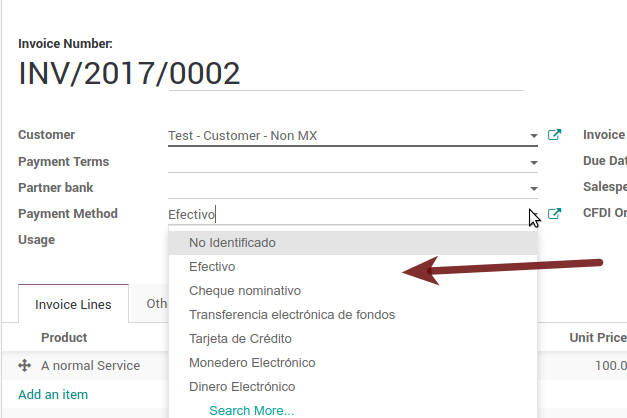
:2:0:ERROR:SCHEMASV:SCHEMAV_CVC_ENUMERATION_VALID: Element “{http://www.sat.gob.mx/cfd/3}Comprobante”, attribute “FormaPago”: [facet “enumeration”] The value “” is not an element of the set {“01”, “02”, “03”, “04”, “05”, “06”, “08”, “12”, “13”, “14”, “15”, “17”, “23”, “24”, “25”, “26”, “27”, “28”, “29”, “30”, “99”}
Truco
Solución: El método de pago es requerido en tu factura.
Mensaje de error:
:2:0:ERROR:SCHEMASV:SCHEMAV_CVC_ENUMERATION_VALID: Element “{http://www.sat.gob.mx/cfd/3}Comprobante”, attribute “LugarExpedicion”: [facet “enumeration”] The value “” is not an element of the set {“00 :2:0:ERROR:SCHEMASV:SCHEMAV_CVC_DATATYPE_VALID_1_2_1: Element “{http://www.sat.gob.mx/cfd/3}Comprobante”, attribute “LugarExpedicion”: “” is not a valid value of the atomic type “{http://www.sat.gob.mx/sitio_internet/cfd/catalogos}c_CodigoPostal”. :5:0:ERROR:SCHEMASV:SCHEMAV_CVC_COMPLEX_TYPE_4: Element “{http://www.sat.gob.mx/cfd/3}Emisor”: The attribute “Rfc” is required but missing.
Truco
Solution: You must set the address on your company properly, this is a mandatory group of fields, you can go to your company configuration on and fill all the required fields for your address following the step 3. Establece tu información legal en la empresa.
Mensaje de error:
:2:0:ERROR:SCHEMASV:SCHEMAV_CVC_DATATYPE_VALID_1_2_1: Element “{http://www.sat.gob.mx/cfd/3}Comprobante”, attribute “LugarExpedicion”: “” is not a valid value of the atomic type “{http://www.sat.gob.mx/sitio_internet/cfd/catalogos}c_CodigoPostal”.
Truco
Solución: El código postal en la dirección de su empresa no es uno valido para México, debería corregirlo.

Mensaje de error:
:18:0:ERROR:SCHEMASV:SCHEMAV_CVC_COMPLEX_TYPE_4: Element “{http://www.sat.gob.mx/cfd/3}Traslado”: The attribute “TipoFactor” is required but missing. :34:0:ERROR:SCHEMASV:SCHEMAV_CVC_COMPLEX_TYPE_4: Element “{http://www.sat.gob.mx/cfd/3}Traslado”: The attribute “TipoFactor” is required but missing.», “”)
Truco
Solución: Configura el nombre mexicano para el impuesto del 0% y el 16% que existe en tu sistema y se usa en las facturas.
Su impuesto, que representa el 16% de IVA y el 0%, debe tener el campo «Tipo de factor» establecido en «Tasa».