
Salarii
In Odoo, salaries are calculated and determined by six factors: salary structure types, salary structures, rules, rule parameters, rule categories, and salary input types. Together, these determine how each employee’s pay is calculated.
Each structure type contains one or more structures within it. Each structure contains a set of rules, and every rule uses parameters and categories to define how specific amounts are calculated. Additional salary inputs, such as bonuses or deductions, can also be included to adjust the final salary.
Când sunt calculate fluturaşii de salariu, Odoo calculează timpul lucrat al angajatului din intrările de lucru, apoi aplică structura, regulile și parametrii relevanți din tipul de structură atribuit angajatului pentru a determina salariul total.
Tipuri de structuri
În Odoo, un tip de structură grupează structuri salariale conexe. Când un contract specifică un tip de structură, doar structurile din acel tip sunt utilizate pentru a calcula salariul angajatului. Fiecare tip de structură conține structuri individuale în cadrul său, fiecare conținând un set de reguli pentru procesarea unei intrări de pontaj.
Tipurile de structuri definesc aspecte cheie ale configurației statului de plată, inclusiv cât de des sunt plătiți angajații, orele lor de lucru, structura salarială implicită și dacă salariile sunt fixe (pe bază de salariu) sau variabile (pe bază de oră).
Example
Un tip de structură numit Angajat conține două structuri diferite în cadrul său: o structură Salariu obișnuit care include toate regulile separate pentru procesarea salariului obișnuit și o structură Bonus de sfârșit de an, care include regulile doar pentru bonusul de sfârșit de an. Ambele aparțin aceluiași tip de structură Angajat.
Vizualizați tipurile de structuri existente navigând la .
Două tipuri de structuri implicite sunt preconfigurate în Odoo: Angajat și Muncitor.
Typically, Employee is used for salaried employees, which is why the Wage Type is set to Fixed Wage. Worker is typically used for employees paid by the hour, so the wage type is set to Hourly Wage.
Notă
If using a country-specific payroll localization, it is recommended to use the structure in the corresponding country localization document.

Nou tip de structură
Dacă tipurile de structuri implicite nu corespund nevoilor companiei, accesați și faceți clic pe Nou pentru a crea un tip de structură personalizat.
Atenționare
Când creați un nou tip de structură salarială, asigurați-vă că toate legile locale și naționale sunt luate în considerare. Confirmați cu departamentul de contabilitate la configurarea structurilor statului de plată, pentru a vă asigura că toate cerințele sunt îndeplinite.
Continuați să introduceți următoarele informații în câmpuri:
Tip de structură: Introduceți numele pentru noul tip de structură, cum ar fi
AngajatsauMuncitor.Țară: Selectați țara căreia i se aplică noul tip de structură din meniul drop-down.
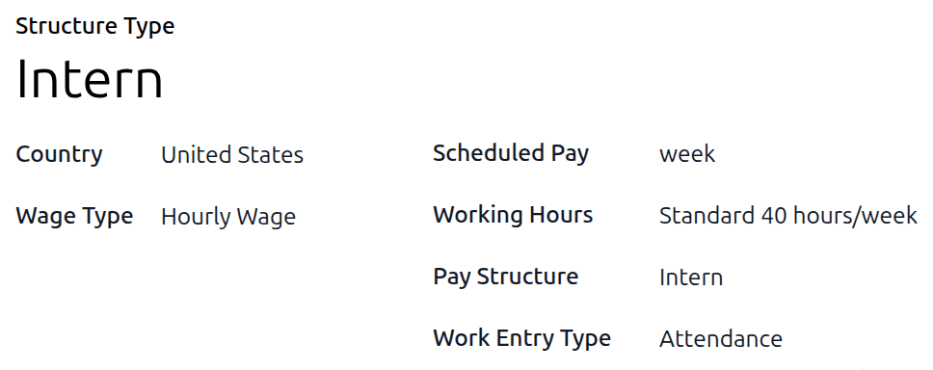
Tip de salariu: Selectați tipul de salariu pentru structură:
Salariu fix: Pentru angajații salariați care primesc același salariu în fiecare perioadă de plată.
Salariu pe oră: Pentru angajații plătiți pe baza orelor lucrate în timpul unei perioade de plată.
Scheduled Pay: Select the typical pay schedule for the new structure type using the drop-down menu. This indicates how often this specific type of structure is paid out.
Working Hours: Select the working hours for the new structure type using the drop-down menu. All available working hours for the currently selected company appear in the drop-down menu. The default working hours are the Standard 40 hours/week option. If the needed working hours do not appear in the list, a new set of working hours can be created.
Pay Structure: Select the pay structure that falls within the new structure type using the drop-down menu. This is used as the default option when generating payslips.
Work Entry Type: Select the work entry type used to create all work entries for the employee.
New working hours
To make new working hours, type the name for the new working hours in the Working Hours field on the new structure type form, then click Create and edit. A Create Working Hours pop-up window loads. The form has two sections: a general information section, and a Working Hours tab listing all the individual working hours by day and time. When the form is completed, click Save.
Name: Type in the name for the new working hours. This should be descriptive and clear to understand, such as
Standard 20 Hours/Week.Schedule Type: Select whether the hours are Flexible or Fully Fixed by clicking the corresponding radio button. Selecting Flexible hides the Working Hours tab and some other fields in the general information section.
Define Amount of Hours per day: Enable this option to base the schedule on a set amount of expected hours by day, instead of set start and end times for each day. When this option is modified, a Confirmation pop-up window appears. Click Confirm on the pop-up to make the change.
Full Time Equivalent: The number of hours per week an employee needs to work to be considered a full-time employee. Typically, this is approximately 40 hours, and this number affects what types of benefits an employee can receive, based on their employment status (full-time vs. part-time). This field is not able to be modified.
Work Time Rate: This percentage is auto-generated based on the configured times in the Working Hours tab, compared to the Full Time Equivalent. This number should be between
0.00%and100%, so if the percentage is above100%, it is an indication that the working times may need adjustment.Company: Select the company that can use the new default working hours using the drop-down menu. Leave this field blank if the hours are available for all companies.
Timezone: Select the time zone to be used for the new working hours using the drop-down menu.
2 Week’s Calendar: Enable this checkbox to switch from a one-week calendar to a two-week calendar. When this option is modified, a Confirmation pop-up window appears. Click Switch on the pop-up to make the change. When enabled, the presented tabs change from a single Working Hours tab to two tabs: Week 1 Working Hours and Week 2 Working Hours.
Important
Switching the calendar between either method removes all current work entries.
Working Hours tab: This tab is where each day’s specific working hours are listed, including breaks. When a new working schedule is created, the Working Hours tab is pre-populated with a default 40-hour week, with each day divided into three timed sections.
Each day includes a morning shift (8:00-12:00), a lunch break (12:00-13:00), and an afternoon shift (13:00-17:00), configured using a 24-hour time format.
The average daily working hours are automatically calculated based on the schedule and appear in the Avg field, along with the Total hours for the week.
To adjust any of these entries, click the desired field and modify the information using the drop-down menus or type the information in directly.
Ensure the Work Entry Type field is configured for each line. This ensures the Payroll app properly calculates all work entries.
Notă
Orele de lucru sunt specifice companiei și nu pot fi partajate între companii.
Sfat
If the 2 Week’s Calendar option is enabled, ensure the various working hours for both tabs (Week 1 Working Hours and Week 2 Working Hours) are correctly configured.

Structuri
Structurile de salarizare sunt diferitele situații în care un angajat ar putea fi plătit în cadrul unei structuri specifice și sunt definite în mod specific de diverse reguli.
Numărul de structuri de care are nevoie o companie pentru fiecare tip de structură depinde de câte modalități diferite există de plată a angajaților și de modul în care este calculată plata acestora. Un exemplu comun de structură suplimentară este Bonus.
Pentru a vizualiza toate diversele structuri pentru fiecare tip de structură, accesați .
Each structure type lists the various structures associated with it. Each structure contains a set of rules that define it.
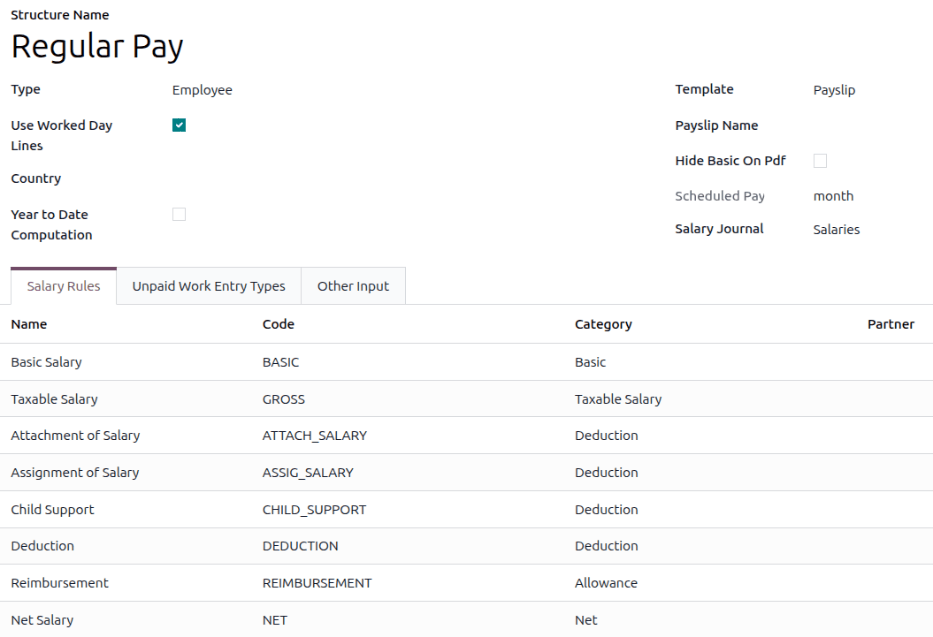
Odoo comes with two salary structures preconfigured: Regular Pay, housed within the Employee structure type, and Worker Pay, housed within the Worker salary structure type.
Faceți clic pe o structură pentru a vedea Salary Rules ale acesteia. Aceste reguli definesc modul în care va fi calculat fluturașul de salariu pentru angajat.
Notă
După instalarea unei localizări de stat de plată, structurile relevante sunt instalate și apar în această listă.
Salary input types
When creating payslips, it is sometimes necessary to add other entries for specific circumstances, like tips, commissions, expenses, or deductions. These other inputs can be found by navigating to . All universal and localization-specific salary input types appear in the list.

If a new input type is needed that does not appear on the list, click the New button to create a new salary input type. Enter the Description, the Code, and select which structure it applies to in the Availability in Structure field.
Enable the Available in adjustments checkbox if the input should be a salary adjustment.
Important
Codul este folosit în regulile de salarizare pentru a calcula fișele de salariu. Dacă câmpul Disponibilitate în structură este lăsat necompletat, indică faptul că noul tip de intrare este disponibil pentru toate fișele de plată și nu este exclusiv pentru o anumită structură.