
급여
In Odoo, salaries are calculated and determined by six factors: salary structure types, salary structures, rules, rule parameters, rule categories, and salary input types. Together, these determine how each employee’s pay is calculated.
Each structure type contains one or more structures within it. Each structure contains a set of rules, and every rule uses parameters and categories to define how specific amounts are calculated. Additional salary inputs, such as bonuses or deductions, can also be included to adjust the final salary.
급여명세서가 계산되면 Odoo는근무 항목에서 임직원의 근무 시간을 계산한 다음 임직원에게 할당된 구조 유형의 관련 구조, 규칙 및 매개변수를 적용하여 총 급여를 결정합니다.
구조 유형
Odoo에서 구조 유형*은 관련된 급여 구조를 그룹화합니다. 계약에서 구조 유형을 지정하면 해당 유형 내의 구조**만* 임직원의 급여를 계산하는 데 사용됩니다. 각 구조 유형은 개별 구조를 포함하며, 각 구조는 작업시간표 항목을 처리하기 위한 규칙 세트를 포함합니다.
구조 유형은 임직원에게 급여를 지급하는 빈도, 근무 시간, 기본 급여 구조, 임금이 고정(급여 기반)인지 변동(시간당 기반)인지 여부를 포함하여 급여 구성의 주요 측면을 정의합니다.
Example
Employee`라는 구조 유형에는 두 가지 구조가 포함됩니다: 정규 급여를 처리하는 모든 별도 규칙을 포함하는 `Regular Pay 구조와 연말 보너스**만**을 위한 규칙을 포함하는 End of Year Bonus 구조입니다. 둘 다 동일한 Employee 구조 유형에 속합니다.
로 이동하여 기존 *구조 유형*을 확인합니다.
Odoo에는 두 가지 기본 구조 유형이 사전 구성되어 있습니다:Employee및Worker.
Typically, Employee is used for salaried employees, which is why the Wage Type is set to Fixed Wage. Worker is typically used for employees paid by the hour, so the wage type is set to Hourly Wage.
참고
If using a country-specific payroll localization, it is recommended to use the structure in the corresponding country localization document.

새 구조 유형
기본 구조 유형이 회사의 요구 사항을 충족하지 못하는 경우로 이동하여New를 클릭하여 사용자 정의 구조 유형을 생성합니다.
경고
새 급여 구조 유형을 생성할 때 모든 지역 및 국가 법률이 고려되었는지 확인하세요. 급여 구조를 구성할 때 회계 부서에 확인하여 모든 요구 사항이 충족되는지 확인하세요.
다음 내용을 필드에 입력합니다:
Structure Type:
Employee또는 `Worker`와 같이 새 구조 유형의 이름을 입력합니다.Country: 드롭다운 메뉴에서 새 구조 유형이 적용되는 국가를 선택합니다.
임금 유형: 구조에 맞는 임금 유형을 선택합니다.
Fixed Wage: 매 급여 기간마다 동일한 임금을 받는 급여를 받는 임직원용입니다.
시급: 급여 기간 동안 근무한 시간을 기준으로 급여를 받는 임직원에게 적용됩니다.
Scheduled Pay: Select the typical pay schedule for the new structure type using the drop-down menu. This indicates how often this specific type of structure is paid out.
Working Hours: Select the working hours for the new structure type using the drop-down menu. All available working hours for the currently selected company appear in the drop-down menu. The default working hours are the Standard 40 hours/week option. If the needed working hours do not appear in the list, a new set of working hours can be created.
Pay Structure: Select the pay structure that falls within the new structure type using the drop-down menu. This is used as the default option when generating payslips.
Work Entry Type: Select the work entry type used to create all work entries for the employee.

New working hours
To make new working hours, type the name for the new working hours in the Working Hours field on the new structure type form, then click Create and edit. A Create Working Hours pop-up window loads. The form has two sections: a general information section, and a Working Hours tab listing all the individual working hours by day and time. When the form is completed, click Save.
Name: Type in the name for the new working hours. This should be descriptive and clear to understand, such as
Standard 20 Hours/Week.Schedule Type: Select whether the hours are Flexible or Fully Fixed by clicking the corresponding radio button. Selecting Flexible hides the Working Hours tab and some other fields in the general information section.
Define Amount of Hours per day: Enable this option to base the schedule on a set amount of expected hours by day, instead of set start and end times for each day. When this option is modified, a Confirmation pop-up window appears. Click Confirm on the pop-up to make the change.
Full Time Equivalent: The number of hours per week an employee needs to work to be considered a full-time employee. Typically, this is approximately 40 hours, and this number affects what types of benefits an employee can receive, based on their employment status (full-time vs. part-time). This field is not able to be modified.
Work Time Rate: This percentage is auto-generated based on the configured times in the Working Hours tab, compared to the Full Time Equivalent. This number should be between
0.00%and100%, so if the percentage is above100%, it is an indication that the working times may need adjustment.Company: Select the company that can use the new default working hours using the drop-down menu. Leave this field blank if the hours are available for all companies.
Timezone: Select the time zone to be used for the new working hours using the drop-down menu.
2 Week’s Calendar: Enable this checkbox to switch from a one-week calendar to a two-week calendar. When this option is modified, a Confirmation pop-up window appears. Click Switch on the pop-up to make the change. When enabled, the presented tabs change from a single Working Hours tab to two tabs: Week 1 Working Hours and Week 2 Working Hours.
중요
Switching the calendar between either method removes all current work entries.
Working Hours tab: This tab is where each day’s specific working hours are listed, including breaks. When a new working schedule is created, the Working Hours tab is pre-populated with a default 40-hour week, with each day divided into three timed sections.
Each day includes a morning shift (8:00-12:00), a lunch break (12:00-13:00), and an afternoon shift (13:00-17:00), configured using a 24-hour time format.
The average daily working hours are automatically calculated based on the schedule and appear in the Avg field, along with the Total hours for the week.
To adjust any of these entries, click the desired field and modify the information using the drop-down menus or type the information in directly.
Ensure the Work Entry Type field is configured for each line. This ensures the Payroll app properly calculates all work entries.
참고
근무 시간은 회사마다 다르며 회사 간에 공유할 수 없습니다.
팁
If the 2 Week’s Calendar option is enabled, ensure the various working hours for both tabs (Week 1 Working Hours and Week 2 Working Hours) are correctly configured.

구조
급여 구조*는 특정 *구조 내에서 임직원에게 급여를 지급할 수 있는 다양한 상황이며, 다양한 규칙에 의해 구체적으로 정의됩니다.
각 구조 유형에 대해 회사에 필요한 구조의 수는 임직원에게 급여를 지급하는 방법과 급여 계산 방법이 얼마나 다양한지에 따라 달라집니다. 추가 구조의 일반적인 예는 `보너스`입니다.
각 구조 유형의 다양한 구조를 모두 보려면로 이동합니다.
Each structure type lists the various structures associated with it. Each structure contains a set of rules that define it.
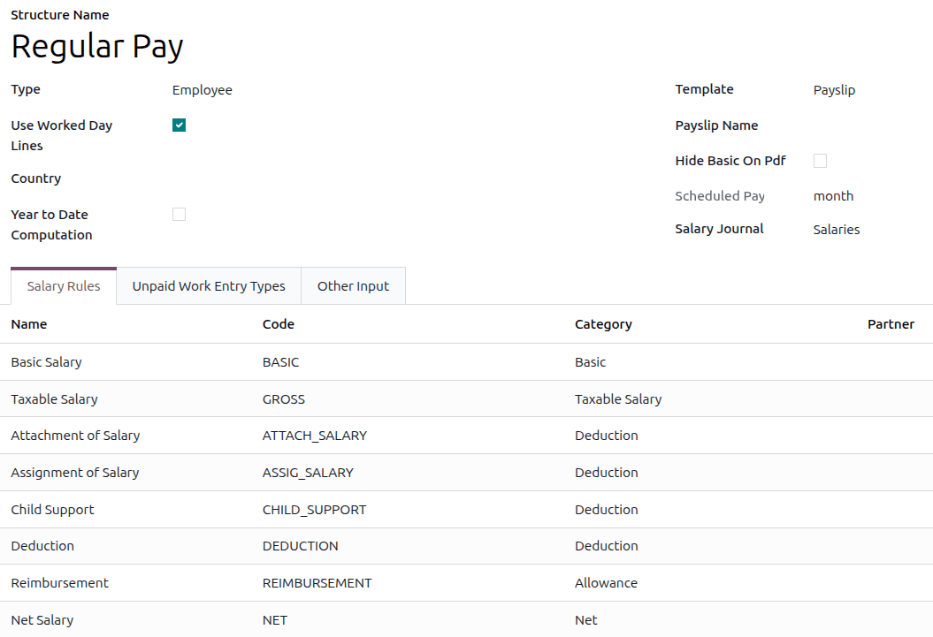
Odoo comes with two salary structures preconfigured: Regular Pay, housed within the Employee structure type, and Worker Pay, housed within the Worker salary structure type.
구조를 클릭하여 해당급여 규칙을 확인합니다. 이 규칙은 임직원의 급여 명세서가 계산되는 방식을 정의합니다.
참고
급여 현지화를 설치하면 관련 구조가 설치되어 이 목록에 표시됩니다.
Salary input types
When creating payslips, it is sometimes necessary to add other entries for specific circumstances, like tips, commissions, expenses, or deductions. These other inputs can be found by navigating to . All universal and localization-specific salary input types appear in the list.

If a new input type is needed that does not appear on the list, click the New button to create a new salary input type. Enter the Description, the Code, and select which structure it applies to in the Availability in Structure field.
Enable the Available in adjustments checkbox if the input should be a salary adjustment.
중요
코드 를 급여 규칙에 사용하여 급여명세서를 계산합니다. 구조 사용 가능 항목에 입력된 내용이 없다는 것은, 특정한 구조에만 국한되지 않고 모든 급여명세서에 새로운 입력 유형을 사용할 수 있다는 것을 나타냅니다.