Configureer uw VOIP Asterisk server voor Odoo
Asterisk server installeren
Afhankelijkheden
Voordat u Asterisk installeert moet u de volgende afhankelijkheden installeren:
wget
gcc
g++
ncurses-devel
libxml2-devel
sqlite-devel
libsrtp-devel
libuuid-devel
openssl-devel
pkg-config
Om libsrtp te installeren volgt u onderstaande instructies:
cd /usr/local/src/
wget http://srtp.sourceforge.net/srtp-1.4.2.tgz
tar zxvf srtp-1.4.2.tgz
cd /usr/local/src/srtp
./configure CFLAGS=-fPIC --prefix=/usr/local/lib
make && make install
Je zal ook PJSIP moeten installeren, je kan de broncode hier downloaden. Eenmaal de broncode directory uitgepakt is:
Wijzig naar de pjproject map:
# cd pjproject
run:
# ./configure --prefix=/usr --enable-shared --disable-sound --disable-resample --disable-video --disable-opencore-amr CFLAGS='-O2 -DNDEBUG'
Bouw en installeer pjproject:
# make dep
# make
# make install
Update gedeelde library links:
# ldconfig
Verifieer dat pjproject geïnstalleerd is:
# ldconfig -p | grep pj
Het resultaat zou moeten zijn:
libpjsua.so (libc6,x86-64) => /usr/lib/libpjsua.so
libpjsip.so (libc6,x86-64) => /usr/lib/libpjsip.so
libpjsip-ua.so (libc6,x86-64) => /usr/lib/libpjsip-ua.so
libpjsip-simple.so (libc6,x86-64) => /usr/lib/libpjsip-simple.so
libpjnath.so (libc6,x86-64) => /usr/lib/libpjnath.so
libpjmedia.so (libc6,x86-64) => /usr/lib/libpjmedia.so
libpjmedia-videodev.so (libc6,x86-64) => /usr/lib/libpjmedia-videodev.so
libpjmedia-codec.so (libc6,x86-64) => /usr/lib/libpjmedia-codec.so
libpjmedia-audiodev.so (libc6,x86-64) => /usr/lib/libpjmedia-audiodev.so
libpjlib-util.so (libc6,x86-64) => /usr/lib/libpjlib-util.so
libpj.so (libc6,x86-64) => /usr/lib/libpj.so
Asterisk
Om Asterisk 13.7.0 te installeren kan u de broncode direct downloaden van <http://downloads.asterisk.org/pub/telephony/asterisk/old-releases/asterisk-13.7.0.tar.gz>`_.
Extract Asterisk:
tar zxvf asterisk*
Geef de Asterisk map in:
cd ./asterisk*
Voer het Asterisk configuratie script uit:
./configure --with-pjproject --with-ssl --with-srtp
Voer de Asteriks menuselect tool uit:
make menuselect
In het selectieveld, ga naar de resources optie en verifieer dat res_srtp ingeschakeld is. Als er 3 x’s zijn naast res_srtp, dan is er een probleem met de srtp bibliotheek en moet je deze herinstalleren. Sla de configuratie op (druk op x). Je zou ook sterren moeten zien voor de res_pjsip lijnen.
Compileer en installeer Asterisk:
make && make install
Als je voorbeeld configuraties nodig heft kan je “maak voorbeelden” uitvoeren om voorbeeld configuraties te installeren. Als je het Asterisk opstart script moet installeren kan je dit ‘maak configuratie’ runnen.
DTLS certificaten
Hierna moet u de DTLS certificaten opzetten.
mkdir /etc/asterisk/keys
Geef de Asterisk scripts map in:
cd /asterisk*/contrib/scripts
Creëer de DTLS certificaten (vervang pbx.mycompany.com met jou ip adres of dns naam, vervang My Super Company met jou bedrijfsnaam):
./ast_tls_cert -C pbx.mycompany.com -O "My Super Company" -d /etc/asterisk/keys
Configureer Asterisk server
Voor WebRTC, zijn er vele instellingen nodig die MOETEN ingesteld worden in de peer settings. De algemene instellingen vloeien niet goed door naar de peer instellingen. Standaard, Asterisk configuratie bestanden zijn te vinden in /etc/asterisk/. Start door http.conf te editeren en verifieer dat volgende lijnen uit commentaar staan:
;http.conf
[general]
enabled=yes
bindaddr=127.0.0.1 ; Replace this with your IP address
bindport=8088 ; Replace this with the port you want to listen on
Next, edit sip.conf. The WebRTC peer requires encryption, avpf, and icesupport to be enabled. In most cases, directmedia should be disabled. Also under the WebRTC client, the transport needs to be listed as ‘ws’ to allow websocket connections. All of these config lines should be under the peer itself; setting these config lines globally might not work:
;sip.conf
[general]
realm=127.0.0.1 ; Replace this with your IP address
udpbindaddr=127.0.0.1 ; Replace this with your IP address
transport=udp

[1060] ; This will be WebRTC client
type=friend
username=1060 ; The Auth user for SIP.js
host=dynamic ; Allows any host to register
secret=password ; The SIP Password for SIP.js
encryption=yes ; Tell Asterisk to use encryption for this peer
avpf=yes ; Tell Asterisk to use AVPF for this peer
icesupport=yes ; Tell Asterisk to use ICE for this peer
context=default ; Tell Asterisk which context to use when this peer is dialing
directmedia=no ; Asterisk will relay media for this peer
transport=udp,ws ; Asterisk will allow this peer to register on UDP or WebSockets
force_avp=yes ; Force Asterisk to use avp. Introduced in Asterisk 11.11
dtlsenable=yes ; Tell Asterisk to enable DTLS for this peer
dtlsverify=no ; Tell Asterisk to not verify your DTLS certs
dtlscertfile=/etc/asterisk/keys/asterisk.pem ; Tell Asterisk where your DTLS cert file is
dtlsprivatekey=/etc/asterisk/keys/asterisk.pem ; Tell Asterisk where your DTLS private key is
dtlssetup=actpass ; Tell Asterisk to use actpass SDP parameter when setting up DTLS
In de sip.conf en rtp.conf bestanden moet u ook de volgende lijnen toevoegen of uit commentaar halen:
icesupport = true
stunaddr = stun.l.google.com:19302
Stel als laatste extensions.conf in:
;extensions.conf
[default]
exten => 1060,1,Dial(SIP/1060) ; Dialing 1060 will call the SIP client registered to 1060
Configureer Odoo VOIP
De configuratie moet in Odoo gedaan worden onder de gebruikersvoorkeuren.
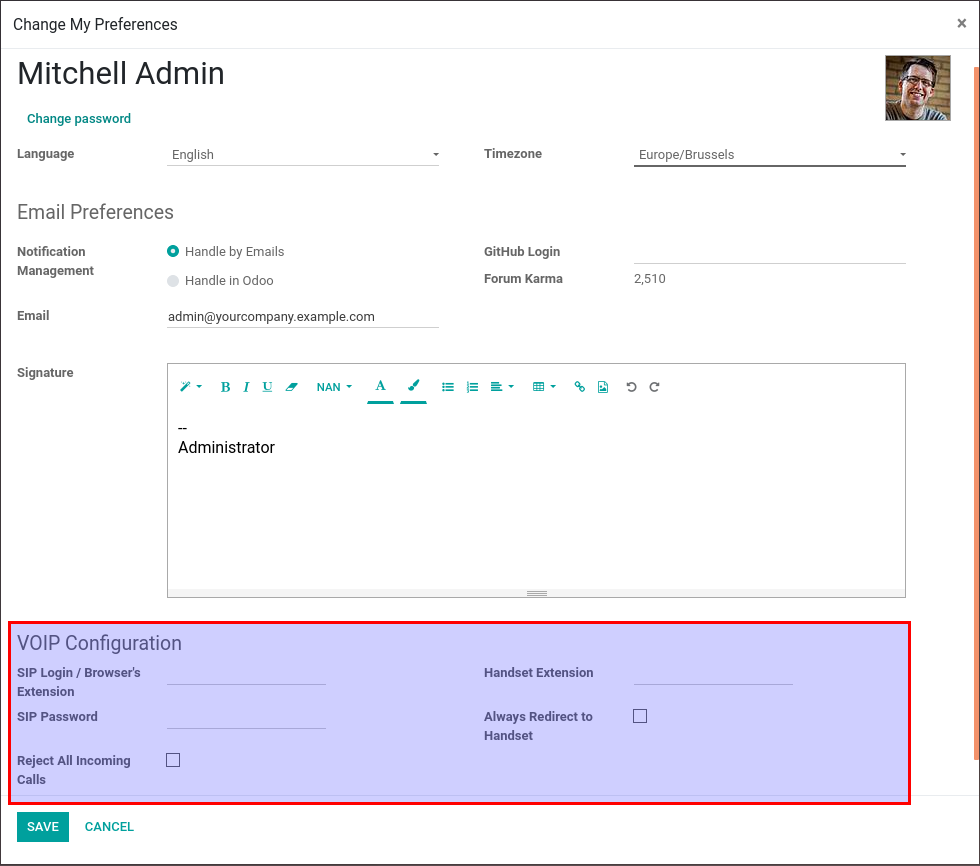
The SIP Login/Browser’s Extension is the number you configured previously in the sip.conf file (in our example: 1060).
The SIP Password is the secret you chose in the sip.conf file.
The extension of your office’s phone is not a required field but it is used if you want to transfer your call from Odoo to an external phone also configured in the sip.conf file.
The configuration should also be done in the General Settings under the “Integrations” section.
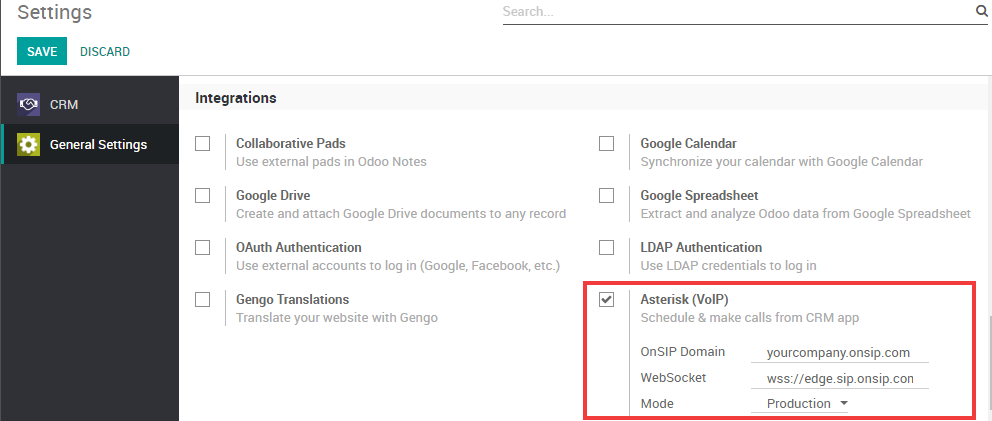
The PBX Server IP should be the same as the IP you define in the http.conf file.
The WebSocket should be: ws://localhost:XXXX/ws where “localhost” needs to be the same as the IP defined previously and “XXXX” needs to be the port defined in the http.conf file.