Track and bill time
Helpdesk provides teams with the ability to track the amount of hours spent working on a ticket, and to bill a customer for that time. Through integrations with the Sales, Timesheets, Project, and Accounting applications, customers can be charged once the work is completed, or before it has even begun.
Warning
Since the Track & Bill Time features require integration with other applications, enabling them may result in the installation of additional modules or applications.
Installing a new application on a One-App-Free database triggers a 15-day trial. At the end of the trial, if a paid subscription has not been added to the database, it will no longer be active or accessible.
Track and bill time features configuration
Before a customer can be invoiced for support services, the Track & Bill Time features must be enabled on each Helpdesk team individually.
Enable track and bill time on a team
To view and enable the Track & Bill Time features on a Helpdesk team, first navigate to . Then, select a team from the list, or create a new Helpdesk team. This reveals a team’s settings page.
On the team’s settings page, click Edit, then scroll to the Track & Bill Time section. Tick the boxes labeled Timesheets and Time Billing.
Once the Timesheets box is checked, a new field appears, labeled Project.
Note
If this is the first time this feature has been enabled on this database, the page may need to be manually saved and refreshed before the Project field appears.
The project selected in this field represents where all the timesheets for this team’s tickets are recorded. Click into the Project drop-down menu to select a project.
To create a new project where the timesheets are recorded, click into the Project drop-down menu, type a name for the project, and then click Create from the drop-down menu beneath.
Click Save at the top-left of the page to save any changes.

Configure service products
When the Time Billing feature is enabled, a new product is created in the Sales app
called, Service on Timesheet. This product can be found under . Then, search for Service on Timesheet in the Search… bar.
This is the product that is used when invoicing for post-paid support services after they have
been completed.
Select Service on Timesheet from the Products page. This reveals the product detail form. The product is configured with the Product Type set to Service, and the Invoicing Policy set to Based on Timesheets. Click Edit to make any necessary changes to the product record, such as the Cost or Sales Price, then click Save.

In order to invoice for support services before the work has been completed, also known as prepaid support services, a separate product with a different invoicing policy must be created.
To create a new service product, go to , and click Create. This reveals a blank product detail form.
On the new product form, add a Product Name.
Tip
Try to use a name that identifies the purpose of the product, for example, Prepaid Services.
This makes it easier when adding it to a sales order later.
Set the Product Type to Service. Then, set the Invoicing Policy to Prepaid/Fixed Price. This means an invoice can be generated and payment can be received for this product, before any timesheet entries have been recorded for these services.

Finally, set the Sales Price, and confirm that the Unit of Measure is set to Hours. Then, click Save to save those configurations.
Invoice prepaid support services
When support services are billed on a fixed price, an invoice can be created before any work is completed on the issue. In this case, a service product with the Invoicing Policy set to Prepaid/Fixed Price would be used, just like the one created in the Configure service products section.
Create prepaid product sales order
To invoice a customer for prepaid support services, first create a sales order (SO) with the support services product. To do this, go to . Then, click Create to reveal a blank quotation form.
Then, fill out the quotation form with the customer information.
Go to the Order Lines tab of the quotation, and click Add a Product. Then, select the prepaid services product configured in the steps above. Update the Quantity field with the number of hours.
After updating any other necessary information, Confirm the quotation. This converts the quotation into a SO.
Create/send invoice for prepaid services
Once the SO has been confirmed, click the Create Invoice button on the sales order form. This opens a Create invoices pop-up window.
If no down payment is collected, the Create Invoice type can remain as Regular invoice. If a down payment is collected, choose between either Down payment (percentage) or Down payment (fixed amount).
When the necessary information has been entered, click Create and View Invoice or Create Invoice.
Tip
Invoices are created in draft mode, so they can be reviewed and edited, if necessary.
The invoice can then be sent to the customer for payment.
Create helpdesk ticket for prepaid services
To create a Helpdesk ticket for prepaid services, navigate to , and click the Tickets button on the desired team’s card, to reveal that specific team’s pipeline. Click Create to create a new ticket.
On the blank ticket form, enter a ticket Title and the Customer information.
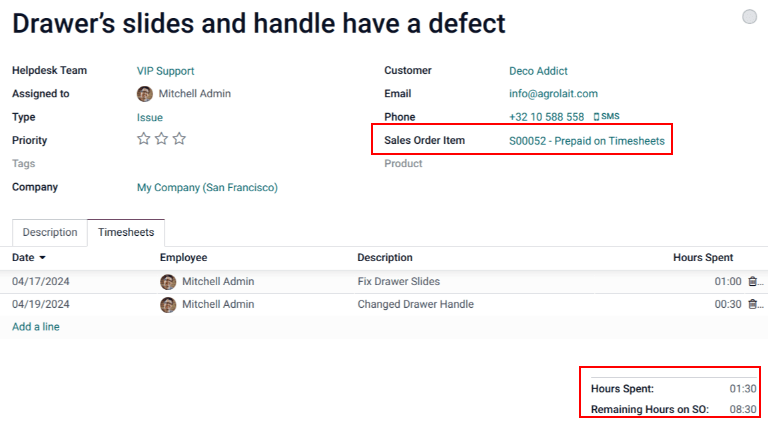
When the customer name is added, the Sales Order Item field automatically populates with the most recent prepaid sales order item that has time remaining.
If a customer has more than one sales order item with remaining time, click the Sales Order Item field, and select the correct item from the drop-down list.
After entering all of the necessary information, click Save.
Track hours on helpdesk ticket
Time spent working on a Helpdesk ticket is tracked on the Timesheets tab on the specific ticket.
On the ticket detail form, click on the Timesheets tab, and click Add a line. Choose an Employee, add a Description of the task, and enter the number of Hours Spent working on the task.
As new lines are added to Timesheets tab, the Remaining Hours on SO field, at the bottom-right of the tab, is automatically updated.
Note
If the number of hours on the Timesheets tab exceeds the number of hours sold, the Remaining Hours of SO turns red.
As hours are added to the Timesheets tab, they are automatically updated in the Delivered field on the SO, as well.
Invoice post-paid support services
When support services are billed based on the amount of time spent on an issue, an invoice cannot be created before the total number of hours required to solve the problem have been entered on a timesheet. In this case, a service product with the Invoicing Policy set to Based on Timesheets would be used, like the one created above.
Create time-tracked product sales order
To invoice a customer for post-paid support services, first create a sales order (SO) with the Service on Timesheet product. To do this, go to . Then, click Create to reveal a blank quotation form.
Fill out the quotation with the customer information.
On the Order Lines tab, click Add a Product. Select the Service on Timesheet product configured above. After updating any other necessary information, Confirm the quotation.
Important
Unlike with the prepaid service quotations, Odoo does not allow an invoice to be created at this time. That is because no services have been performed; in other words, nothing has been delivered, therefore, there is nothing to invoice.
Create a helpdesk ticket for time-tracked services
To record a Timesheet entry for time-tracked services, go to the , and select the appropriate team for which these services apply.
If there is already an existing ticket for this issue, select it from the Kanban view to open it. If there is no existing ticket for this customer issue, click Create to create a new ticket, and enter the necessary customer information on the blank ticket detail form.
After selecting or creating a ticket, go to the Sales Order Item drop-down menu. Select the SO created in the previous step.
Track support hours on a ticket
In order to create an invoice for a product based on timesheets, hours need to be tracked and recorded. At this point, the service is considered delivered. To record hours for this support service, click on the Timesheets tab of the ticket.
Click Add a Line to record a new entry. Select an Employee from the drop-down menu, and record the time spent in the Hours Spent column.
Repeat these steps, as needed, until all time spent on the issues has been recorded. Then, click Save.
Create invoice for hours tracked on a ticket
After the customer’s issue has been solved, and it is determined no new timesheet entries need to be made, an invoice can be created, and the customer can be billed.
To do this, return to the SO by clicking on the Sales Order smart button at the top of the ticket.
Before creating the invoice, confirm that the number in the Delivered column matches the total number of Hours Spent listed in the Timesheets tab on the ticket.
Then, click Create Invoice. This opens a Create invoices pop-up window.
If no down payment is collected, the Create Invoice type can remain as Regular invoice. If a down payment is collected, choose between either Down payment (percentage) or Down payment (fixed amount).
Important
Use the Timesheets Period field if this invoice should only include timesheets from a certain time period. If this field is left blank, all applicable timesheets that have not yet been invoiced will be included.
When the necessary information has been entered, click Create and View Invoice or Create Invoice. The invoice can then be sent to the customer for payment.