
아르헨티나
모듈
The following modules related to the Argentinian localization are available:
이름 |
기술적 명칭 |
설명 |
|---|---|---|
아르헨티나 - 회계 |
|
Default fiscal localization package, which represents the minimal configuration to operate in Argentina under the ARCA regulations and guidelines. |
아르헨티나 회계 보고서 |
|
VAT 장부 보고서 및 VAT 요약 보고서. |
아르헨티나 전자 청구서 |
|
Includes all technical and functional requirements to generate electronic invoices via web service, based on ARCA regulations. |
|
(optional) Allows the user to see Identification Type and ARCA Responsibility in the eCommerce checkout form to create electronic invoices. |
|
|
청구서 결제 중에 원천징수 등록을 할 수 있습니다. |
참고
현지화의 핵심 모듈은 현지화와 함께 자동으로 설치됩니다. 나머지는 수동으로설치할 수 있습니다.
현지화의 전반적인 흐름
The Argentinian localization package ensures compliance with Argentinian fiscal and accounting regulations. It includes tools for managing taxes, fiscal positions, reporting, and a predefined chart of accounts tailored to Argentina’s standards.
The Argentinian localization package provides the following key features to ensure compliance with local fiscal and accounting regulations:
Chart of accounts: a predefined structure tailored to Argentinian accounting standards
Taxes: pre-configured tax rates, including standard VAT, zero-rated, and exempt options
재정 위치 (세금 및 계정 매핑): 고객 또는 공급업체 등록 상태에 따라 자동으로 세금 조정
계정과목표
Three distinct chart of accounts packages are available when configuring the Argentinian fiscal localization. The choice of package depends on the company’s ARCA responsibility type and reflects the different levels of fiscal complexity required:
Monotributista (227 accounts): Generic chart of accounts Argentina single taxpayer / basis
Exento (290 accounts): Argentine generic chart of accounts for exempt individuals
Responsable Inscripto (298 accounts): Argentine generic chart of accounts for registered accountants.
세금
As part of the localization module, taxes are created automatically with their related financial account and configuration, e.g., 73 taxes for Responsable Inscripto.
Argentina has several tax types; the most common ones are:
VAT: Regular VAT with various percentages.
Perception: Advance payment of a tax that is applied to invoices.
Retention: Advance payment of a tax that is applied to payments.
Some Argentinian taxes are not commonly used for all companies, and are therefore labeled as inactive in Odoo by default. Before creating a new tax, check that the tax is not already included and labeled inactive.
문서 유형
In some Latin American countries, like Argentina, accounting transactions such as invoices and vendor bills are classified by document types defined by the governmental fiscal authorities. In Argentina, the ARCA is the governmental fiscal authority that defines such transactions.
The document type is an essential piece of information that must be clearly displayed in printed reports, invoices, and journal entries that list account moves.
Each document type can have a unique sequence per journal where it is assigned. As part of the localization, the document type includes the country where the document is applicable (this data is created automatically when the localization module is installed).
The required information about Document Types is included by default, so no further configuration is necessary in the Document Types view.
참고
The list displayed below is not exhaustive and does not include all available document types.

팁
Several Document Types are inactive by default, but can be activated as needed.
편지
아르헨티나의 경우 :guilabel:`문서 유형`에는 거래 또는 작업의 유형을 나타낼 수 있는 문자가 포함되어 있습니다. 예를 들어 a (n)와 관련된 청구서는:
B2B transaction, a document type A must be used.
B2C transaction, a document type B must be used.
문서 유형이 :guilabel:`수출 거래`인 경우라면, 반드시 문서 유형으로 :guilabel:`E`를 사용해야 합니다.
The documents included in the localization already have the correct letter associated with each Document Type, and no further configuration is necessary.
청구서에 사용하기
각 거래별 :guilabel:`문서 유형`은 다음에 따라 결정됩니다:
The journal entry related to the invoice (if the journal uses documents).
The conditions applied depend on the issuer and receiver types (e.g., the buyer’s and vendor’s fiscal regime types).
전표
In the Argentinian localization, the journal can have a different approach depending on its usage and internal type. To configure journals, go to .
For sales and purchase journals, the Use Documents option can be activated, enabling Document Types to be linked to invoices and vendor bills.
If the sales or purchase journals do not have the Use Documents option activated, they will not be able to generate fiscal invoices, limiting their use case mostly to monitoring account moves related to internal control processes.
ARCA information (ARCA Point of Sale)
The ARCA POS System is a field that defines the type of ARCA POS to be used to manage the transactions for which the journal is created.
The ARCA POS defines the following:
The sequences of document types related to the web service.
The structure and data of the electronic invoice file.
웹 서비스
Web services help generate invoices for different purposes. Below are a few options to choose from in the ARCA POS System field:
wsfev1: Electronic Invoice: The most common service, used to generate invoices for document types A, B, C, M, with no item detail.
wsbfev1: Electronic Fiscal Bond: For those who invoice capital goods and wish to benefit from the Electronic Tax Bonds granted by the Ministry of Economy.
wsfexv1: Export Voucher: Used to generate invoices for international customers and transactions involving export processes; the related document type is type E.
다음은 웹서비스 작업에 있어서 알아야 하는 유용한 필드입니다:
ARCA POS Number: The number configured in ARCA to identify the operations related to this ARCA POS.
ARCA POS Address: The field related to the commercial address registered for the POS, which is usually the same address as the company. For example, if a company has multiple stores (fiscal locations), then ARCA will require the company to have one ARCA POS per location. This location will appear on the invoice report.
In ARCA, when configuring the electronic invoicing data, the following should be configured:
Monotributista: Factura Electrónica – Monotributo - WebServices
Exento: Facturación Electrónica - exento en IVA - WebServices
Responsable Inscripto: RECE para aplicativo y WebServices
시퀀스
For the first invoice, Odoo automatically synchronizes with ARCA and displays the last sequence used.
참고
When creating Purchase Journals, specify if they are related to document types. When the Use Documents option is activated, there is no need to manually associate document type sequences, since the vendor provides the document number.
보고
As part of the localization installation, financial reporting for Argentina is available in the Accounting dashboard. To access these reports, navigate to , and select the relevant report in the Argentinean Statements section.
To access the VAT book report, go to , click Report:, and select VAT book (AR).
참고
Click the (cog) icon and select VAT Book (ZIP) or VAT Simple Report (ZIP) to generate the VAT Book or VAT Simple report ZIP file, respectively.
VAT 요약
This pivot table displays the monthly VAT totals. This report is for internal use and is not sent to the ARCA. To access it, go to .
IIBB - 관할 지역별 판매
This pivot table displays the gross income for each jurisdiction. It serves as an affidavit for the corresponding taxes due, but is not submitted to the ARCA. To access it, go to .
IIBB - 관할 지역별 매입
This pivot table displays the gross purchases for each jurisdiction. It serves as an affidavit for the corresponding taxes due, but is not submitted to the ARCA. To access it, go to .
회사
Once the localization modules are installed, the first step is to set up the company’s record. In addition to the basic information, make sure to complete the Argentina-specific field, ARCA Responsibility Type, to define the company’s fiscal obligation and structure.
연락처
식별 유형 및 VAT
As part of the Argentinian localization, identification types defined by ARCA are available in the contact form. Information is essential for most transactions. Seven Identification Types are available by default, as well as 32 inactive types.
참고
The complete list of Identification Types defined by ARCA is included in Odoo, but only the common ones are active.
ARCA responsibility type
In Argentina, the document type and corresponding transactions associated with customers and vendors are defined by the ARCA Responsibility Type. This field should be defined in the contact form.
전자 청구서
환경설정
환경
The ARCA infrastructure is replicated across two separate environments, testing and production.
Testing is provided so companies can test their databases until they are ready to move to the production environment. As these two environments are completely isolated from each other, the digital certificates issued in one instance are not valid in the other.
To select a database environment, go to , scroll down to the Argentinean Localization section, and choose either Testing (Prueba) or Production (Produccion).
ARCA certificates
The electronic invoice and other ARCA services use the Web Services (WS) provided by ARCA.
To enable communication with ARCA, follow these steps to request a Digital Certificate if you do not already have one:
Go to and scroll down to the Argentinean Localization section.
Generate renewal request: In the ARCA Web Services section, click Generate Renewal Request to generate a
.csr(certificate signing request) file to use in the ARCA portal to request the certificate.Obtain certificate (ARCA): Access the ARCA portal and follow the instructions described in this document to get a certificate.
Upload certificate and add private key (Odoo): To upload the certificate into Odoo, click the (Internal link) icon next to the Certificate field and select the corresponding file. Then add the existing private key that was created after clicking Generate Renewal Request.
팁
When a created certificate expires, click Generate Renewal Request to generate a new certificate.
If you need to configure the Homologation Certificate, refer to the official ARCA documentation. It is possible to test electronic invoicing locally without a Homologation Certificate; the following message appears in the chatter when testing locally:

회계
청구서
The information below applies to invoice creation once the contacts and journals are created and properly configured.
참고
To handle invoice adjustments or corrections, credit notes and debit notes can also be created.
문서 유형 할당
When the partner is selected, the Document Type field will be filled in automatically based on the ARCA document type:
Invoice for a customer IVA Responsable Inscripto, prefix A is the type of document that shows all the taxes in detail, along with the customer’s information.

Invoice for an end customer, prefix B is the type of document that does not detail taxes, since the taxes are included in the total amount.

수출용 청구서, 접두사 E 는 품목 수출 시 인코텀즈을 표시하는데 사용되는 문서 유형입니다.

청구서에서 같은 전표를 사용하더라도 접두사와 순서는 문서 유형 필드에 따라 지정됩니다.
The most common Document Type will be automatically defined for different combinations of ARCA responsibility type, but it can be updated manually before confirming the invoice.
전자 청구서 요소
When using electronic invoices, if all information is correct, the invoice is posted in the standard way unless an error needs to be addressed. Error messages indicate both the issue that needs attention and a proposed solution. If an error persists, the invoice remains in draft until the issue is resolved.
Once the invoice is posted, the information related to ARCA appears on the invoice, and the Result field indicates if the invoice has been Aceptado en ARCA or Aceptado con Observaciones.
In the ARCA tab, the following authorization information is displayed:
ARCA authorization: CAE number
Authorization Due date: deadline to deliver the invoice to the customers (normally 10 days after the CAE is generated)

청구서 세금
Based on the ARCA Responsibility Type, the VAT tax can apply differently on the PDF report:
Tax excluded: In this case the taxed amount must be clearly identified in the report. This condition applies when the customer’s ARCA Responsibility type is Responsable Inscripto.
Tax amount included: This means that the taxed amount is included as part of the product price, subtotal, and totals. This condition applies when the customer has the following ARCA Responsibility type:
IVA Sujeto Exento
Consumidor Final
Responsable Monotributo
IVA liberado
특수한 사례
서비스에 대한 청구서
For electronic invoices that include Services, ARCA requires reporting the service start and end dates. To do so, fill in the Service Date field in the Other Info tab.
참고
If the dates are not selected manually before the invoice is validated, the values will be automatically set to the first and last days of the invoice’s month.
수출용 청구서
Invoices related to Exportation Transactions require a journal using ARCA POS System Export Voucher - Web Service to ensure the correct document types are associated.
When the customer selected in the invoice is configured with an ARCA responsibility type Cliente / Proveedor del Exterior - Ley N° 19.640, Odoo automatically assigns the:
Journal: related to the exportation Web Service
Exportation Document Type
Exempt Taxes
In the Other Info tab:
Invoice section - ARCA Concept: Products / Definitive export of goods
Accounting section - Fiscal position: Compras/Ventas al exterior
참고
For exportation documents, complete the Incoterm field in the Accounting section of the Other Info tab.
재정 채권
The Electronic Fiscal Bond is used by those who invoice capital goods and wish to benefit from the Electronic Tax Bonds granted by the Ministry of Economy.
이러한 거래는 다음과 같은 요구 사항을 고려해야 합니다:
Currency (according to the parameter table) and invoice quotation
세금
Zone
Detail each item
Code according to the Common Nomenclator of Mercosur (NCM)
Complete description
Unit Net Price
Quantity
Unit of measurement
Bonus
VAT rate
전자 신용 청구서 MiPyme (FCE)
For SME invoices, several document types are classified as MiPyME, also known as Electronic Credit Invoice (FCE in Spanish). This classification develops a mechanism that improves financing conditions for small and medium-sized businesses and allows them to increase productivity by collecting early on credits and receivables issued to their clients and/or vendors.
이러한 거래는 다음과 같은 요구 사항을 고려해야 합니다:
Specific document types (201, 202, 206, etc).
The emitter should be eligible for MiPyME transactions via ARCA.
The amount should be larger than 100,000 ARS.
A bank account type CBU must be associated with the emitter; otherwise, the invoice cannot be validated, with an error message such as the following:

To set up the Transmission Mode, go to and scroll down to the Argentinean Localization section. Then, in the Default MiPyME FCE Transmission Option section, select either:
SCA - TRANSFERENCIA AL SISTEMA DE CIRCULACION ABIERTA
ADC - AGENTE DE DEPOSITO COLECTIVO
참고
To change the transmission mode, access the related invoice form and, in the Other Info tab, update the FCE: Transmission Mode field in the Invoice section before confirming the invoice.
Changing the Transmission Mode on a specific invoice does not change the transmission mode selected in Settings.
When creating a Credit/Debit note related to an FCE document:
Use the Credit Note and Debit Note buttons in the related invoice form to transfer all information from the invoice to the new credit or debit note.
The document letter should match the originator document (either A or B).
The same currency as the source document must be used. When using a secondary currency, there is an exchange difference if the currency rate differs between the emission date and the payment date. Create a credit/debit note to decrease/increase the amount to pay in ARS.
When creating a credit note, there are two scenarios:
The FCE is rejected; then, the credit note should have the FCE: is Cancellation? option enabled, or
The credit note is created to annul the FCE document; then, the FCE: is Cancellation? option must be disabled.
청구서 인쇄 보고서
The PDF Report for electronic invoices validated by ARCA includes a QR code at the bottom of the page, which represents the CAE number. The expiration date is also displayed, as it is a legal requirement.

문제 해결 및 감사
For auditing and troubleshooting purposes, detailed information can be obtained for an invoice number previously sent to ARCA. To retrieve this information, follow these steps:
:ref:`개발자 모드 <developer-mode>`를 사용하도록 설정합니다.
Go to .
In the Consult invoice in ARCA window, select the relevant Journal, Document Type, and Number. Then, click Get Invoice Detail.

팁
To retrieve the last number used in ARCA for a specific Document Type and POS Number and use this reference for any potential issues with the sequence synchronization between Odoo and ARCA, select Get Last Invoice as the Type.
공급업체 청구서
Based on the selected purchase journal for the vendor bill, the Document Type field is now required. This value is auto-populated based on the ARCA Responsibility Type of Issuer and Customer, but it can be changed if necessary.
The Document Number field must be entered manually, and the format will be validated automatically. However, if the format is invalid, an error message indicates the expected format.
The vendor bill number is structured the same way as customer invoices, except that the document
sequence is entered by the user in the following format: Document Prefix - Letter - Document
Number.
Validate vendor bill number in ARCA
As most companies have internal controls to verify that the vendor bill is related to a valid ARCA document, an automatic validation can be set.
To do so, go to , scroll down to the Argentinean Localization section, then set one of the following options under Verify Vendor Bills validity in ARCA:
Not available: No verification is performed (this is the default value).
Available: Verification is performed. If the number is invalid, a warning is displayed but the vendor bill can still be posted.
Required: Verification is performed. The vendor bill can only be posted if the number is valid.
Odoo에서 업체 청구서 확인
Once the vendor bill validation settings are enabled, click Verify on ARCA in the Authorization code field.
If the vendor bill cannot be validated in ARCA, the status is updated to Rejected in the Authorization code field, and the details are recorded in the chatter.
특수한 사례
비과세 개념
Some transactions include items that are not part of the VAT base amount, such as fuel and gasoline invoices.
The vendor bill will be recorded using one item for each product that is part of the VAT base amount, and an additional item to register the amount of the exempt concept.

인지세
The vendor bill will be recorded using one item for each product that is part of the VAT base amount, and the perception tax can be added to any of the product lines. As a result, there will be one tax group for the VAT and another for the perception. The perception default value is always 0.10.
To edit the VAT perception and set the correct amount, you should use the Pencil icon next to the Perception amount. After the VAT perception amount has been set, the invoice can be validated.
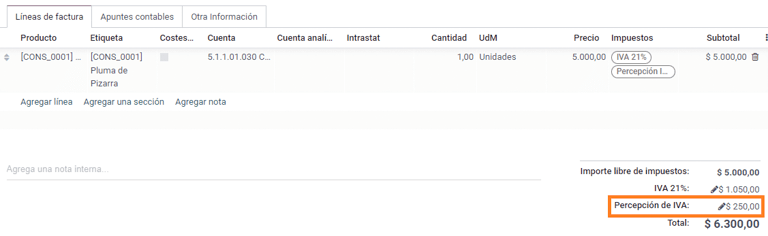
원천징수 관리
참고
Make sure the Argentina Payment Withholdings (l10n_ar_withholding) module is
installed.
The Argentinian fiscal localization module contains the necessary withholding records, which can be seen by navigating to and removing the default Sale or Purchase filter.
결제 내용이 게시될 때 미납 계정 이 설정되어 있지 않으면 전표가 생성되지 않습니다. 따라서 이 기능이 정상적으로 작동하려면 은행 전표의 모든 결제 수단에 미납 출금 및 입금 계정이 설정되어 있는지 반드시 확인하세요.

이 설정은 고객 및 공급업체와의 원천징수 거래를 적절히 회계 처리하는 데 매우 중요합니다.
참고
아르헨티나에서 원천징수는 공급업체에 지불할 총 부채 중 특정한 일부를 취소하거나 고객에게서 지급받을 총 대금을 감소시키는 것을 의미합니다. 따라서 청구서에 적용되어 있는 각 결제 항목에 대해 원천징수를 하나 또는 여러 건으로 기록할 수 있습니다.
환경설정
While Odoo already creates most of the required withholdings inside the Taxes menu, in several cases it is necessary to apply or modify configurations to correctly calculate the withholding amount on vendor payments. The following withholding types are available:
수입
For Earnings withholdings, Odoo already has a record for each regime group, which is listed under the tax name and the ARCA code.
Each of these records is ready to be used. As a best practice, the configuration should be double-checked to make sure it is updated and well-applied. The fields to validate are:
금액: 총 결제 금액 중 원천징수되는 금액의 비율입니다.
비과세 금액: 해당 금액 이하인 경우 원천징수가 적용되지 않습니다.
최소 원천징수: 계산된 원천징수 금액이 이 값보다 작으면 총 원천징수 금액이 `0.0`으로 설정됩니다.
Withholding Sequence: This field automates the capture of a withholding number under the payment line. If this field is not set, a number is manually captured while adding a withholding to a payment.

소득 규모
이 특정 경우에는 백분율을 설정할 필요가 없습니다. 대신 이 원천징수는규모필드의 값을 기반으로 계산됩니다.
To view, modify, or create new scales, navigate to . By default, the Argentinian localization is preconfigured with two main scales. However, scales should be created and updated as necessary to suit a business’s needs.
참고
Earnings scales are cumulative, which means that Odoo keeps track of the different records created for a bill and automatically calculates the correct withholding amount.
IIBB 총액
In this case, the necessary records related to the applicable province must be created. The withholding amount is calculated based on the percentage Amount set on the tax configuration. Since Odoo does not automatically synchronize the percentages applicable to each province, this information must be manually updated.
The recommendation, in this case, is to always duplicate and apply the different configurations to each record to safeguard technical configurations that allow the proper calculation and accounting of the withholding.
IIBB 비과세
The configuration of non-taxable gross income withholdings is very similar to that of a total amount withholding, so the percentage Amount in each record must be maintained. However, Odoo comes preconfigured with several records that apply to different provinces. The difference, in this case, is that it is not necessary to establish a non-taxable amount or minimum withholding for this record type.
파트너 원천징수 지정
Once the proper configuration is set on each possible withholding for partners, the applicable withholdings must be assigned to each contact. To do this, open the Contacts app and select the desired partner. In the Accounting tab, find the Purchase Withholdings table.
추가 필드인 다음 날짜부터 및 다음 날짜까지 를 사용하면 다양한 날짜 범위에 원천징수를 자동으로 적용할 수 있습니다. ref 필드를 활용하면 내부 통제 번호를 각 원천징수 행에 적용할 수 있으며, 이 항목은 내부 참조용으로만 사용되므로 거래에 영향을 미치지 않으며 거래에서 표시가 되지 않습니다. 이 필드는 (설정 조정) 메뉴에서 액세스할 수 있습니다.
From Date: The start of the withholding date range.
To Date: The end of the withholding date range.
ref: Apply an internal control number to each withholding line that is only visible for internal reference and does not affect any transactions.
개별 결제 건당 자동 원천징수 계산 및 적용
공급업체 청구서에 새 지급을 적용하면 Odoo는 자동으로 적절한 원천징수를 지급에 적용하고 계산합니다. 레코드 구성에 따라 각 원천징수 라인에 참조 번호를 사용해야 할 수 있습니다.
필요한 경우 원천징수를 더 추가하거나 계산된 원천징수를 수정할 수 있습니다.

중요
The amount of the debt to be cancelled equals the total payment amount. However, Odoo still captures the net amount (i.e., the amount to be reconciled with the bank), which will be represented as the payment amount after the withholding application.

수표 관리
참고
Make sure to install the Third Party and Deferred/Electronic
Checks Management (l10n_latam_check) module.
이 모듈로 전표 및 결제에 필수적인 환경 설정 메뉴를 활성화할 수 있습니다:
Create, manage, and control your different types of checks.
Optimize the management of own checks and third-party checks.
Have an easy and effective way to manage expiration dates for your own and third-party checks.
Once all the configurations are set for the Argentinian electronic invoice flow, it is also needed to complete certain configurations for the own checks and third-party checks flows.
자기앞수표
로 이동하여 은행 전표를 선택한 다음 지급 결제 탭을 열어 자기앞수표를 발행할 때 사용할 은행 전표를 설정합니다.
Checks should be available as a Payment Method. If not, click Add a line and type
Checksunder Payment Method to add them.:guilabel:`전자 및 선일자 수표 사용`을 할 수 있게 설정합니다.
참고
This last configuration disables the printing ability but:
allows check numbers to be entered manually
adds a field to indicate the payment date of the check
자기앞수표 관리
Own checks can be created directly from the vendor bill. For this process, click Register Payment.
In the Pay window, select the bank journal from which the payment is to be made and set the Check Cash-In Date and Amount.
참고
현재의 수표를 관리하려면 수표 입금일 필드를 비워두거나 현재 날짜를 입력해야 합니다. 선일자수표를 관리하려면 :guilabel:`수표 입금일`를 향후의 날짜로 설정해야 합니다.
To manage your existing own checks, navigate to . This window displays critical information, including the dates checks must be paid, the total number of checks, and the total amount paid in checks.
이 목록에는 아직 은행 명세서와 아직 조정되지 않은 수표 (아직 은행에서 인출되지 않은 수표) 필터가 미리 적용되어 있다는 점에 유의하시기 바랍니다. 이는 은행 명세서와 일치함`으로 확인할 수 있습니다. 자신앞수표를 모두 확인하려면 :guilabel:`X 기호를 클릭하여 은행과 일치하지 않음 필터를 삭제합니다.
자기앞수표 취소
To cancel an own check created in Odoo, navigate to and select the check to be cancelled, then click Void Check. This breaks the reconciliation between vendor bills and bank statements, leaving the check marked as Cancelled.
Third-party checks
To register payments with third-party checks, two specific journals must be configured. To do so, navigate to and create two new journals:
Third-Party ChecksRejected Third-Party Checks
참고
You can manually create additional journals if you have multiple points of sale and need journals for those.
To create the Third-Party Checks journal, click New and configure the following:
Type
Third-Party Checksas the Journal Name.Select Cash as Type.
In the Journal Entries tab, set Cash Account: to
1.1.1.02.010 Cheques de
Terceros
, input a Short Code of your choice, and select a Currency.
The available payment methods are listed in the Payments tab:
For new incoming third-party checks, click Add a line in the Incoming Payments tab and select New Third Party Checks. This method is used to create new third-party checks.
For incoming and outgoing existing third-party checks, click Add a line in the Incoming Payments tab and select Existing Third Party Checks. Repeat the same step for the Outgoing Payments tab. This method is used to receive and/or pay vendor bills using already existing checks, as well as for internal transfers.
팁
You can delete pre-existing payment methods that appear by default when configuring third-party check journals.
The Rejected Third-Party Checks journal must also be created and/or configured. This journal is used to manage rejected third-party checks and can be used to send checks rejected at the time of collection or upon receipt from vendors.
To create the Rejected Third-Party Checks journal, click New and configure the following:
In the Journal Entries tab, set Cash Account: to
1.1.1.01.002 Rejected
Third Party Checks
, input a Short Code of your choice, and select a Currency.
Use the same payment methods as the Third-Party Checks journal.
New third-party checks
To register a new third-party check for a customer invoice, click Register Payment. In the pop-up window, select Third-Party Checks as the journal for the payment registration.
Select New Third Party Checks as Payment Method, and fill in the Check Number, Payment Date, and Check Bank. Optionally, you can manually add the Check Issuer Vat, but this field is automatically filled with the customer’s VAT number as it appears on the invoice.
Existing third-party checks
To pay a vendor bill with an existing check, click Register Payment. In the pop-up window, select Third Party Checks as the journal for the payment registration.
기존 외부 수표 를 결제 수단 으로 선택한 후, 수표 필드에서 수표를 선택합니다. 이 필드에는 공급업체 청구서를 결제를 할 때 선택할 수 있는 기존 수표 가 모두 표시됩니다.
When an existing third-party check is used, you can review the operations related to it. For example, you can see if a third-party check made to pay a customer invoice was later used as an existing third-party check to pay a vendor bill.
To do so, either go to or , depending on the case, and click on a check. In the Check Current Journal field, click on => Check Operations to bring up the check’s history and movements.
메뉴에는 다음과 같이 작업과 관련된 중요한 정보도 표시됩니다:
유동성 품목 직접 판매
유동성 품목 직접 판매는 판매에 제3자가 관련된 경우에 사용됩니다. 이러한 판매의 경우 판매자 및 품목 소유 회사는 각각 해당 판매 및 매입 등록을 할 수 있습니다.
참고
Install the Argentinean Electronic Invoicing module
(l10n_ar_edi) to use this feature.
환경설정
매입 전표
A purchase journal is needed to generate an electronic vendor bill with a document type Liquidity Product. This journal must be synchronized with ARCA, as it will be used to generate the electronic document for the liquidity product.
To modify the existing purchase journal or create a new one, navigate to . Then, select the existing purchase journal or click New, and fill in the following required information:
Type: Select Purchase.
Use Documents: Check this field to select the electronic document type.
Is ARCA POS?: Check this field to generate electronic documents. Three additional fields appear:
ARCA POS System: Select Electronic Invoice - Web Service from the drop-down menu to send the electronic document to ARCA via web service.
ARCA POS Number: The number configured in ARCA to identify the operations related to this ARCA POS.
ARCA POS Address: The field related to the commercial address registered for the POS, which is usually the same address as the company. For example, if a company has multiple stores (fiscal locations) then ARCA will require the company to have one ARCA POS per location. This location will be printed in the invoice report.
판매 전표
A sales journal is needed to record the invoice when a product is sold to a third party that will then sell the same product. This journal will not be synced with ARCA as the invoice will not be electronic.
To modify the existing sales journal or create a new one, navigate to . Then, access the sales journal or click New, and fill in the following required information:
유형: 판매 를 선택합니다.
Use Documents: check this field on the journal to select the electronic document type (in this case, the electronic invoice).
청구서 발행 흐름
Once all configurations are set, the Liquidity Product Vendor Bill will be generated by the company selling the product on behalf of another party. For example, a distributor of a specific product.
이커머스 전자 청구서 발행
Install the Argentinean eCommerce (l10n_ar_website_sale)
module to enable the following features and configurations:
Allow clients to create online accounts for eCommerce purposes.
이커머스 애플리케이션에서 필수 회계 항목을 지원합니다.
온라인으로 판매 주문에 대한 대금을 받습니다.
이커머스 애플리케이션에서 전자 문서를 생성합니다.
환경설정
Once all configurations for the Argentinian electronic invoice flow are complete, additional configurations must be completed to integrate the eCommerce flow.
고객 계정 등록
고객 계정에 대한 웹사이트를 구성하려면결제문서의 지침을 따르십시오.
자동 청구서
To generate electronic documents in the sales process, go to and enable the Automatic Invoice option in the Invoicing section to automatically generate the required electronic documents when the online payment is confirmed.
참고
Since an online payment must be confirmed for the Automatic Invoice feature to generate the document, a payment provider must be configured for the related website.
품목
온라인 결제 확정 후에 품목 관련 청구서가 발행되게 하려면 탭에서 :guilabel:`청구서 발행 정책`을 :guilabel:`주문 수량`으로 설정하고 :guilabel:`고객 세금`을 지정합니다.
이커머스용 청구서 발행 흐름
Once all configurations mentioned above are set, clients can complete the following required steps in the Argentinian eCommerce flow to enter fiscal fields during checkout.
Fiscal fields are available for input during checkout once the Country field is set to
Argentina. Entering the fiscal data enables the purchase to be recorded in the corresponding
electronic document.

When the client makes a successful purchase and payment, the necessary invoice is generated with the corresponding layout and fiscal stamps stated in the Invoice printed report.
더 보기: