
Planning
Odoo Planning allows you to plan your team’s schedule and manage shifts and resources.
Handling your team’s planning comes with specific requirements that may vary widely depending on your business needs. The following concepts were introduced in Odoo Planning to meet those needs:
Shifts are dispatched to resources, which can be either human (employees) or material (e.g., equipment). The resources are assigned roles, which allows for organization of work within the team.
Once the initial configuration is done, planning shifts can be done manually or automated by using the Auto Plan feature.
An integration between the Planning and Sales apps allows the linking of sold services to roles and shifts in Planning. Additionally, integration with Project allows dedicating shifts, and thus time and resources, to specific projects.
See also
Configuration
Roles
To define the roles your resources perform (e.g., chef, bartender, waiter), go to , then click New, and fill in the Name (e.g., assistant, receptionist, manager). Then, choose the Resources that will perform this role. Resources can be either Employees or Materials.
Note
If the Sales app is installed in your database, the Services field appears, allowing you to specify which roles are needed to perform services so that the shifts are dispatched to the right person.
Roles are taken into account when using the Auto Plan feature.
Property fields and roles
Property fields allow you to add custom fields to forms across several Odoo applications. Planning includes the possibility of adding property fields linked to roles to shifts.
To create a property field, switch to the list view from any schedule. From there, click View on the shift that you wish to edit. If the Role field is empty, fill it in with the desired role, then click the cog icon and select Add Properties. Configure the new field according to your needs.
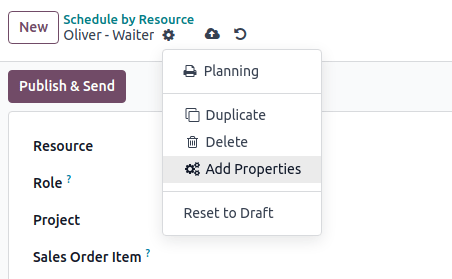
The property field is linked to the role and is included in the shift form of all shifts performed by this role.
Example
Some of the use cases of role property fields include:
Accreditation: for roles that require a specific permit (e.g., driving license)
Location: in companies that operate in multiple locations (e.g., shops or restaurants)
Language: in a multi-lingual environment (e.g., consulting company)
Employees
All employees can be included in the planning and assigned shifts.
To adapt the employee’s planning settings, go to , and choose the employee for whom you want to edit the settings. Then, go to the Work Information tab.
Tip
You can do the same from the Employees app, which is installed by default along with Planning.
Two sections of the employee’s Work Information tab have an impact on Planning: Schedule (namely, the Working Hours field) and Planning.
Working hours
The Working Hours are taken into account when the Allocated Time and its percentage is calculated for shifts. If the Working Hours field is left blank, the employee is considered to be working flexible hours.
To create individual Working Hours, for example, for employees working part-time, click Search more…, then New.
Note
The Working Hours and the Allocated Time in Planning can impact Payroll, if the employee’s contract is configured to generate work entries based on shifts.
See also
Planning roles
Once an employee has one or more Roles:
When creating a shift for this employee, only the shift templates from the roles chosen in this field are displayed.
When a schedule is published, the employee is only notified of open shifts for the roles that are assigned to them.
When auto-assigning open shifts or planning sales orders, the employee is only assigned shifts for the roles assigned to them.
Additionally, when a Default role is defined:
When creating a shift for the employee, the default role is automatically selected.
This role also has precedence over the other roles of the employee when auto-assigning open shifts or planning sales orders.
Note
If the Planning roles fields are left empty, there are no restrictions in the shift templates and open shifts shared with the employee. However, it’s not possible to use the Auto Plan feature for employees with no roles.
Materials
Materials are resources that can be assigned shifts and working hours but are not employees. For example, a construction company could use materials to create shifts for shared machines (e.g., cranes, forklifts).
Similarly to employees, materials can be assigned roles and working time.
Shift templates
To create a shift template, click New on any schedule, then fill in the details of the shift, and click Save Template.
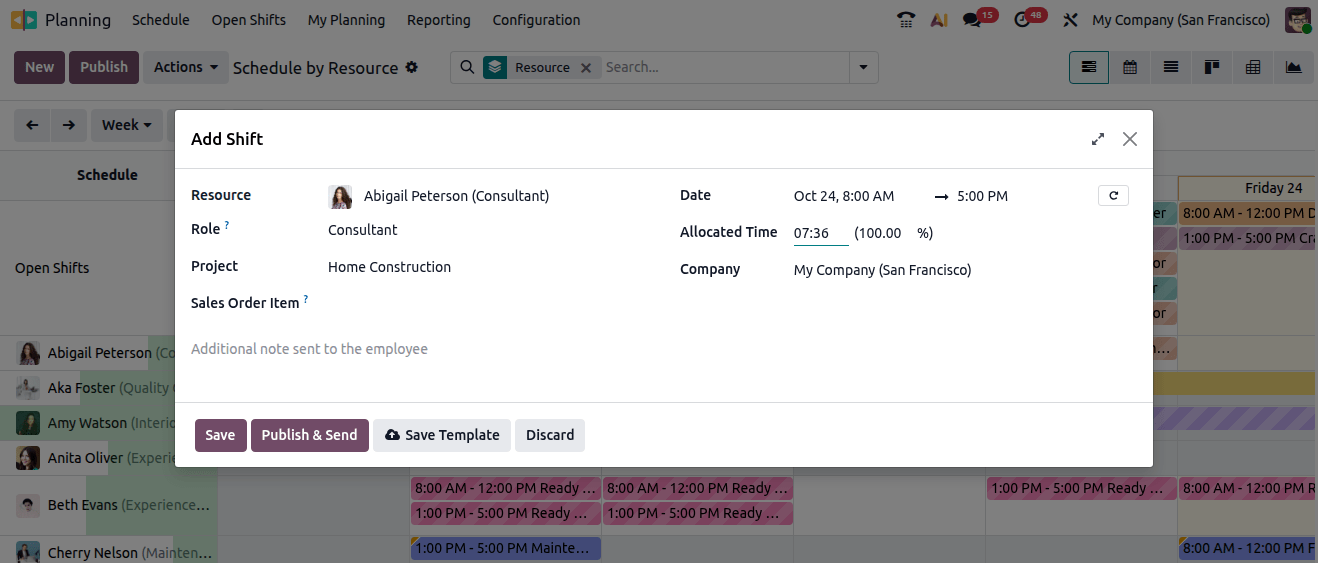
Alternatively, go to , then click New. Fill in the Start & End Hours and the shift’s Span, then assign a Role.
If the Project app is installed, a Project can also be selected.
Planning shifts
On opening the Planning app, the users see their own schedule. Users with administrator access rights can also see the schedule By Resource, By Role, By Project, and By Sales Order, as well as reporting and configuration menus.
Note
The schedule is displayed in the Gantt view, which allows you to reassign, reschedule, resize, split, and duplicate shifts without having to open them.
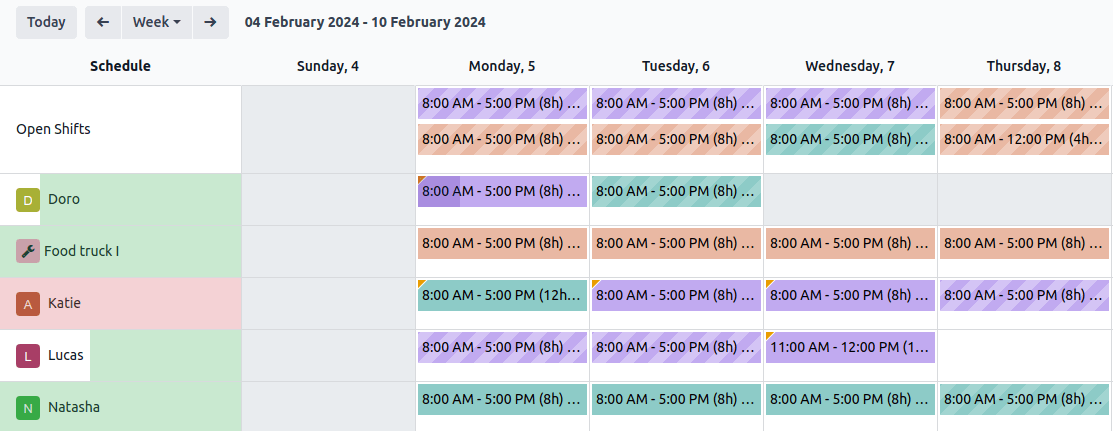
The following visual elements are used on the shifts in the schedules:
Full color: shifts that are planned and published.
Diagonal stripes: shifts that are planned but have yet to be published.
Grayed-out background: employees who are on time off.
Progress bar: currently ongoing shifts with timesheets linked to them.
Grayed-out shift: when copying shifts, the copied shifts are shown in full color, whereas previously existing shifts are temporarily greyed out. The color changes back to full color or diagonal stripes on the next refresh of the page or by removing the filter.
Create shifts
To create a shift, go to any schedule, then click New. In the pop-up window that opens, fill in the following details:
Templates: If there is one or more shift templates existing in the database, they are displayed in the upper section of the pop-up window. Once selected, a template prefills the shift form accordingly.
Resources: Resources can be both employees or materials. If this field is left empty, the shift is considered an open shift.
Date: Choose the date and time of the shift. This is the only mandatory field when creating a shift.
Repeat: Click the (repeat) button and configure the Repeat every fields as needed. The following rules apply to recurring shifts:
All fields (e.g., Resource, Role, Project) are copied from the original shift except for the date, which is adjusted according to the Repeat Every field.
Recurrences are planned but not published.
By default, planned shifts are created six months in advance, after which they are created gradually. To change the time frame, activate the developer mode, then go to and edit the Recurring Shifts.
Allocated Time: Is calculated based on the shift’s date and time, and the employee’s Working Schedule.
Role: Select the role that the assigned resources will be performing. This field is especially useful when auto-planning shifts. Once you select a role, the shift templates associated with it are displayed in the upper section of the pop-up window.
Additionally, the following fields may also be available:
Project: If the Project planning setting is enabled in the Planning settings, select the relevant project to link to the shift. Shifts dedicated to the selected project are then planned and tracked accordingly.
Task: If a project is selected, optionally select a task within that project.
Sales Order: If the Sales app is installed, select the relevant sales order to link to the shift.
Customer: If the shift is an on-site intervention, select the relevant customer to link to the shift.
Worksheet: If field service worksheets are configured, optionally select the relevant worksheet template.
Click Save to create the shift, or Publish to create it and notify the assigned employee by email.
Create shifts from sales orders
Shifts are created automatically from sales orders containing products configured as follows:
Product Type: Set to Service.
Plan Services: Enable the checkbox, then select the relevant role.
Once the sales order is confirmed, schedule the shift:
Click the To Plan smart button on the sales order form.
Click the relevant day in the appropriate resource’s schedule.
Note
Only resources whose role matches the role configured for the product on the sales order are available for shift assignment.
Select the relevant shift from the list of open shifts for that role.
Publish the shift.
Tip
To edit the shift before planning it, on the Schedule by Resource view:
either click New;
or click the relevant day in the appropriate resource’s schedule, then click Create New.
Then, edit the fields as needed and Save the shift or Publish it.
Once shifts have been planned for the sales order, click the Planned smart button on the sales order form to view them.
Edit and delete shifts
To edit a shift, click it in the calendar or schedule, then click Edit.
Shifts can also be adjusted directly on the schedule, without opening them:
Reassign or reschedule a shift by dragging and dropping it to the desired employee and day.
Extend a shift over several days by hovering over the right edge of the shift block. When the cursor changes into a resize pointer, click and drag the edge to the desired day.
Split a shift spanning multiple consecutive days into two segments by hovering over the boundary between the two affected day columns, then clicking the (scissors) icon.
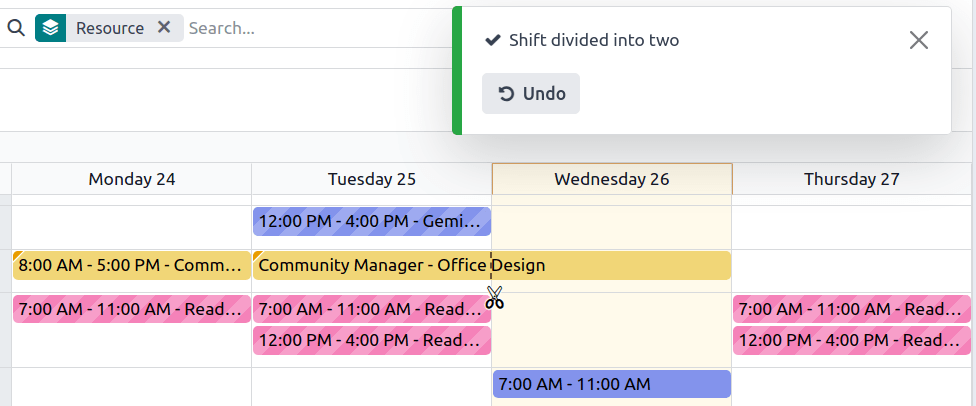
To delete a shift, click it in the schedule, then click Delete.
Tip
Alternatively, the shift form can be accessed by switching to the list view and clicking View on the relevant shift’s line, or by switching to the Kanban view and clicking the relevant shift’s card.
Publish shifts
Publishing shifts notifies the assigned employees by email and makes the schedule visible to all users, including those without Administrator Planning access rights (via ).
Shifts can be published individually or in bulk.
To publish an individual shift:
either click Publish at the end of the shift creation process;
or click the shift in the schedule, click Edit, then click Publish on the shift form.
To publish all planned shifts:
From any schedule, click Publish.
In the pop-up, optionally edit the Period.
Disable Include Open Shifts to exclude open shifts from the publication.
Optionally edit the list of employees; removing an employee from the list excludes their shifts from this publication.
Click Publish & Send.
Employees are notified of their shifts once they are published:
Employees without user accounts are redirected to a dedicated Planning portal.
Employees with a user account are redirected to the My Planning view.
Note
If the email address of one or more employees in the list has not been configured, enter their Work Email in the pop-up that opens, then click Save & Send Schedule. If the missing email addresses are not added, the corresponding employees’ schedules are not published.
Unpublished shifts are only visible on schedules for users with Administrator Planning access rights and are identified by diagonal lines.
Open shifts and auto planning
The Auto Plan button allows you to assign Open shifts (shifts with no resource assigned) and create and assign shifts linked to sales orders or project tasks.
The following features have an impact on auto planning:
Roles: Open shifts are only assigned to resources (employees or materials) that have the corresponding role assigned. It is not possible to use the Auto Plan feature for employees with no role.
Default roles: The default role assigned to a resource is given priority over the other roles they have assigned to them.
Conflicts: Employees or materials cannot be assigned multiple shifts at the same time.
Time off: The employees’ time off is taken into account, as well as public holidays.
Working hours: Are taken into account when assigning shifts to employees or materials. It is not possible to use the Auto Plan feature for an employee who is working flexible hours.
Contracts: If the employee has an active contract, they won’t be assigned shifts that fall outside of their contract period.
Click Publish to confirm the schedule and notify the employees of their planning.
Switching shifts and unassignment
Two features are available to allow employees to make changes to their schedule: switching shifts and unassignment.
Note
These features are mutually exclusive. Switching shifts is possible by default and cannot be disabled. However, once the Allow unassignment feature is enabled, it replaces the option to switch shifts.
Switching shifts
Once shifts are planned and published, employees receive an email notification. If an employee wishes to switch a shift, they can click the unwanted shift and click Ask to switch.
The shift remains assigned to the original employee, but in the schedule, a notification informing that the assigned employee would like to switch shifts is visible on the shift.
The shift is then displayed to other employees who share the same role, and if they wish to assign it to themselves, they can click the I take it button.
Note
The following rules apply:
Only the shifts matching the employee’s roles are displayed as available to them.
Switching shifts is not available for shifts in the past.
Unassignment
To allow employees to unassign themselves from shifts, go to , then tick the checkbox Allow Unassignment. Then, specify the maximum number of days that the employees can unassign themselves before the shift.
Once shifts are planned and published, employees receive an email notification. If shift unassignment is allowed, the employees can click the I am unavailable button, and the shift reverts to an open shift.
Note
The following rules apply:
Only the shifts matching the employee’s roles are displayed in their schedule.
Unassigning shifts is not available for shifts in the past.