Pages
Odoo allows you to create different kinds of webpages, including with the help of AI, publish them, and define their structure and visibility by configuring page properties. Pages can be duplicated, deleted, and redirected.
Page types
Static pages, such as the homepage or custom pages, contain fixed content that does not change dynamically. You can manually create these pages, define their URLs, and adapt their properties as needed.
Dynamic pages, on the other hand, display content that changes automatically based on the
data in the database and user interaction (e.g., filtering). They are generated automatically by
Odoo, for example, when installing an app or module (e.g., /shop or /blog) or publishing a
new product or blog post. Dynamic pages are managed
differently from static pages.
Page creation
Website pages can be created from the frontend and the backend.
To create a new website page:
Either open the Website app, click New in the top-right corner, then select Page;
Or go to and click New.
In the New Page pop-up, select a template. Templates are grouped by type:
Basic: Multi-purpose page. A blank page is also available to start from scratch.
About: Information about the brand and company.
Landing Pages: Summary of company content and information.
Gallery: Photos and media showcase.
Services: Overview of the services offered by the company.
Pricing Plans: Overview of the subscriptions and prices.
Team: The people behind the company.
Custom: Custom-created templates. To add a custom template, open the page you want to save as a template and edit the page’s properties.
In the New Page pop-up:
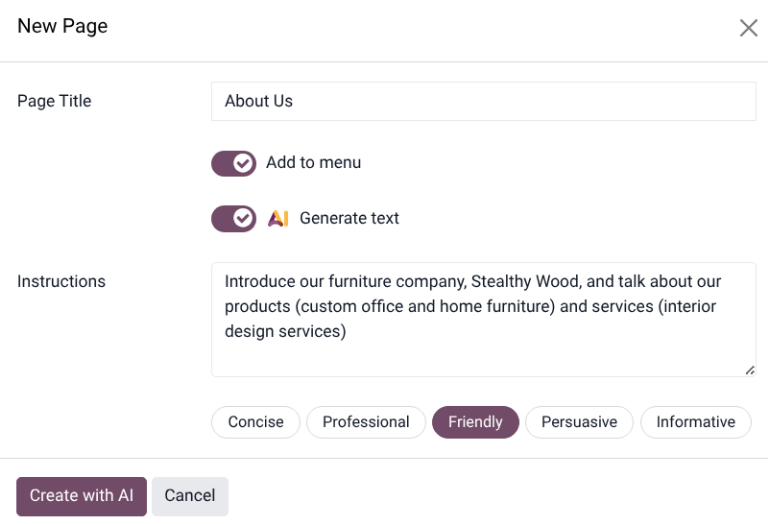
Enter a Page Title. This title is used in the menu and the page’s URL.
Disable Add to menu if the page should not appear in the menu.
Enable Generate text to use the AI tool to build the page.
Click Create.
If needed, customize the page’s content and appearance using the website editor or translate it, then click Save.
Publish the page.
AI webpage generator
To generate content using AI when creating a new page, follow these steps:
After choosing a template, in the New Page pop-up, toggle the AI Generate Text switch.
In the Instructions field, enter a short description of the page being created. This should include a few important keywords that define the page’s focus and scope.
Select one of the tone options for the page, such as Concise, Professional, Friendly, Persuasive, or Informative.
Click Create with AI. It may take a few moments for the webpage to load.
Note
The AI application does not need to be installed on the database to use the webpage generator.
Content created by the AI generator can be customized using the website editor.
The AI webpage generator is not available for the Blank page type.
The webpage generator may create buttons. Before publishing the webpage, confirm that all buttons are linked to an active webpage.
See also
Publishing/unpublishing pages
Pages need to be published to make them visible to website visitors. To publish or unpublish a page, access it and toggle the switch in the upper-right corner from Unpublished to Published, or vice versa.

Note
It is also possible to:
Publish/unpublish a page from the page properties.
Publish/unpublish several pages at once. To do so, go to , select the pages, then click Actions and select Publish or Unpublish.
Page properties
To modify a static page’s properties, access the page you wish to modify, then go to , where the following properties can be adapted:
Page Title: Modify the page’s title.
Page URL: Modify the page URL in the field. In this case, you can redirect the old URL to the new one if needed. To do so, enable Redirect Old URL, then select the Type of redirection:
301 Moved permanently: to redirect the page permanently.
302 Moved temporarily: to redirect the page temporarily.
In Menu: Disable if the page should not appear in the menu. Click the Edit Menu link to modify the menu.
Is Homepage: Enable if the static page should serve as the homepage of the website.
Has Parent Page: Toggle the switch on to add a parent page in breadcrumbs format.
Published: Enable it to publish the page.
Publish on: To publish the page at a specific date and time, click the field, set the date and time, then press Enter or click Apply to validate the selection.
Indexed: Disable if the page should not appear in search engine results.
Visibility: Select who can access the page:
Public: Everyone can access the page.
Signed In: Only signed-in users can access the page.
Restricted Group: Select the user access group(s) in the Authorized Groups field.
With Password: Type the password required to access the page in the Password field.
Is a Template: Toggle the switch to save the page as a template. It is now available in the Custom category when creating a new page.
Duplicating pages
To duplicate one or several pages, go to , select the relevant page(s), click Actions, and select Duplicate. In the Confirmation window, enter a Page Name, then click Ok. By default, the new page is not published; it is added after the originally duplicated page in the menu. Use the menu editor to remove it from the menu or change its position.
Deleting pages
To delete delete one or several pages, proceed as follows:
Go to , and select the relevant page(s).
Click Actions, and select Delete.
The Delete Page pop-up shows all links referring to the page you want to delete, organized by category. To ensure website visitors do not land on an error page, update all links on the website that refer to the page. To do so, expand a category, then click on a link to open it in a new window. Alternatively, you can set up a redirection for the deleted page.
Once you have updated the links (or set up a redirect), tick the I am sure about this. checkbox, then click Delete.
URL redirect mapping
URL redirect mapping involves sending visitors and search engines to a URL other than the one they initially requested. This technique is used, for example, to prevent broken links when deleting a page, modifying its URL, or migrating the site from another platform to an Odoo domain. It can also be used to improve Search Engine Optimization (SEO).
Note
A redirect record is added automatically every time you modify a page’s URL and enable Redirect Old URL.
Redirections can be configured for static and dynamic pages.
To access existing URL redirections and create new ones, go to , click New in the Rewrite view, then adapt the fields:
Name: Enter a name to identify the redirect.
Action: Select the type of redirection:
404 Not found: Visitors land on a 404 error page when they try to access an unpublished or deleted page.
301 Moved permanently: for permanent redirections of unpublished or deleted static pages. The new URL is shown in search engine results, and the redirect is cached by browsers.
302 Moved temporarily: for short-term redirections, for example, if you are redesigning or updating a page. The new URL is neither cached by browsers nor shown in search engine results.
308 Redirect / Rewrite: for permanent redirections where the original URL is rewritten (typically used for dynamic pages). The URL is renamed; the new name appears in search engine results and is cached by browsers. Use this redirect type to rename a dynamic page, for example, if you wish to rename
/shopinto/market.
URL from: Enter the URL to be redirected (e.g.,
/about-the-company) or search for the desired dynamic page and select it from the list.URL to: For 301, 302, and 308 redirects, enter the URL to be redirected to. If you want to redirect to an external URL, include the protocol (e.g.,
https://).Website: Select a specific website.
Active: Toggle the switch off to deactivate the redirection.
Tip
You can also define the order in which redirections are performed, e.g., in the case of redirect chains (i.e., a series of redirects where one URL is redirected to another one, which is itself further redirected to another URL). To do so, activate the developer mode, access the Rewrite form, and define a Sequence.
Important
301 and 302 redirects are commonly used to redirect traffic from unpublished or deleted static pages to new pages. The 308 redirect is typically used for permanent URL rewrites, especially for dynamic pages. A 404 status is used when a page no longer exists, and no redirection is configured.