
Management
Time off requests and allocation requests undergo an approval process before being granted. Requests either need one or two approvals, if any, depending on how the specific type of time off is configured. All these configurations can be found under the Management section of the Time Off application.
Note
The Management section in the Time Off application is only visible to users who can approve allocation requests and time off requests.
View time off requests
To view time off requests waiting for approval, navigate to . Doing so reveals the All Time Off page. All time off requests appear in a default Kanban view.
The only time off requests that are visible on this page belong to employees the user either has Time Off Officer or Administrator access rights for in the Time Off application.
The default filter on the All Time Off page is Waiting For Me. This filter only presents time off requests that need to be approved for current employees on the user’s team, with a status of either To Approve or Second Approval.
On the left side of the All Time Off page, there are various grouping options that can be used to narrow down the presented time off requests, located beneath the Status and Department headings.
Since only time off requests that need to be approved are shown, the only Status options are All, To Approve, and Second Approval.
The various departments the user is a member of, and manages employees under, also appear on the left side of the page, under Departments.
To only display time off requests for specific departments, click on the Department on the left-hand side of the page. Only requests within the selected department are then presented.
If the Waiting For Me filter is removed, all statuses appear.
Note
If no requests fall under one of the status options or departments, that status or department is not visible on the left-side menu.
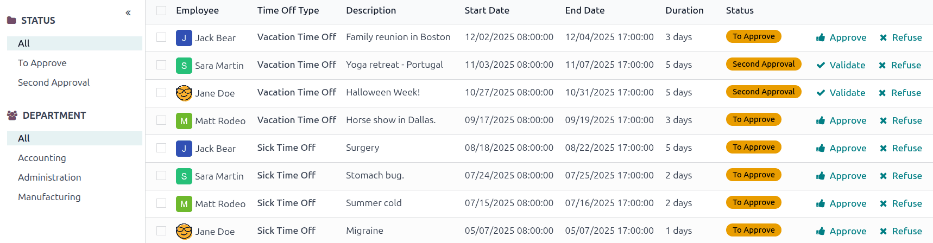
Approve or refuse time off requests
To approve or refuse a time off request, navigate to . At the end of each time off request Kanban card, two buttons appear: an Approve or Validate button, depending on the status of the request, and a Refuse button.
To approve a time off request, click the Approve button. To validate a time off request that has already been approved and is waiting on a second approval, click the Validate button. To refuse a request, click the Refuse button.
If more information is needed before approving a time off request, click anywhere on the Kanban card (except for the Approve, Validate, or Refuse buttons). Doing so loads the detailed time off request form.
Depending on the rights of the user, changes can be made. To modify the request, make any desired changes to the form. All changes are automatically saved.
It is also possible to approve, validate, or refuse the request from this form. Click the Approve button to approve, the Validate button to validate, or the Refuse button to refuse the request.
All Time Off page. To view all requests, including approved and refused requests, clear the default filters in the search bar.

Add missing time off requests
If an employee forgets to request time off for days they did not work, a time off record must be created retroactively. To create missing time off requests, navigate to , and click New.
On the time off request form, configure the following fields:
Employee: Using the drop-down menu, select the employee missing the time off request.
Time Off Type: Using the drop-down menu, select the type of time off for the request.
Payslip State: Using the drop-down menu, select when the paid time off is given to the employee. The options are: To compute in next payslip, To compute in current payslip, and To defer to next payslip.
Dates: Using the calendar selector, configure the start and end dates for the time off request.
Description: In the field below. enter any information regarding the request. For example,
Forgot to request the time off.orCould not request time off as they were sick.Attach File: If there is relevant documentation for the request, click this button, navigate to the desired file, then click Open.
Once the form is filled out, click Approve to approve the request.

View allocation requests
To view allocation requests waiting for approval, navigate to . Doing so reveals the Allocations page. All allocation requests appear in a default Kanban view.
The only allocation requests that are visible on this page belong to employees the user either has Time Off Officer or Administrator access rights for in the Time Off application.
The default filters on the Allocations page are First Approval and My Team. These filters only present allocation requests that need to be approved for current employees on the user’s team, awaiting approval or validation.
On the left side of the Allocations page, there are various grouping options that can be used to narrow down the presented allocation requests, located beneath the Status and Department headings.
Since only allocation requests that need to be approved are shown, the only Status options are All, To Approve, and Approved.
The various departments the user is a member of, and manages employees under, also appear on the left side of the page, under Departments.
To only display allocation requests for specific departments, click on the Department on the left-hand side of the page. Only requests within the selected department are then presented.
If the First Approval and My Team filters are removed, all statuses appear.
Note
If no requests fall under one of the status options or departments, that status or department is not visible on the left-side menu.

Approve or refuse allocation requests
To approve or refuse an allocation request, navigate to . At the end of each allocation request Kanban card, two buttons appear: an Approve or Validate button, depending on the status of the request, and a Refuse button.
If more information is needed before approving an allocation request, click anywhere on the Kanban card (except for the Approve, Validate, or Refuse buttons). Doing so loads the detailed allocation request form.
Depending on the rights of the user, changes can be made. To modify the request, make any desired changes to the form. All changes are automatically saved.
It is also possible to approve, validate, or refuse the request from this form. Click the Approve button to approve, the Validate button to validate, or the Refuse button to refuse the request.
Once a request has been approved, validtaed, or refused, the Kanban card disappears from the default Allocations page. To view all requests, including approved and refused requests, clear the default filters in the search bar.
