Reglas de automatización
Automation rules allow the execution of one or more predefined actions in response to a specific trigger, e.g., create an activity when a field is set to a specific value, or archive a record 7 days after its last update.
When creating an automation rule, domain filters allow you to add conditions that must be met for the automation rule to run, e.g., the opportunity must be assigned to a specific salesperson, or the state of the record must not be Draft.
To create an automation rule with Odoo Studio, proceed as follows:
Abra Studio, haga clic en Automatizaciones y después en Nuevo.
Give the automation rule a clear, meaningful name that identifies its purpose.
Select the trigger and, if necessary, fill in the fields that appear on the screen based on the chosen trigger.
Haga clic en Agregar una acción, seleccione el Tipo de acción y llene los campos que aparecen en la pantalla según la acción seleccionada.
Haga clic en Guardar y cerrar o Guardar y crear nuevo.
Example
To ensure follow-up on less satisfied clients, this automation rule creates an activity 3 months after a sales order is created for clients with a satisfaction percentage lower than 30%.

Truco
Use the Notes tab to document the purpose and functioning of automation rules. This makes rules easier to maintain and facilitates collaboration between users.
To modify the model targeted by the automation rule, switch models before clicking Automations in Studio, or activate developer mode, create or edit an automation rule, and select the Model in the Automation Rules form.
Automation rules can be created from any kanban stage by clicking the (Settings) icon that appears when hovering over the kanban stage name, then selecting Automations. In this case, the Trigger is set to Stage is set to by default, but it can be changed if necessary.

Activador
The Trigger is used to define what kind of event needs to occur for the automation rule to run. The available triggers depend on the model. Five trigger categories are available overall:
Adding conditions
Domain filters allow you to determine the records an automation rule should target or exclude. Efficient filtering enhances overall performance as it avoids unnecessary processing on records that are not impacted by the rule.
Truco
Activate developer mode before creating an automation rule to have the most flexibility in adding domain filters.
Depending on the trigger chosen, it is possible to define one or more conditions a record must meet before and/or after a trigger occurs.
The Before Update Domain defines the conditions a record must meet before the trigger event occurs, e.g., the record must have
Type = Customer InvoiceandStatus = Posted.With developer mode activated, click Edit Domain, if available, then New Rule.
Extra Conditions, or in some cases Apply on filters, define the conditions a record must meet after the trigger event occurs, e.g., the customer invoice must have
Payment Status = Partially Paid.With developer mode activated if needed, click Add conditions or Edit Domain, as relevant, then New Rule.
When a trigger occurs, e.g., the payment status of a posted customer invoice is updated, the automation rule checks the defined conditions and only executes the action if the record matches those conditions.
Example
If the automated action should be executed when an email address is set for the first time (in
contrast to modifying an email address) on an existing contact that is an individual rather than
a company, use Email is not set and Is a Company is not set as the Before Update
Domain and Email is set as the Apply on domain.

Nota
The Before Update Domain is not checked upon the creation of a record.
Valores actualizados
Trigger automated actions when specific changes happen in the database. The triggers available in this category depend on the model and are based on common changes, such as adding a specific tag (e.g., to a task) or setting a field’s value (e.g., setting the User field).
Select the trigger, then select a value if required.
Eventos de correo electrónico
Activación de acciones automatizadas al enviar o recibir correos electrónicos.
Condiciones de tiempo
Trigger automated actions at a point in time relative to a date field or to the creation or update of a record. The following triggers are available:
Based on date field: The action is triggered a defined period of time before or after the date of the selected date field.
After creation: The action is triggered a defined period of time after a record is created and saved.
After last update: The action is triggered a defined period of time after an existing record is edited and saved.
Puede definir ya sea:
a Delay: Specify the number of minutes, hours, days, or months. To have an action executed before the trigger date, specify a negative number. If you selected the Based on date field trigger, you must also select the date field to be used to determine the delay.
Nota
By default, the scheduler checks for time-triggered automation rules every 240 minutes, or 4 hours. This frequency is generally sufficient for delays such as 3 months after the order date or 7 days after the last update.
For delays of less than the equivalent of 2400 minutes, or 40 hours, the system recalculates the frequency of this check to ensure that more granular delays, e.g., 1 hour before the event start date and time, or 30 minutes after creation, can be respected as closely as possible.
An on-screen message indicates the possible delay after the scheduled triggering of the rule.

To view or manually edit the frequency of the scheduler, with developer mode activated, go to to see all scheduled actions for your database.
Enter
Automationin the search bar, then, in the list of results, click Automation Rules: check and execute. If desired, update the value of the Execute Every field. Click Run Manually at any time to manually trigger this scheduled action.Extra Conditions: Click Add condition, then specify the conditions to be met for the automation rule to run. Click New Rule to add another condition.
The action is executed when the delay is reached and the conditions are met.
Example
To send a reminder email 30 minutes before the start of a calendar event, select Based on date
field as the Trigger, then set the Delay to -30 Minutes
and select Start (Calendar Event) as the date field.

Personalizado
Activar acciones automatizadas:
On save: when a record is saved.
On deletion: when a record is deleted.
On UI change: when a field’s value is changed on the Form view, even before the record is saved.
Para los activadores al guardar y al cambio de la UI debe seleccionar el o los campos que se usarán para activar la regla de automatización en el campo Al actualizar.
Advertencia
Si no se selecciona ningún campo en el campo Al actualizar, es posible que la acción automatizada se ejecute varias veces por registro.
También tiene la opción de definir condiciones adicionales que se deben cumplir para activar la regla de automatización en el campo Aplicar en.
Example
To trigger an automated action upon the creation of a record, e.g., when a new contact is
created, select the On save trigger and use
ID is not set as the Before Update Domain and ID is set as the
Apply on domain. Make sure the correct field is selected in the When
updating field.
When a new contact is saved, it is automatically assigned a database ID, thereby triggering the automation rule.

Nota
The On UI change trigger can only be used with the Execute Code action and only works when a modification is made manually. The action is not executed if the field is changed through another automation rule.
Externo
Trigger automated actions based on a specific event in an external system or application using a webhook.
After the webhook is configured in Odoo, where the webhook’s URL is generated and the target record defined, it needs to be implemented in the external system.
Advertencia
Le recomendamos consultar a un desarrollador, arquitecto de soluciones o cualquier otra persona con experiencia técnica antes de decidir si usar webhooks y durante el proceso de implementación. Si no se hace una configuración adecuada, los webhooks pueden afectar la base de datos de Odoo y puede tomar tiempo solucionar estos problemas.

Nota
It is also possible to set up an automated action that sends data to a external system’s webhook when an event occurs in your Odoo database.
Ver también
Acciones
Once you have defined the automation rule’s trigger, click Add an action in the Actions To Do tab to define the action to be executed.
The title of the action is automatically generated based on the action you define, but it can be updated manually.
Truco
You can define multiple actions for the same automation rule. By default, actions are executed in the order in which they were defined.
This means, for example, that if you define an Update record action and then a Send email action where the email references the field that was updated, the email uses the updated values. However, if the Send email action is defined before the Update record action, the email uses the values set before the record is updated.
To change the order of defined actions, click the (drag handle) icon beside an action and drag it to the desired position.
Actualizar registro
This action updates one of the record’s (related) fields. Click the Update field and, in the list that opens, select or search for the field to be updated. If needed, click the (right arrow) next to the field name to access the list of related fields.
If you selected a many2many field, choose whether the field must be updated by Adding, Removing, or Setting it to the selected value or by Clearing it.
Example
If you want the automated action to remove a tag from the customer record, set the Update field to Customer > Tags, select by Removing, then select the tag.

Truco
Alternatively, you can also set a record’s field dynamically using Python code. To do so, select
Compute instead of Update, then enter the code to be used for computing
the field’s value. For example, if you want the automation rule to compute a custom
datetime field when a task’s priority is set to
High (by starring the task), you can define the trigger Priority is set to to
High and define the Update Record action as follows:

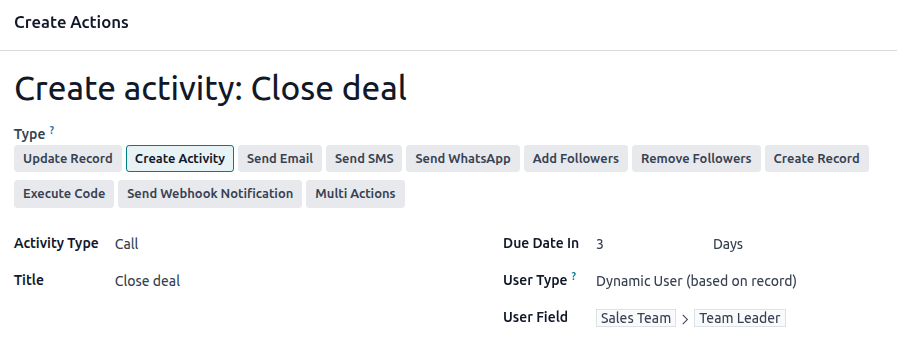
Crear actividad
Esta acción se usa para programar una nueva actividad vinculada al registro. Seleccione un Tipo de actividad, ingrese un título y una descripción, después especifique cuándo quiere que se programe la actividad en el campo Fecha de vencimiento en y seleccione un Tipo de usuario:
To always assign the activity to the same user, select Specific User, then add the user in the Responsible field.
To target a user linked to the record dynamically, select Dynamic User (based on record). If needed, change the User Field by clicking on the placeholder field name then selecting or searching for the user field in the list that appears. In the list, click the (right arrow) next to the field name to access related fields if needed.
Example
After a proposition is sent to a opportunity with a high expected revenue, you want to create an activity for the salesperson’s team leader to call the potential client to increase the chances of closing the deal.
To do so, set the Activity Type to Call and the User Type to Dynamic User (based on record). Click on the placeholder field and select Sales Team, then click the (right arrow) and select Team Leader.
Enviar correos electrónicos y enviar mensajes de texto
Estas acciones se usan para enviar un correo electrónico o mensaje de texto a un contacto vinculado a un registro específico. Para hacerlo, seleccione o cree una Plantilla de correo electrónico o una Plantilla de SMS y, en el campo Enviar correo electrónico como o Enviar SMS como seleccione cómo quiere enviar el correo electrónico o mensaje de texto:
Correo electrónico: para enviar el mensaje como un correo electrónico a los destinatarios de la Plantilla de correo electrónico.
Mensaje: para publicar el mensaje en el registro y notificar a los seguidores del registro.
Nota: para enviar el mensaje como una nota interna que los usuarios internos podrán ver en el chatter.
SMS (sin nota): para enviar el mensaje como un mensaje de texto a los destinatarios de la plantilla de SMS.
SMS (con nota): para enviar el mensaje como un mensaje de texto a los destinatarios de la plantilla de SMS y también publicarlo como una nota interna en el chatter.
Solo nota: para solo publicar el mensaje como una nota interna en el chatter.
Enviar WhatsApp
Importante
Para automatizar el envío de mensajes de WhatsApp debe crear una o varias plantillas de WhatsApp.
This action is used to send a WhatsApp message to a contact linked to a specific record. To do so, select the appropriate WhatsApp Template from the dropdown menu.
Agregar o quitar seguidores
This action is used to subscribe/unsubscribe existing contacts to/from the record. Followers can be added in two ways:
To always add the same, specific contact(s), select Specific Followers as Followers Type then choose the relevant contact from the dropdown. Repeat as many times as needed to add multiple contacts.
To add a contact linked to the record dynamically, select Dynamic Followers as Followers Type. If needed, change the Followers Field by clicking on the placeholder field name then selecting or searching for the partner field in the list that appears. In the list, click the (right arrow) next to the field name to access related fields if needed.
Example
To keep customers informed of progress on a project, this automated action adds the relevant customer as a follower when a project task is set to In progress.

Crear registro
Esta acción se usa para crear un nuevo registro en cualquier modelo.
Seleccione el modelo necesario en el campo Registro por crear, este incluye el modelo actual de forma predeterminada. Especifique un nombre para el registro y, si desea crear el registro en otro modelo, seleccione un campo en el campo Vincular campo para vincular el registro que activó la creación de uno nuevo.
Nota
The dropdown list related to the Link Field field only contains one2many fields existing on the current model that are linked to a many2one field on the target model.
Truco
You can create another automation rule with Actualizar registro actions to update the fields of the new record if necessary. For example, you can use a Create Record action to create a new project task and then assign it to a specific user using an Update Record action.
Ejecutar código
Importante
For automation rules that require the execution of custom code, note that maintenance of custom code is not included in the Standard or Custom pricing plans and incurs additional fees.
Esta acción se usa para ejecutar código Python. Puede escribir su código en la pestaña Código con las siguientes variables:
env: entorno en el que se activa la acciónmodel: modelo del registro en el cual se activa la acción. Es un conjunto de registros vacío.record: registro en el que se activa la acción; puede estar vacío.records: conjunto de todos los registros en lo cuales la acción fue activada en modo múltiple; puede ser vacío.time,datetime,dateutil,timezone: librerías Python útilesfloat_compare: función de utilidad para comparar números basada en una precisión específica.log(message, level='info'): función de registro para registrar información de depuración en la tabla ir.logging._logger.info(message): registrador para emitir mensajes en los registros del servidor.UserError: clase de excepción para generar mensajes de advertencia dirigidos al usuario.Command: espacios de nombres de comandos x2many.action = {...}: para devolver una acción.
Truco
Las variables disponibles se describen en las pestañas Código y Ayuda.
Ver también
Enviar notificación webhook
This action is used to send a POST API request with the values of the selected Fields
to the webhook URL specified in the URL field.
La Carga efectiva de ejemplo proporciona una vista previa de los datos que se incluyen en la solicitud usando los datos de un registro al azar o datos de prueba si es que no hay registros disponibles.
Nota
It is also possible to set up an automated action that uses a webhook to receive data from an external system when a predefined event occurs in that system.
Ejecutar acciones existentes
La acción se usa para activar varias acciones (vinculadas al modelo actual) al mismo tiempo. Para hacerlo, haga clic en Agregar una línea y después, en la ventana emergente Agregar: acciones secundarias, seleccione una acción existente o haga clic en Nueva para crear una acción nueva.