创建新车辆
Odoo 的 车队 应用程序可管理所有车辆以及与车辆维护和驾驶员记录相关的文档。
所有车辆都在 车队 主仪表板上组织。每辆车都有自己的*车辆表单*,根据状态在看板视图中以卡片形式显示。每个车辆表单都显示在当前对应的看板阶段。默认阶段是 新请求、订购、已订购、已注册、降级、储备`和 :guilabel:`等待列表。
要在车队中添加新车辆,请点击 创建 按钮,系统将加载空白的车辆表单。在车辆表格中输入车辆信息,然后点击 保存。
车辆表单字段
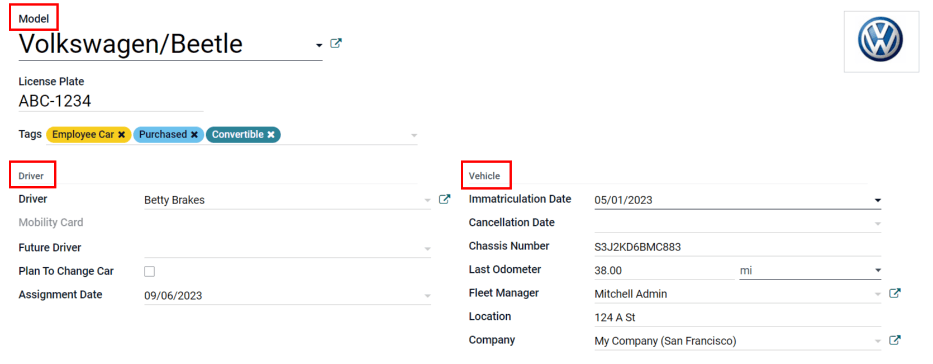
模型:从下拉菜单中选择车辆的型号。如果未列出车型,请键入车型名称,然后点击 创建 或 创建并编辑。
车牌号:在此字段中输入车辆的车牌号。
标签:从下拉菜单中选择任何标签,或输入新标签。可选择的标签数量没有限制。
注解
在新车辆表单中,:guilabel:`车型`是唯一必填字段。选择车型后,其他字段将出现在车辆表单上,相关信息将自动填充适用于该车型的字段。如果某些字段没有出现,可能表示没有选择车型。
驾驶员部分
车辆表格的这一部分涉及目前驾驶车辆的人员,以及今后更换驾驶员的计划和时间。
驾驶员:从下拉菜单中选择驾驶员,或输入新驾驶员,然后点击 创建 或 创建并编辑。
Mobility Card: if the selected driver has a mobility card listed on their employee card in the Employees application, the mobility card number will appear in this field. If there is no mobility card listed and one should be added, edit the employee card in the Employees application.
Future Driver: if the next driver for the vehicle is known, select the next driver from the drop-down menu, or type in the next driver and click either Create or Create and Edit.
Plan To Change Car: if the current driver set for this vehicle plans to change their vehicle, either because they are waiting on a new vehicle that is being ordered, or this is a temporary vehicle assignment and they know which vehicle they will be driving next, check this box. If the current driver does not plan to change their vehicle and use this current vehicle, do not check this box.
分配日期:使用下拉日历选择车辆可供其他驾驶员使用的日期。使用 ⬅️(左箭头) 和 ➡️ (右箭头) 图标导航到正确的年月日来选择日期,然后点击特定日期。如果该字段为空白,则表示车辆当前可用,可以重新分配给其他司机。如果已填入,则在输入日期之前,车辆不能分配给其他驾驶员。
重要
驾驶员不一定是员工,但必须在*联系人*应用程序中列出。创建新驾驶员时,司机将被添加到*联系人*应用程序中,而不是*员工*应用程序中。
车辆部分
车辆表格的这一部分涉及车辆实物、各种属性、添加时间、位置以及管理人。
入学日期:使用下拉日历选择获得车辆的日期。
取消日期:使用下拉日历选择车辆租赁到期或车辆不再可用的日期。
底盘编号:在该字段中输入底盘编号。在部分国家/地区,这被称为 VIN (车辆识别码) 号码。
上次里程表读数:在数字字段中输入上次已知的里程表读数。使用数字字段旁边的下拉菜单,选择里程表读数的单位是公里 (km) 还是英里 (mi)。
车队管理员:从下拉菜单中选择车队管理员,或输入新的车队管理员,然后点击:guilabel:
创建`或:guilabel:`创建并编辑。guilabel:
位置:在该字段中键入车辆的位置。该字段最常见的情况是公司有多个办公地点。输入的位置就是车辆所在的常用办公地点。公司:从下拉菜单中选择车辆将服务和关联的公司,或输入新公司,然后点击:guilabel:
创建`或:guilabel:`创建并编辑。
重要
创建新公司可能会导致订阅价格发生变化,具体取决于当前计划。详情请参阅 Odoo 定价计划。
税务信息选项卡
财务
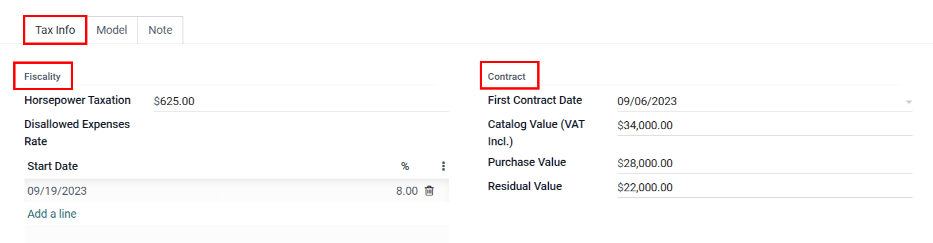
Horsepower Taxation: enter the amount that is taxed based on the size of the vehicles engine. This is determined by local taxes and regulations, and varies depending on the location. It is recommended to check with the accounting department to ensure this value is correct.
Disallowed Expense Rate: this is the amount of non-deductible expenses for the vehicle. This amount is not counted towards any deductions on a tax return or as an allowable expense when calculating taxable income. It is recommended to check with the accounting department to ensure the value(s) entered are correct.
Start Date: enter the Start Date and (%) Percentage for when the Disallowed Expense Rate value goes into effect. Click Add a line to enter a date. Click on the blank line to display a calendar. Select the date by navigating to the correct month and year using the ⬅️ (left arrow) and ➡️ (right arrow) icons, then click on the specific day. Enter the percentage that is disallowed in the % (percent) field to the right of the date. The percentage should be entered in an XX.XX format. Repeat this for all entries needed.
合同
第一份合同日期:使用下拉日历选择车辆第一份合同的开始日期。通常情况下,这是购买或租赁车辆的日期。
目录价值(含增值税):输入车辆购买或租赁时的 MSRP(制造商建议零售价)。
购买价值:输入车辆的购买价格或租赁价值。
剩余价值:输入车辆的当前价值。
注解
The values listed above will affect the accounting department. It is recommended to check with the accounting department for more information and/or assistance with these values.
型号选项卡
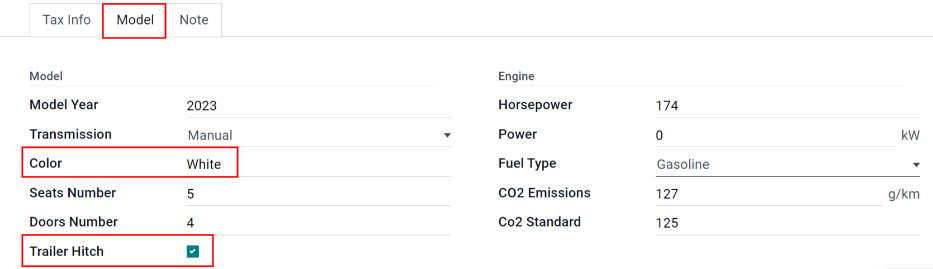
If the model for the new vehicle is already configured in the database, the Model tab will be populated with the corresponding information. If the model is not already in the database and the Model tab needs to be configured, configure the new vehicle model.
检查 型号 选项卡中的信息,确保准确无误。例如,车辆的颜色、是否安装了拖车挂钩等信息都可能需要更新。
备注选项卡
在此部分输入有关车辆的任何说明。