Servicios
Para preservar de manera óptima una flota de vehículos, es necesario llevar a cabo mantenimiento con regularidad y reparaciones periódicas. Es muy importante que programe reparaciones y gestione los servicios para toda la flota, esto garantizará que todos los vehículos se encuentren en buen estado de funcionamiento cuando se requieran.
Services, such as regular maintenance, like oil changes or tire rotations, can be logged in advance. Other repairs are logged as they occur.
Crear registros de servicio
Create a service record in one of two ways: directly in the Fleet app, or from a vendor bill in the Accounting app.
From the Fleet app
To log a service for a vehicle in the Fleet app, go to the main Services dashboard by navigating to . Open a new service form by clicking the New button in the top-left corner.
Llene la información que se le pide en el formulario. Los únicos dos campos requeridos son el Tipo de servicio y el Vehículo.
Los campos del formulario son:
Description: Enter a brief description of the service in this field.
Service Type: Using the drop-down menu, select the type of service performed. If the desired service does not exist, enter a new type of service, and click either Create «(service type)» or Create and edit… to add the service type and configure it.
Importante
Only one Service Type comes preconfigured in Odoo: Vendor Bill.
Date: Using the calendar selector, select the date the service was provided, or is scheduled to be performed. Navigate to the desired month using the (arrow) icons, then click on the date to select it.
Cost: Enter the estimated cost of the service, if available. If the service is for a future repair, this field should be left blank. This field is updated as estimates are received, and again, when the final repair cost is known.
Vendor: Using the drop-down menu, select the vendor who is performing the service. If the vendor has not already been entered in the system, add and configure the vendor.
Vehicle: Using the drop-down menu, select the vehicle that was serviced. When the vehicle is selected, the Driver field is populated, and the unit of measure for the Odometer Value field appears.
Driver: The vehicle’s current driver automatically populates this field when the Vehicle is selected. If the driver needs to be changed, another driver can be selected using the drop-down menu.
Odometer Value: Enter the odometer reading from when the service was done. The units of measure are either in kilometers (km) or miles (mi), depending on how the selected vehicle was configured.
Truco
To change from kilometers to miles, or vice versa, click the (Internal Link) icon to the right of the vehicle selected in the Vehicle field.
Cambie la unidad de medida, después regrese al formulario de servicio usando las migas de pan. La unidad de medida debería estar actualizada en el campo Valor del odómetro.
NOTES: Enter any notes for the repair at the bottom of the service form. For example, this can include estimate details or parts being replaced.

From the Accounting app
Sometimes repairs are performed and billed before service records are created. This is a common situation when repairs are unexpected, such as towing broken down vehicles or performing emergency repairs on the side of the road. In these circumstances, service records can be created directly from a vendor bill in the Accounting app.
To link a vendor bill to a service and create a service record, first open the Accounting app and click Purchases on the dashboard. Click the vendor bill for the repair to open the bill details.
In the Invoice Lines tab, click the (additional options) icon to reveal a drop-down menu. Click the checkbox next to Vehicle, then click away to close the drop-down menu.
Click into the Vehicle field and select the vehicle the service was done on.
Importante
To add a vehicle to a bill, the Status of the bill on the accounting dashboard must be Draft. If the bill has been confirmed, click the Reset to Draft button on the bill, then add the vehicle.

Once the Vehicle field is populated, open the Services dashboard by navigating to . The Service Type is listed as Vendor Bill, by default. The record must be updated to keep accurate service records.
Click on the new Vendor Bill record to view the service details. Click the Service Type field to reveal a drop-down menu of all available service types, and select the correct type of service. If necessary, create a new service type.
On the service record, a Service’s Bill smart button appears at the top. Click the Service’s Bill smart button to view the corresponding vendor bill.
Truco
The text color in the Service’s Bill smart button indicates the status of the bill. Green text indicates the bill is confirmed or paid, orange text indicates it is still a draft.
Crear tipos de servicio
The only method to create service types is from a service form.
En el formulario de servicio escriba el nombre del nuevo Tipo de servicio en el campo correspondiente. Después, haga clic en Crear y editar… y aparecerá un formulario emergente Crear tipo de servicio .
El tipo de servicio que se ingrese en el formulario hará que se llene de forma automática el campo Nombre, que puede modificar si así lo desea.
Después, seleccione la Categoría para el nuevo tipo de servicio desde el menú desplegable de ese campo. Las dos opciones predeterminadas de las que puede elegir son Contrato o Servicio. No puede crear categorías adicionales.
Si el servicio aplica solo a contratos o servicios, seleccione la Categoría correspondiente. Si el servicio aplica a tanto a contratos como a servicios, deje este campo en blanco.
Por último, haga clic en Guardar y cerrar.
Crear un proveedor
When a service is performed for the first time, typically, the vendor’s record has not yet been added to the database. It is best practice to add the full details for a vendor in the database, so that any necessary information can be retrieved.
Vendors are added with the Contacts app. Refer to the documentation for more details.
Nota
Es probably que haya diferentes pestañas o campos visibles en el formulario para Crear proveedor, dependiendo de qué otras aplicaciones tenga instaladas.
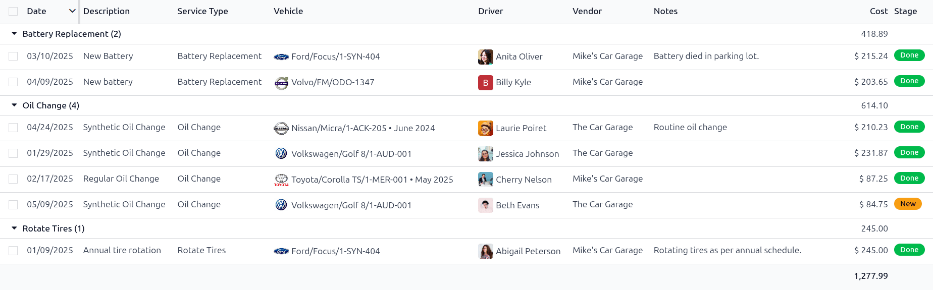
Ver servicios
Para ver todos los servicios registrados en la base de datos, entre ellos las solicitudes antiguas y nuevas, vaya a . Todos los servicios aparecerán en una vista de lista junto a sus detalles correspondientes.
Los registros del servicio se agrupan por tipo de servicio. El número de reparaciones de cada tipo de servicio aparece en paréntesis después del nombre del tipo de servicio.
Todos los servicios muestran la siguiente información:
Date: The date that the service, or repair, was performed (or requested to be performed).
Description: A short description of the specific type of service, or repair, performed to clarify the specific service.
Service Type: The type of service, or repair, performed. This is selected from a list of services that must be configured.
Vehicle: The specific vehicle the service was performed on.
Driver: The current driver for the vehicle.
Vendor: The specific vendor who performed the service, or repair.
Notes: Any information associated with the service, or repair, that is documented to add clarification.
Cost: The total cost of the service, or repair.
Stage: The status of the service, or repair. Options are New, Running, Done, or Cancelled.
En la parte inferior de la columna Coste se muestran el coste total de todos los servicios y reparaciones.