Recibos de nómina
Payslips are generated by payroll officers through the application.
The Payslips drop-down header of the application consists of three sections: To Pay, All Payslips, and Batches.
These three sections provide all the tools needed to create payslips for employees, including individual payslips, a batch of payslips, or commission payslips.

To pay
Click on to see the payslips that need to be paid.

Cada recibo de nómina incluye el número de referencia del recibo, el nombre del empleado, el nombre del lote, la empresa, el salario básico, el salario bruto, el salario neto y el estado del recibo de nómina.
Haga clic en la entrada de un recibo de nómina para visualizar los detalles correspondientes.
Create a new payslip
Es posible crear un nuevo recibo de nómina desde la página de Recibos de nómina por pagar o la de Recibos de nómina del empleado.
Create a new payslip by clicking the New button in the top-left corner.
A blank payslip form is loaded, where the necessary payslip information can be entered.
Formulario de recibo de nómina
On the blank payslip form, several fields are required. Most of the required fields auto-populate after an employee is selected.
Complete la siguiente información en el formulario del recibo de nómina:
Employee: type in the name of an employee, or select the desired employee from the drop-down list in this field. This field is required.
Nota
It is recommended to only create payslips for employees that are already in the database. If there is no current employee record (and therefore no employee contract) it is recommended to create the new employee in the Employees application before creating payslips for that employee. Refer to the new employee documentation for instructions on how to add an employee.
Period: the first day to the last day of the current month auto-populates the Period fields by default. The dates can be changed, if desired.
To change the start date, click on the first date in the Period field to reveal a pop-up calendar. On this calendar, use the < (less-than) and > (greater-than) icons to select the desired month. Then, click on the desired day to select that specific date.
Repita este proceso para modificar la fecha de finalización del recibo de nómina. Estos campos son obligatorios.
Contract: using the drop-down menu, select the desired contract for the employee. Only the available corresponding contracts for the selected employee appear as options. This field is required.
Batch: using the drop-down menu in this field, select the batch of payslips this new payslip should be added to.
Structure: using the drop-down menu, select the salary structure type. Only the corresponding structures associated with the selected contract for the employee appear as options.
If no employee and/or no contract is selected yet, all available Structures appear in the list. Once an employee and/or contract is selected, any unavailable Structures set for that employee and/or contract do not appear. This field is required.

Nota
Typically, after making a selection in the Employee field, Odoo auto-populates all other required fields (besides the Period field), but only if that information is already on that employee’s form in the Employees app.
Importante
If modifications to auto-populated fields are made, it is recommended to check with the accounting department to ensure every entry that affects the Accounting application is correct.
Pestaña de días trabajados y entradas
Worked Days: the entries under Worked Days (including the Type, Description, Number of Days, Number of Hours, and Amount) are automatically filled in, based on what was entered for the Period, Contract, and Structure fields of the payslip form.
Other Inputs: additional inputs affecting the payslip can be entered in this section, such as deductions, reimbursements, and expenses.
Click Add a line to create an entry in the Other Inputs section.
Using the drop-down menu in the Type column, select a Type for the input. Next, enter a Description, if desired. Lastly, enter the amount in the Count field.

Pestaña de cálculo del salario
Salary Computation: the Salary Computation tab is automatically filled in after the Compute Sheet button is clicked. Doing so displays the wages, deductions, taxes, etc. for the entry.

Pestaña de Otra información
Payslip Name: type in a name for the payslip in this field. The name should be short and descriptive, such as
(Employee Name) April 2023. This field is required.Company: select the company the payslip applies to using the drop-down menu in this field. This field is required.
Close Date: enter the date that the payment is made to the employee in this field.
Click in the field to reveal a calendar pop-up window. Using the < > (less-than/greater-than) icons, navigate to the desired month and year.
Then, click on the desired date to select it.
Date Account: enter the date on which the payslip should be posted in this field.
Salary Journal: this field auto-populates after selecting an existing Employee. This field cannot be edited, as it is linked to the Accounting application. This field is required.
Accounting Entry: if applicable, this field is automatically populated once the payslip is confirmed. This field cannot be modified.
Add an Internal Note…: any note or reference message for the new entry can be typed in this field.

Process the new payslip
When all the necessary information on the payslip is entered, click the Compute Sheet button. Upon doing so, all the information on the payslip is saved, and the Salary Computation tab auto-populates, based on the information on the employee’s contract or attendance records.
If any modifications need to be made, first click the Cancel button, then click the Set to Draft button. Make any desired changes, then click the Compute Sheet button once again, and the changes are reflected in the Worked Days and Salary Computation tabs.
Once everything on the payslip form is correct, click the Create Draft Entry button to create the payslip.
Then, a confirmation pop-up window appears, asking Are you sure you want to proceed?. Click OK to confirm.
Nota
The database may need to be refreshed for the payslip and email to appear.
To print the payslip, click the Print button. To cancel the payslip, click the Cancel button.

Next, the payment must be sent to the employee. To do this, click the Register Payment button. Doing so reveals a pop-up form, in which the desired Bank Journal that the payment should be made against must be selected from a drop-down menu. Then, click the Confirm button to confirm the journal, and return to the payslip.
Importante
In order for a payslip to be paid, the employee must have a bank account entered in their contact information. If there is no bank information, a payslip cannot be paid, and an error appears when the Make Payment button is clicked. Banking information can be found in the Private Information tab on the employee’s card in the Employees app. Edit the employee card, and add banking information, if it is missing.

Odoo automatically checks bank account information. If there is an error with the employee’s listed bank account, an error appears in a pop-up window, stating, The employee bank account is untrusted. If this error appears, update the employee’s bank account information on their Employee Form.
If a payment needs to be cancelled or refunded, click the corresponding Cancel or Refund button, located at the top-left of the screen.
Truco
Before processing payslips, it is best practice to check the Warnings section of the Payroll app dashboard. Here, all possible issues concerning payroll appear.
Vaya a para ver las advertencias, estas aparecen en la esquina superior izquierda.

Las advertencias están agrupadas por tipo, como Empleados sin contratos activos o Empleados sin número de cuenta bancaria. Haga clic en una advertencia para ver todas las entradas asociadas con ese problema en específico.
Es posible que ocurra un error en cualquier momento al procesar el recibo de nómina si no resuelve las advertencias. Los errores aparecen en una ventana emergente y proporcionan detalles sobre el error y cómo resolverlo.
All payslips
Para ver todos los recibos de nómina sin importar el estado que tengan, vaya a . Una vez que la página Recibos de nómina del empleado cargue, aparecerán todos los recibos organizados por lote en una vista de lista predeterminada.
Click on the ▶ (right arrow) next to an individual batch name to view all the payslips in that particular batch, along with all the payslip details.
El número de recibos de nómina en el lote está escrito entre paréntesis después del nombre del lote. El Estado de cada recibo aparece del lado derecho e indica alguna de las siguientes opciones:
Borrador: el recibo de nómina se creó y aún puede realizar modificaciones, ya que todavía no se calculan los importes.
En espera: ya se calculó el recibo de nómina y los detalles salariales están disponibles en la pestaña Cálculo del salario.
Listo: el recibo de nómina ya está calculado y está listo para pagarse.
Pagado: el empleado ya recibió su pago.

Haga clic en un recibo de nómina individual para ver los detalles en una página por separado. Use el menú de migas de pan y haga clic en Recibos de nómina del empleado para volver a la vista de lista de todos los recibos de nómina.
A new payslip can be created from the Employee Payslips page, by clicking the New button in the upper-left corner. Doing so reveals a separate blank payslip form page. On that blank payslip form page, enter all the necessary information, as described in the Create new payslips section.
To print PDF versions of payslips from the Payslips to Pay or Employee Payslips pages, first select the desired payslips by clicking on the individual checkbox to the left of each payslip to be printed. Or, click the box to the left of the Reference column title, which selects all visible payslips on the page. Then, click the Print button to print the payslips.
Payslips can also be exported to an Excel spreadsheet. To export all payslips, click on the ⚙️ (gear) icon at the end of the words Employee Payslips in the top-left corner. This reveals a drop-down menu. Click Export All to export all payslips to a spreadsheet.

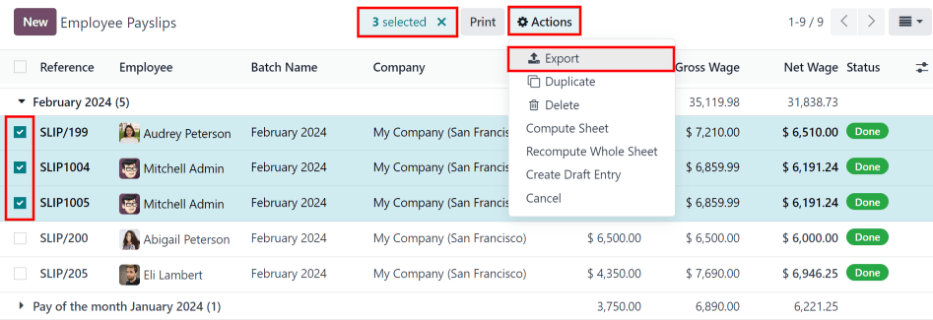
To export only select payslips, first select the payslips to be exported from the list. Then, click the checkbox to the left of each individual payslip to select it. As payslips are selected, a smart button appears in the top-center of the page, indicating the number of selected payslips. Then, click the ⚙️ (gear) Actions icon in the top-center of the page, and click Export.
Nota
Tanto Por pagar como Todos los recibos de nómina muestran toda la información detallada para cada recibo de nómina.
Lotes
To view payslips in batches, navigate to to display all the payslip batches that have been created. These payslip batches are displayed in a list view, by default.
Each batch displays the Name, Date From and Date To dates, its Status, the number of payslips in the batch (Payslips Count), and the Company.

Crear un nuevo lote
To create a new batch of payslips from the Payslips Batches page (), click the New button in the top-left corner. Doing so reveals a blank payslip batch form on a separate page.
On the new payslip batch form, enter the Batch Name.
Seleccione el rango de fechas al cual se aplica el lote. Haga clic en uno de los campos Periodo para abrir un calendario emergente, allí busque el mes correcto y haga clic en el día correspondiente tanto para la fecha de inicio como para la fecha de finalización del lote.
La empresa actual completa el campo Empresa. Si se encuentra en un entorno multiempresa no podrá modificar la empresa desde el formulario, debe crearlo desde la base de datos de la empresa deseada.

Procesar un lote
Click on an individual batch to view the details for that batch on a separate page. On this batch detail page, different options (buttons) appear at the top, depending on the status of the batch:
New status: batches without any payslips added to them have a status of New. The following button options appear for these batches:
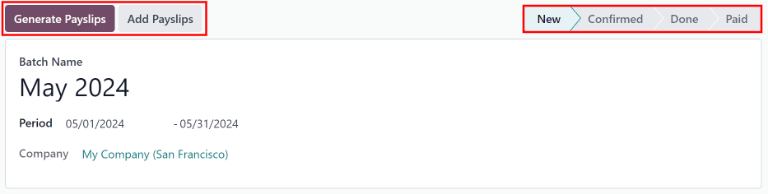
Add Payslips: click the Add Payslips button to add payslips to the batch, and an Add Payslips pop-up window appears. Only payslips that can be added to the batch (payslips not currently part of a batch) appear on the list.
Select the desired payslips by clicking the checkbox to the left of each payslip name, then click the Select button to add them to the batch. Once payslips are selected and added to the batch, the status changes to Confirmed.
Generate Payslips: after payslips have been added to the batch, click the Generate Payslips button to process the payslips and create individual payslips in the database.
A Generate Payslips pop-up window appears. If only a specific Salary Structure and/or specific Department is desired to make payslips for, select them from the corresponding drop-down menus. If no selections are made, then all payslips listed in the pop-up window are processed as usual.
Click the Generate button to create the payslips. The Generate Payslips button changes to a Create Draft Entry button, and the status changes to Confirmed.
Confirmed status: batches that have been created and have payslips in them, but the payslips have not been processed, have a status of Confirmed. The following two button options appear for these batches:
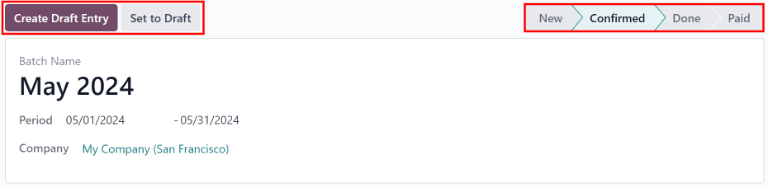
Create Draft Entry: click the Create Draft Entry button to confirm the individual payslips (and the batch), and create a draft of the payslips. The batch now has a status of Done.
Set to Draft: if at any point the batch needs to be reverted back to a status of New, click the Set to Draft button. This action does not remove any payslips that have already been added to the batch.
Done status: batches with confirmed payslips in them have a status of Done. The following button options appear for these batches:
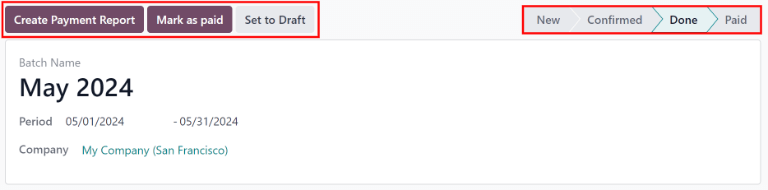
Create Payment Report: click the Create Payment Report button, and a Select a bank journal pop-up window appears. Select the correct bank journal from the drop-down menu.
The batch name appears in the File name field, but this can be modified, if desired. Finally, click Confirm to process the payslips, and pay the employees.
Mark as paid: after the payments have been created via the Create Payment Report button, the payslips need to be marked as paid in the database.
Click the Mark as paid button, and the status of the batch changes to Paid.
Set to Draft: if at any point the batch needs to be reverted back to a status of New, click the Set to Draft button. This action does not remove any payslips that have already been added to the batch.
Paid status: batches that have been completed have a status of Paid. No other button options appear for this status.

On the batch detail page, the individual payslips in the batch are accessible, via the Payslips smart button, located above the batch information, in the center. Click the Payslips smart button to view a list of all the individual payslips.
Use the breadcrumb menu to navigate back to the individual batch detail page, or back to the list of all batches.
Generate warrant payslips
Commissions are paid to employees in Odoo using warrant payslips.
Warrant payslips can be generated directly from the Payslips Batches page ().
First, select the desired batches by clicking the box to the left of each batch for which commission payslips should be created. Next, click the Generate Warrant Payslips button at the top of the page.
Doing so reveals a Generate Warrant Payslips pop-up window, in which the necessary information must be filled out.

In this pop-up window, click on the drop-down menus, located beside the Period field, to reveal calendar pop-up windows. On these calendar pop-up windows, select the desired period for which the payslips are being generated. Using the < (left) and > (right) arrow icons, navigate to the correct month, and click on the date to select it.
In the Department field, select the desired department from the drop-down menu.
When a department is selected, the employees listed for that department appear in the Employee section.
Under the Employee section, enter the Commission Amount for each employee in the far-right column. To remove an employee, click the 🗑️ (trash) icon to remove the line.
Add a new entry by clicking Add a Line, and entering the Employee and the appropriate Commission Amount.
Click the Upload your file button to add a file, if necessary. Any file type is accepted.
Once all the commissions are properly entered, click the Generate Payslips button to create the warrant payslips in a batch.
Procese el lote de la misma manera en que procesaría un lote común para completar el proceso de pago.