Connect Windows IoT Odoo
A Virtual IoT box is a computer program that needs to be downloaded and installed on a Windows computer. This requires a Windows operating system with an Odoo 16 or later database.
The Windows virtual IoT box works the same way as a physical IoT box, with the ability to run most of the same devices. All POS devices work with it, such as a scale or printer. Payment terminals will also work, but it should be noted that MRP devices are not compatible. These include cameras or measurement tools.
Pre-requisites
The following items will be needed to complete the Windows IoT installation.
Odoo 16 database or any version above.
IoT compatible devices (except those mentioned above). Refer to: Odoo’s compatible IoT devices.
Device drivers for Windows.
Note
Odoo recommends using an updated, recent version of Windows (Windows 10/11) as some older operating systems can cause the Windows virtual IoT to not work.
Windows computer (laptop, desktop, or server).
Odoo IoT subscription. Refer to: Internet of Things (IoT) eligibility.
Connect the Windows virtual IoT box to an Odoo database
The Windows virtual IoT box is simple to setup in just a few easy steps. Follow this process when installing the Windows virtual IoT software for the first time.
Download and initial installation
To begin the installation, navigate to the Odoo 16 or higher installation package for Enterprise or
Community - Windows edition at Odoo’s download page. Next, install
and setup the Odoo .exe file. After the instructions screen, click Next to start
the installation and agree to the TOS.
During the next step of the installation, select Odoo IoT from the Select the type of install drop-down menu.
Example
For reference, the following should be installed:
Odoo server
Odoo IoT
Nginx WebServer
Ghostscript interpreter
Ensure there is enough space on the computer for the installation and click Next.
Setting the destination and completing the installation
To complete the installation, select the Destination Folder and click Install.
Tip
Choosing C:\odoo as the install location will allow for the Nginx server to start. If the
folder doesn’t exist, then create it. Otherwise the installation files will be spread throughout
the hard drive.
Warning
Odoo’s Windows virtual IoT software should not be installed inside any of the Window’s User’s directories. Doing so will not allow for Nginx to initialize.
The installation may take a few minutes. When complete, click Next to continue.
Ensure that the Start Odoo box is checked and click Finish. After
installation, the Odoo server will run and automatically open http://localhost:8069 on a web
browser. The webpage should display the IoT box homepage.
See also
A restart of the Windows IoT program may be necessary should the web browser not display anything. Restart Windows IoT box
Connecting devices
Next, connect the IoT devices to the Windows computer. Windows should automatically detect the device because the driver is pre-installed on the computer. If not, search for and install the Windows driver for the device.
Important
Most devices connect to the Windows Machine for Windows IoT automatically through Windows Plug-N-Play (PnP). However, if Windows does not automatically recognize the device after connecting, then the administrator may need to install the corresponding drivers manually.
Devices automatically recognized:
Regular ink/toner based printers
Receipt printers (Epson/Star)
Barcode scanners
Measurement devices (although some configuration of the measurement device settings is required) See this documentation: Connect a measurement tool
Devices not automatically recognized (requires manual driver download):
Label printers (Zebra)
Scales
Reference the manufacturer’s website for the equipment in question. Then, download the drivers and install them on the Windows machine. Reconnect the device in question and Windows will find the device.
Following connecting devices to the computer, refresh the IoT box homepage and verify the device is seen. If not, reload the handlers through the IoT box homepage.
Finally, connect Windows IoT to a database using existing instructions (manually using the Token).
See also
Now the installation is complete, the devices connected to IoT can be used to complete processes/actions.
Troubleshooting
Restart Windows IoT box
In some instances a manual restart of the physical IoT box can resolve the issue of an IoT box not showing up on the database. For the Windows virtual IoT box a manual restart of the Odoo server can resolve database connection issues.
To restart the virtual Windows IoT server:
Type
Servicesinto the Windows Search Bar.Select the App and scroll down to the Odoo service.
Right click on Odoo and select Start or Restart. This action will manually restart the Odoo IoT server.
Firewalls
Firewalls keep devices safe and secure. Sometimes they can block connections that should be made though. The Windows virtual IoT box software may not be reachable to the LAN due to a firewall preventing the connection. Consult your local IT support team to make exceptions (network discovery) in the OS or firewall program. Windows has their own firewall as do other virus protection programs.
Example
A client might encounter a time when they are able to reach the homepage of the IoT box, yet they cannot access it from another computer/mobile device/tablet on the same network.
Making an exception on Windows Defender
It is possible to allow other devices to access the Windows virtual IoT
box while keeping the firewall on. This is done by creating a rule on Windows Defender and
allowing communication through port 8069. The following process describes the steps to take in
order to make this exception.
Create a rule in Windows Defender
First, open the Windows Firewall by navigating to the and typing in
Firewall. Then, open the program. In the left-hand
menu, navigate to Advanced Settings.
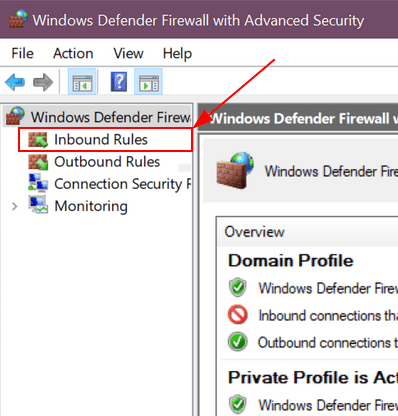
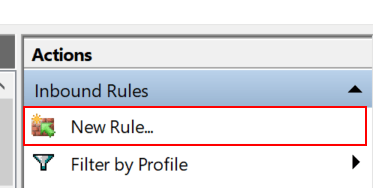
Once Advanced Settings have been selected, click Inbound Rules in the left-hand menu. Then, in the right-hand menu column (under Inbound Rules), click on New Rule to create a new rule.
Configure new rule
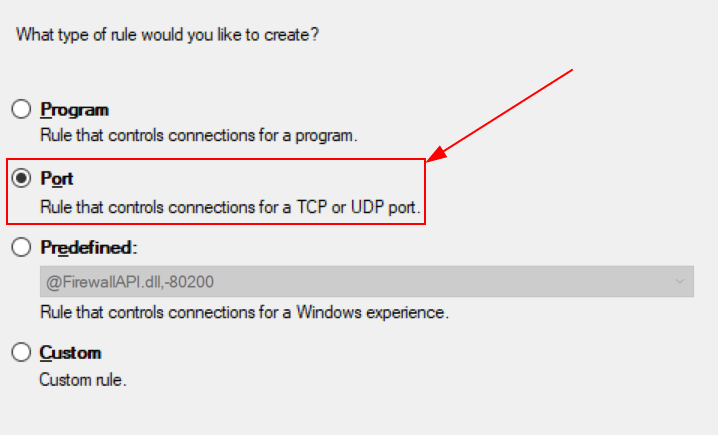
On the screen, select Port. Then click Next. From
the page leave the rule application to TCP. Then,
select Specific Local Ports for the ports option. In the text box, type in
8069. Finally click Next to continue to the next step.
On the page, select Allow the connection and click Next. The following page on the wizard is the Profile page. On this page, select whichever connection type applies to the network the Windows machine is operating on. Ideally, select Private only connections. The Private connection type is the most secure connection while allowing the selected port to communicate. Click Next to continue.
Finally, assign a new, unique name to the rule. For example, this name can be Odoo. Optionally,
add a brief description in the Description field. Click Finish to complete
the Rule Configuration wizard. Now, the new rule is active and devices can connect to
the Windows virtual IoT box.
Worldline exception
Worldline is a payment terminal that can be connected to Odoo’s PoS (point of sale) system. It allows for a comprehensive and fluid payment experience for customers. Worldline is available in Benelux (coalition of Belgium, the Netherlands, and Luxembourg).
When using the Windows IoT server to connect the Worldline payment terminal, it is necessary to create an exception in the Windows firewall so that a connection can be made between the Odoo database/IoT box and Worldline.
See also
To create the exception, first, open the Windows Defender Firewall app on the Windows machine.
This can be accomplished by typing windows defender in the Search bar.
Next, click Advanced settings in the left menu.

In the left menu, choose Inbound Rules.
After selecting Inbound Rules, select New Rule in the far right menu.
Then, for the Rule Type, select the radio button for Port. Click Next to continue to the rest of the configuration.
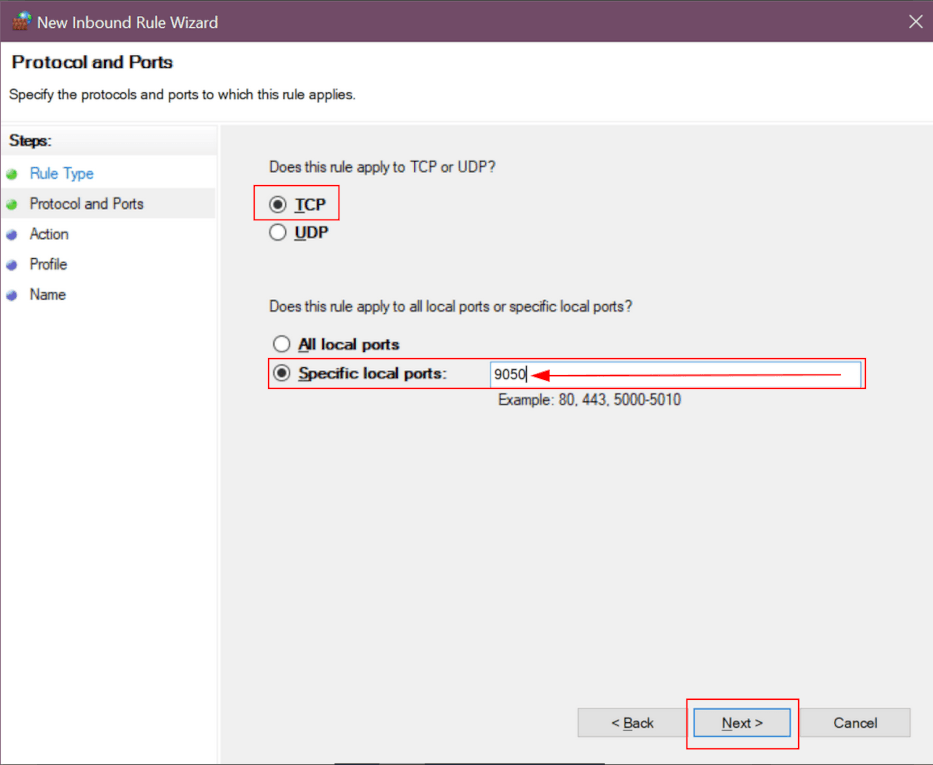
On the Protocols and Ports page, choose the radio button for TCP, under Does this rule apply to TCP or UDP?.
Next, under Does this rule apply to all local ports or specific ports?, select the radio
button for Specific local ports. Then, enter 9050, and click Next to
continue.
The next screen is the Action page. Under What action should be taken when a connection matches the specified conditions?, choose the radio button for Allow the connection. Then, click Next to continue.
A Profile page appears. Under When does this rule apply?, leave the three boxes checked for: Domain, Private, and Public. Click Next to continue to the naming convention page.
On the Name page, enter Odoo Worldline, under the Name field. Enter a
Description (optional). Finally, once ready, click Finish.
The final Inbound rule should appear as follows:
Odoo Worldline |
|
|---|---|
Profile |
All |
Enabled |
Yes |
Action |
Allow |
Override |
No |
Program |
Any |
Local Address |
Any |
Remote Address |
Any |
Protocol |
TCP |
Local Port |
9050 |
Remote Port |
Any |
Authorized Users |
Any |
Authorized Computers |
Any |
Authorized Local Principals |
Any |
Local User Owner |
Any |
PolicyAppld |
None |
Application Package |
Any |
Uninstalling Windows IoT
Uninstalling the Windows virtual IoT box is done through the Windows
program manager. Using any Windows version, search for program. Then, select Add or
Remove Programs located in the control panel. Search for Odoo and click the three dot
menu to uninstall.
Confirm the un-installation and follow the steps to uninstall through the Odoo uninstall guide.