Contacten
Contacts are created in the Contacts application for customers the company does business with through Odoo. A contact is a repository of vital business information, facilitating communication and business transactions.
Contactformulier
Om een nieuw contact aan te maken, navigeer je naar de en klik je op Nieuw. Er verschijnt een nieuw formulier waar je verschillende contactgegevens kunt toevoegen.
Notitie
Sommige velden kunnen enigszins verschillen, afhankelijk van de fiscale lokalisatie die op de database is geïnstalleerd.
Contacttype
Odoo maakt zowel Personen als Bedrijven contacten mogelijk. Selecteer Persoon of Bedrijf, afhankelijk van het type contact dat wordt toegevoegd.
Naam
Vul eerst de naam van het contact in. Zo verschijnt de naam in de hele database. Dit veld is verplicht.
Tip
Individual contacts can have a Company contact linked to it. After selecting Individual, a new Company Name… field appears below the first name field.
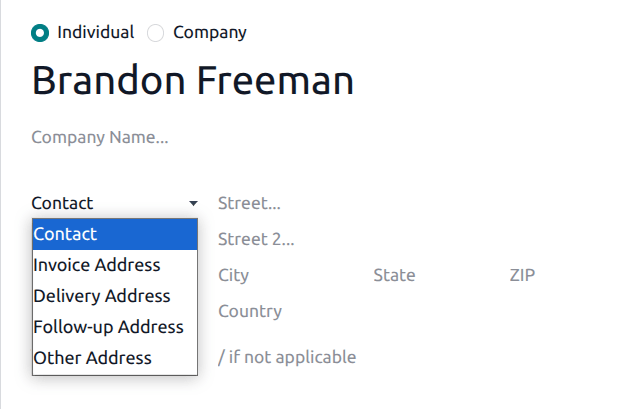
Adres
Voer vervolgens het Adres van het contact in. Als de optie Persoon is gekozen, kan het type adres worden gekozen uit een vervolgkeuzemenu. Opties voor dit vervolgkeuzemenu zijn: Contact, Factuuradres, Afleveradres, Vervolgadres en Ander adres.
Extra velden
Je kunt aanvullende details opnemen in het initiële formulier. De volgende velden zijn beschikbaar:
Functie: vermeld de functie van het contact (alleen beschikbaar bij Persoon).
BTW-nummer: het identificatienummer dat wordt gebruikt voor belasting- en boekhoudkundige doeleinden. Dit kan verschijnen als Identificatienummer of Burgerservicenummer, afhankelijk van het land.
Partnerniveau: selecteer het correcte partner-niveau voor dit contact uit het vervolgkeuzemenu.
Website: voer het volledige webadres in, beginnend met
httpofhttps.Taal: voer de taal in die door het contact wordt gebruikt. Alle e-mails en documenten die naar dit contact worden verzonden, worden dan vertaald naar de geselecteerde taal.
Labels: voer vooraf geconfigureerde labels in door ze in het veld te typen of klik op het vervolgkeuzemenu en selecteer er één. Om een nieuw label aan te maken, typ je het nieuwe label in het veld en klik je op Aanmaken in het resulterende vervolgkeuzemenu.
Contacts & Addresses tab
At the bottom of the contact form are several tabs. On the Contacts & Addresses tab, contacts can be added that are associated with a Company and related addresses. For example, a specific contact person for the company can be listed here.
Meerdere adressen kunnen worden toegevoegd aan contacten. Klik hiervoor op Toevoegen in het tabblad Contacten & Adressen. Hierdoor verschijnt een pop-upformulier Contact aanmaken, waarin extra adressen kunnen worden geconfigureerd.
Selecteer in het pop-upformulier Contact aanmaken een van de volgende opties voor het adrestype:
Contact: voegt nog een contact toe aan het bestaande contactformulier.
Factuuradres: voegt een specifiek factuuradres toe aan het bestaande contactformulier.
Afleveradres: voegt een specifiek afleveradres toe aan het bestaande contactformulier.
Vervolgadres: voegt een voorkeursadres toe voor vervolgrapportages en herinneringen over achterstallige verkoopfacturen.
Ander adres: voegt een alternatief adres voor het bedrijf toe, zoals een dochteronderneming.

Zodra een optie is geselecteerd, voer je de bijbehorende contactinformatie in die gebruikt moet worden voor het opgegeven adrestype.
Voeg de Contactnaam, Adres, E-mail toe, samen met de Telefoon en Mobiel nummers hieronder.
Set the Job Position, which appears if the Contact address type has been selected. This is similar to the Individual contact.
Om een notitie toe te voegen, klik je op het tekstveld naast Notities en schrijf je alles wat van toepassing is op de klant of het contact.
Klik vervolgens op Opslaan & sluiten om het adres op te slaan en het venster Contact aanmaken te sluiten. Of klik op Opslaan & Nieuw om het adres op te slaan en direct een nieuwe in te voeren.
Tabblad ‘Verkoop & Inkoop’
Vervolgens is er het tabblad Verkoop & Inkoop, dat alleen verschijnt wanneer de applicaties Verkoop, Inkoop of Kassa zijn geïnstalleerd.
De Fiscale positie kan worden ingesteld op het tabblad Verkoop & Inkoop. Selecteer een Fiscale positie uit het vervolgkeuzemenu.
Verkoopgedeelte
Onder de titel Verkoop kan een specifieke Verkoper aan een contact worden toegewezen. Klik hiervoor op het vervolgkeuzeveld Verkoper en selecteer er een. Maak een nieuwe Verkoper aan door de naam van de gebruiker te typen en de juiste selectie te maken.
Bepaalde Betalingsvoorwaarden, een Betalingsmethode of een specifieke Prijslijst kunnen ook worden ingesteld, indien nodig. Klik op het vervolgkeuzemenu naast Betalingsvoorwaarden en wijzig dit naar een van de voorgeselecteerde Betalingsvoorwaarden, of Maak een nieuwe aan. Selecteer het vervolgkeuzemenu Prijslijst om de juiste Prijslijst te kiezen.
Klik in het veld Verzendwijze om een optie uit het vervolgkeuzemenu te selecteren.
Sectie ‘Kassa’
Voer onder de kop Kassa een Barcode in die gebruikt kan worden om het contact te identificeren.
Sectie ‘Inkoop’
Specify Payment Terms, 1099 Box information, and a preferred Payment Method here. A Receipt Reminder can be set here, as well.
Sectie ‘Overige’
Voer onder de kop Diversen indien nodig een Burgerservicenummer in voor belastingdoeleinden. Gebruik het veld Referentie om eventuele aanvullende informatie voor dit contact toe te voegen.
Als dit contact alleen toegankelijk moet zijn voor één bedrijf in een database met meerdere bedrijven, selecteer dit dan uit de vervolgkeuzelijst van het veld Bedrijf. Gebruik het vervolgkeuzemenu Website om de publicatie van dit contact te beperken tot één website (bij werken in een database met meerdere websites). Selecteer een of meer Website Labels om te helpen bij het filteren van gepubliceerde klanten op de /customers websitepagina.
Selecteer een Bedrijfstak voor dit contact uit het vervolgkeuzemenu. Gebruik het veld SLA-beleid om een Helpdesk SLA-beleid aan dit contact toe te wijzen.
Tabblad ‘Boekhouding’
Het tabblad Boekhouding verschijnt wanneer de applicatie Boekhouding is geïnstalleerd. Hier kan een gebruiker gerelateerde Bankrekeningen toevoegen of standaard Boekhoudkundige posten instellen.
Under the Miscellaneous heading, use the LEI field to enter a Legal Entity Identifier, if necessary.
Tabblad interne ‘Notities’
Vervolgens is er het tabblad Interne notities waar notities op dit contactformulier kunnen worden achtergelaten, net zoals op het hierboven vermelde contactformulier.
Tabblad ‘Partnertoekenning’
Vervolgens is er het tabblad Partnertoewijzing, dat standaard een sectie Geolocatie bevat, en andere partneropties, waaronder Partneractivering en Partnerbeoordeling configuraties. Deze zijn alleen aanwezig wanneer de module Resellers is geïnstalleerd.
Zie ook
Volg de Reseller-documentatie voor meer informatie over het publiceren van partners op de website.
Contacten archiveren
Als een gebruiker besluit dat hij dit contact niet langer actief wil houden, kan het record worden gearchiveerd. Ga hiervoor naar het menu Actie bovenaan het contactformulier en klik op Archiveren.
Klik vervolgens op Archiveren in het resulterende Confirmatie-pop-upvenster.
Nu dit contact succesvol is gearchiveerd, zoals aangegeven door een banner bovenaan, verschijnt het niet meer op de hoofdpagina van de contacten, maar kan het nog steeds worden gezocht met de filter Gearchiveerd.
Tip
Een contactpersoon kan worden gedearchiveerd als de gebruiker besluit er weer mee te werken. Klik daarvoor gewoon opnieuw op het Actie-menu bovenaan het gearchiveerde contactformulier en klik op Dearchiveren. De banner Gearchiveerd wordt dan verwijderd en het contact wordt hersteld.