Verlof
Odoo’s Time Off application serves as a centralized hub for all time-off-related information. This application manages requests, balances, allocations, approvals, and reports.
Users can request time off, and see an overview of their requests and time off balances. Managers can allocate time off to individuals, teams, or the whole company, and approve time off requests.
Detailed reports can be run to see how much time off (and what kinds of time off) are being used, accrual plans can be created, and public holidays can be set.
Notitie
Be advised, only users with specific access rights can see all aspects of the Time Off app.
All users can access the My Time Off and Overview sections of the Time Off app. All other sections require specific access rights.
To better understand how access rights affect the Time Off app, refer to the Nieuwe werknemers document, specifically the section about configuring the Work Information tab.
Zie ook
Configuratie
In order to allocate time off to employees, and for employees to request and use their time off, the various time off types must be configured first, then allocated to employees (if allocation is required).
Mandatory days
Some companies have special days where specific departments, or the entire staff, is required to be present, and time off is not allowed on those specific days.
These types of days are called mandatory days in Odoo. These can be configured to be company-wide, or department specific. When configured, employees in the specified department or company are unable to submit time off requests for these mandatory days.
Create mandatory days
No mandatory days are configured in Odoo by default. To create a mandatory day, navigate to .
Click the New button in the top-left corner, and a blank line appears in the list.
Enter the following information on that new line:
Name: Enter the name of the mandatory day.
Company: If in a multi-company database, this field is visible, and the current company populates this field, by default. Using the drop-down menu, select the company the mandatory day is for.
Departments: This column is hidden by default. First, click the (additional options) icon in the top-right corner, next to Color, and then tick the checkbox next to Departments to reveal that column.
Next, select the desired departments from the drop-down menu. Multiple departments can be selected, and there is no limit to the amount of departments that can be added.
If this field is left blank, the mandatory day applies to the entire company.
Start Date: Using the calendar picker, select the date the mandatory day starts.
End Date: Using the calendar picker, select the date the mandatory day ends. If creating a single mandatory day, the end date should be the same as the start date.
Color: If desired, select a color from the available presented options. If no color is desired, select the
No coloroption, represented by a white box with. The selected color appears on the main Time Off app dashboard, in both the calendar and in the legend.

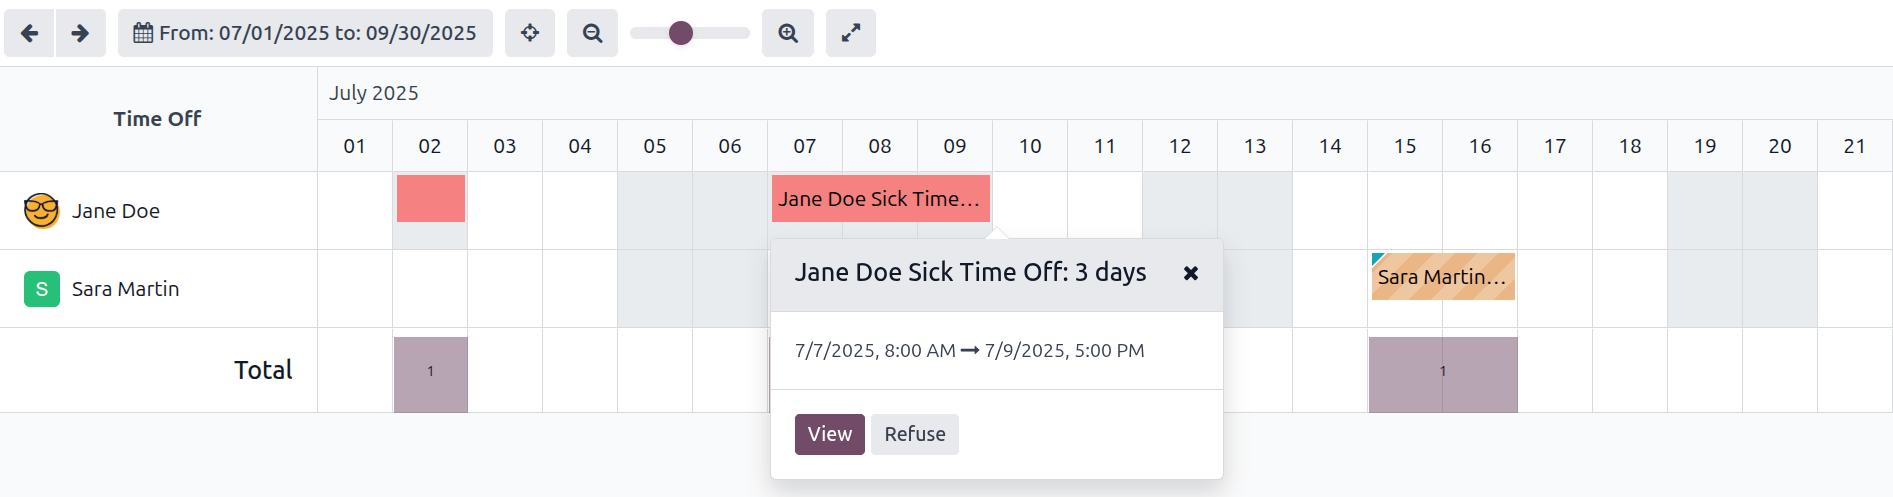
Overzicht
To view a color-coded schedule of the user’s time off, and/or of the team managed by them, navigate
to . This presents a calendar with the default filter of
My Team, in a quarterly (three month) view.
To change the time period displayed, click on the (time period) button to reveal a drop-down menu. Then, select either Today, This week, This month, This year, or a custom time period, to present the calendar in that corresponding view.
To navigate forward or backward in time, in the selected increment (Month, Week, etc.), click the (left arrow) or (right arrow) buttons to move either forward or backward in that specified amount of time. For example, if Month is selected, the arrows adjust the view by one month.
To return to a view containing the current day, click the (Focus Today) button at any time.
Team members are listed alphabetically on individual lines, and their requested time off, regardless of the status (validated or to approve), is visible on the calendar.
Each employee is color-coded. The employee’s color is selected at random, and does not correspond to the type of time off they requested.
The status of the time off is represented by the color detail of the request, either appearing solid (validated) or striped (to approve).
The number of days or hours requested is written on the request (if there is enough space).
At the bottom of the calendar, in the Total line, a bar graph shows how many people are projected to be out on any given day. The number on each individual bar represents the number of employees out for those highlighted days.
Click on a time off entry to view the details for the specific time off entry. The total number of hours or days are listed, along with the start and end time of the time off. To view the details of the time off request in a modal, click the View button.
Zie ook