Asignaciones
Allocations are amounts of time off given to employees, either granted immediately or earned as the employee works, through an accrual plan.
Una vez que se hayan configurado los tipos de ausencias y los planes de asignación, el siguiente paso es asignar, o dar permisos a los empleados.
La página Asignaciones de la aplicación Tiempo personal solo es visible para los usuarios que tienen permisos de acceso de encargado de tiempo personal o administrador en esta misma aplicación. Consulte la documentación sobre permisos de acceso para obtener más información.
Asignar tiempo personal
Vaya a para crear una nueva asignación.
Allí podrá consultar una lista de todas las asignaciones actuales con sus respectivos estados.
Click New to allocate time off, and a blank Allocation form appears.
Después de proporcionar un nombre para la asignación en el primer campo vacío del formulario, complete la siguiente información:
Name: Enter a name for the allocation, typically containing the type of time off, and the period of time it is available (example:
Annual Vacation Time Off - 2025).Tipo de tiempo personal: Con el menú desplegable seleccione el tipo de tiempo personal que recibirán los empleados.
Allocation Type: Select how the allocation is granted. Choose Regular Allocation if the time off is given immediately, or Accrual Allocation if the time off is earned through an accrual plan.
Accrual Plan: If Accrual Allocation is selected for the Allocation Type, the Accrual Plan field appears. Using the drop-down menu, select the accrual plan associated with the allocation. An accrual plan is required when using the Accrual Allocation type.
Periodo de validez/Fecha de inicio: Si para el tipo de asignación selecciona una asignación regular, este campo será Periodo de validez; si selecciona asignación acumulada, este campo será Fecha de inicio.
La fecha actual completará el primer campo de fecha de forma predeterminada. Para seleccionar otra fecha, haga clic en la fecha anterior para abrir el calendario emergente. Vaya a la fecha de inicio deseada para la asignación y haga clic en ella para seleccionarla.
If the allocation expires, select the expiration date in the next date field. If the time off does not expire, leave the second date field blank.
Si en Tipo de asignación selecciona Asignación acumulada, entonces este campo se llamará Ejecutar hasta.
Asignación: Proporcione la cantidad de tiempo que recibirán los empleados. Este campo muestra el tiempo en horas o en días según la configuración del Tipo de tiempo personal.
Employee: Using the drop-down menu, select the employee being allocated the time off.
Agregue un motivo…: Si necesita agregar una descripción o nota para explicar la asignación de tiempo personal escríbala en este campo. Está situado en la parte inferior del formulario.

Accrual start date behavior
If the Start Date is in the middle of an accrual period, Odoo adjusts it to the start or end of that period based on the Accrued Gain Time entered on the accrual plan.
Example
At the start of the accrual period: A Start Date of
06/16/25applies from06/01/25At the end of the accrual period: A Start Date of
06/18/25applies from07/01/25
Automatic adjustments on the start date to either the begining or end of an accural period ensures accruals align with the defined period boundaries, rather than the exact date entered.
Multiple requests
When allocating time off, it is common to allocate time to several employees at once. This is done using the Multiple Requests feature.
To allocate time to multiple employees in a single allocation, navigate to . Then, click the (Actions) icon in the upper-left corner, then click Multiple Requests. This reveals a Multiple Requests pop-up window.
This form is identical to the Allocation form, with an additional Mode field. The Mode field determines how multiple employees are selected.
Using the drop-down menu, select a Mode from one of the following options:
By Employee: This option allows for the selection of multiple individual employees that are unrelated in terms of department, company, or tags. Selecting this reveals an Employees field. Select the employees to receive the allocation in the Employees field. There is no limit to the amount of employees that can be selected.
By Company: This option allows for the selection of all employees within a specific company. Selecting this reveals a Company field. Select the Company to assign the allocation to. Only one company can be assigned in the Company field. When a company is selected, all employees within the company receive the allocation.
By Department: This option allows for the selection of all employees within a specific department. Selecting this reveals a Department field. Select the Department to assign the allocation to. Only one department can be assigned in the Department field. When a department is selected, all employees within the department receive the allocation.
By Employee Tag: This option allows for the selection of all employees with a specific tag. Selecting this reveals an Employee Tag field. Select the desired Employee Tag to select all employees with that tag. Only one tag can be assigned in the Employee Tag field. When a tag is selected, all employees with that tag receive the allocation.
Next, select the Time Off Type using the drop-down menu. Once a Time Off Type is selected, the placeholder name, “Allocation Request”, changes to the name of the selected Time Off Type, including the amount of days. Change the name of the allocation, if desired.
Fill out the remainder of the Multiple Requests form, then click Create Allocations when done.
Example
A company hosts an annual picnic, including a raffle. There are five raffle prizes for a free
vacation day, which must be redeemed by the end of the year. The winners of this raffle all have
the tag Raffle Winner - 2025 Employee Picnic Prize added to their employee profiles.
The time off officer creates multiple allocations, and configures the Multiple Requests form as follows:
The name for the allocation is Vacation Day - Raffle Prize - 2025 Picnic. The Mode is set to By Employee Tag, and the Tag identified is Raffle Winner - 2025 Employee Picnic Prize.
The Time Off Type is set to Vacation Time Off, with the Allocation Type set to Regular Allocaiton, since the time off is given up front, and is not earned.
The Validity Period is set to 07/18/2025 12/31/2025, since the compnay picnic was that day, and the earned vacation day expires at the end of the year.
The Allocation is set to 1.00 Days, and A bonus vacation day won at the
annual Company Picnic. appears in the details at the bottom.

Solicitar una asignación
Un empleado puede solicitar una asignación de tiempo personal si ya utilizó todo el que tenía disponible o está próximo a terminárselo. Hay dos maneras de solicitar una asignación, desde el tablero o desde la vista Mis asignaciones.
Para crear una nueva solicitud de asignación haga clic en el botón Nueva solicitud de asignación del tablero principal de la aplicación Tiempo personal o en el botón Nuevo de la vista de lista de Mis asignaciones. Ambos botones abrirán un formulario para una nueva solicitud de asignación.
Nota
Both options open a new allocation request form, but when requested from the Dashboard, the form appears in a pop-up window, and the Validity Period field does not appear.
When requested from the My Allocations list view, the screen navigates to a new allocation request page, instead of presenting a pop-up window.
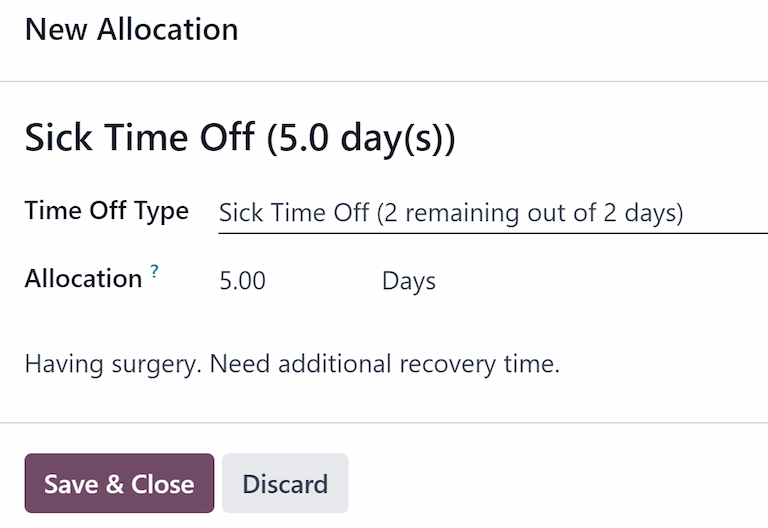
Ingrese la siguiente información en el nuevo formulario de solicitud de tiempo personal:
Time Off Type: Using the drop-down menu, select the type of time off being requested for the allocation. After a selection is made, the title updates with the time off type.
Validity Period: By default, the current date populates this field, and it is not able to be modified. This field only appears when requesting an allocation from the My Allocations view ().
Asignación: Ingrese la cantidad de tiempo que está solicitando en este campo. El formato aparecerá en días o en horas según la configuración del tipo de tiempo personal. Una vez que haya completado el campo, el nombre de la solicitud de asignación se actualizará para incluir la cantidad de tiempo solicitado.
Agregue un motivo…: Proporcione una descripción sobre la solicitud de asignación en este campo. Debe incluir todos los detalles necesarios que los aprobadores pudieran necesitar para aprobar la solicitud.
Si la solicitud se creó desde el tablero, haga clic en el botón Guardar y cerrar en la ventana emergente Nueva asignación para guardar la información y enviar una solicitud.
If the form was completed from the My Allocations list view, the information is automatically saved as it is entered.