分配
一旦配置了 休假类型 和 累积计划,下一步就是 分配 或给员工放假。
只有拥有 休假* 应用程序的 **休假负责人* 或 **管理员* 访问权限的用户才能看到 **休假 应用程序的 **分配* 页面。有关访问权限的更多信息,请参阅 访问权限 说明文档。
分配休假时间
要创建新分配,请导航至 。
这将显示当前所有分配的列表,包括各自的状态。
点击 新建 分配休假时间,会出现空白的 分配 表格。
在表格第一个空白栏输入分配名称后,输入以下信息:
休假类型:使用下拉菜单,选择分配给员工的休假类型。
Allocation Type: Select either Regular Allocation or Accrual Allocation. If the allocation is not based on an accrual plan, select Regular Allocation.
Accrual Plan: If Accrual Allocation is selected for the Allocation Type, the Accrual Plan field appears. Using the drop-down menu, select the accrual plan with which the allocation is associated. An accrual plan must be selected for an Accrual Allocation.
有效期/开始日期:如果 分配类型 选择了 定期分配,此字段的标签为 有效期。如果 分配类型 选择了:guilabel:
应计分配,此字段的标签为 开始日期。默认情况下,当前日期会填入第一个日期字段。要选择其他日期,请点击预填充日期,弹出日历窗口。导航到所需的分配开始日期,然后点击日期进行选择。
If the allocation expires, select the expiration date in the next date field. If the time off does not expire, leave the second date field blank. No Limit appears in the field if no date is selected.
如果选择 应计分配 作为 分配类型,则第二个字段的标签为 运行至。
重要
If the Start Date entered is in the middle of a period of time, such as the middle of the month, Odoo applies the allocation to the beginning or end of the period, depending on the Accrued Gain Time entered on the accrual plan (either At the start of the accrual period, or At the end of the accrual period) instead of the specific date entered.
For example, an allocation is created, and references an accrual plan that grants time At the start of the accrual period, monthly, on the first of the month.
On the allocation form, the Allocation Type is set to Accrual Allocation, and the Start Date entered is
06/16/24.Odoo’s Time Off app retroactively applies the allocation to the beginning of the time period entered in the Start Date.
Therefore, this allocation accrues time from
06/01/24, rather than06/16/24.Additionally, if on the accrual form, the allocation references an accrual plan that grants time `At the end of the accrual period, the allocation accrues time from
7/01/24rather than6/18/24.Allocation: Enter the amount of time that is being allocated to the employees. This field displays the time in either Hours or Days, depending on how the selected Time Off Type is configured.
Add a reason…: If any description or note is necessary to explain the time off allocation, enter it in this field at the bottom of the form.

Multiple Allocations
When allocating time off, it is common to allocate time to several employees at once. This is done using the Multiple Requests feature.
To allocate time to multiple employees in a single allocation, navigate to . Then, click the (Actions) icon in the upper-left corner, then click Multiple Requests. This reveals a Multiple Requests pop-up window.
This form is identical to the Allocation form, with an additional Mode field. The Mode field determines how multiple employees are selected.
Using the drop-down menu, select one of the following Modes:
By Employee: This option allows for the selection of multiple individual employees that are unrelated in terms of department, company, or tags. Selecting this reveals an Employees field. Select the employees to receive the allocation in the Employees field. There is no limit to the amount of employees that can be selected.
By Company: This option allows for the selection of all employees within a specific company. Selecting this reveals a Company field. Select the Company to assign the allocation to. Only one company can be assigned in the Company field. When a company is selected, all employees within the company receive the allocation.
By Department: This option allows for the selection of all employees within a specific department. Selecting this reveals a Department field. Select the Department to assign the allocation to. Only one department can be assigned in the Department field. When a department is selected, all employees within the department receive the allocation.
By Employee Tag: This option allows for the selection of all employees with a specific tag. Selecting this reveals an Employee Tag field. Select the desired Employee Tag to select all employees with that tag. Only one tag can be assigned in the Employee Tag field. When a tag is selected, all employees with that tag receive the allocation.
Next, select the Time Off Type using the drop-down menu. Once a Time Off Type is selected, the placeholder name, ‘Allocation Request’, changes to the name of the selected Time Off Type, including the amount of days. Change the name of the allocation, if desired.
Fill out the remainder of the Multiple Requests form, then click Create Allocations when done.

Request allocation
如果员工已用完所有休假时间,或休假时间即将用完,他们可以申请额外的时间分配。申请分配的方式有两种,一种是通过 仪表板 视图,另一种是通过 我的分配 视图。
要创建新的分配请求,请点击 休假 主仪表板上的 新分配请求 按钮,或 我的分配 列表视图中的 新 按钮。这两个按钮都会打开一个新的分配申请表。
注解
Both options open a new allocation request form, but when requested from the Dashboard, the form appears in a pop-up window, and the Validity Period field does not appear. When requested from the My Allocations list view, the screen navigates to a new allocation request page, instead of presenting a pop-up window.
在新分配申请表中输入以下信息:
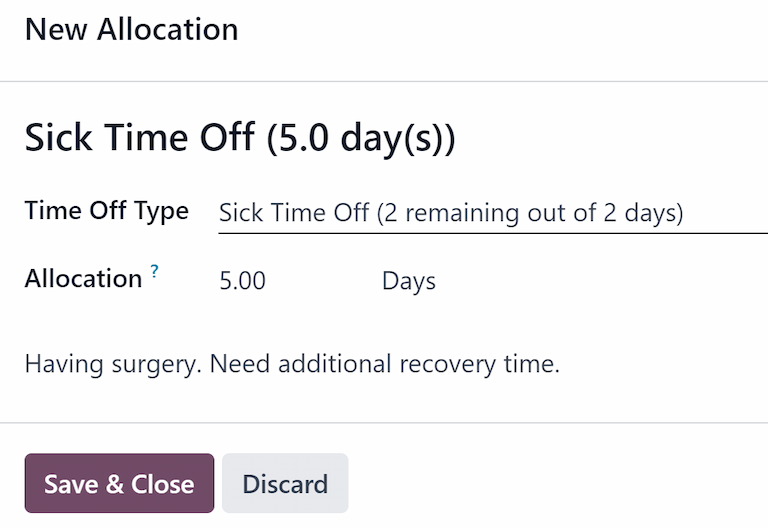
Time Off Type: Select the type of time off being requested for the allocation from the drop-down menu. After a selection is made, the title updates with the time off type.
Validity Period: By default, the current date populates this field, and it is not able to be modified. This field only appears when requesting an allocation from the My Allocations view ().
分配:在此字段中输入请求的时间量。根据 休假类型 配置,格式为 天数 或 小时 。该字段填入后,分配请求的名称将更新为包含请求的时间量。
添加理由…:在此字段中输入分配请求的说明。其中应包括审批人审批请求时可能需要的任何详细信息。
如果申请是从 仪表板 创建,请点击 新建分配 弹出窗口上的 保存并关闭 按钮,保存信息并提交申请。
If the form was completed from the My Allocations list view, the information is automatically saved as it is entered. However, the form can be saved manually at any time by clicking the (cloud upload) icon.