Nieuwe werknemer toevoegen
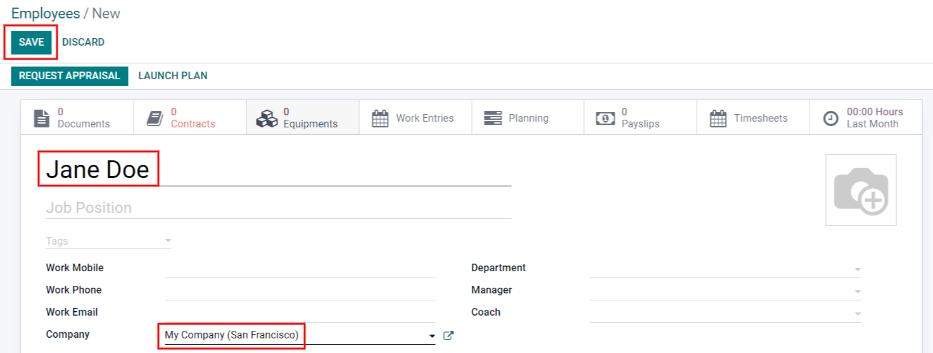
When a new employee is hired, the first step is to create a new employee form. Starting in the app dashboard, click the Create button to create a new employee form. Fill out the required information (underlined in bold) and any additional details, then click Save.
Notitie
Het huidige telefoonnummer en de huidige naam van het bedrijf worden ingevuld in de velden Werktelefoon en Bedrijf.
Algemene informatie
Vereiste velden
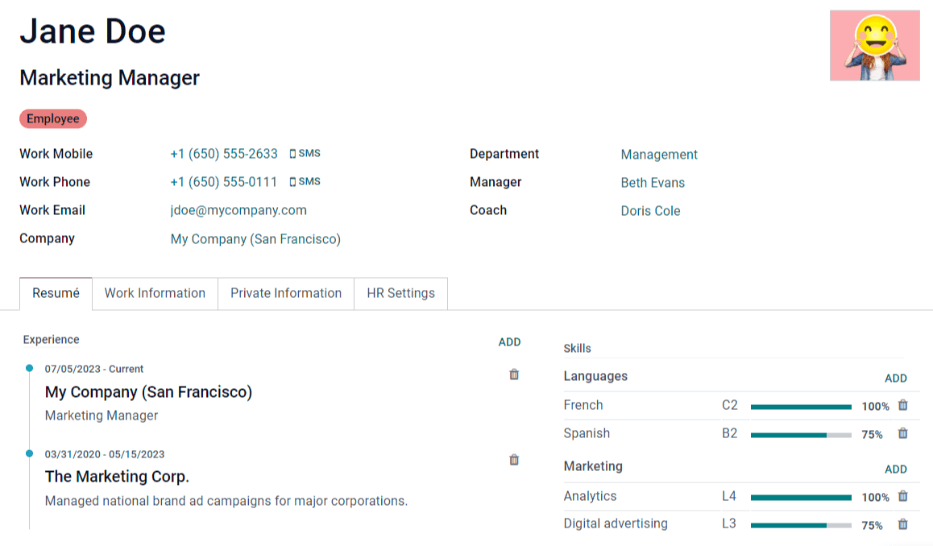
Naam: Vul de naam van de werknemer in.
Bedrijf: Selecteer het bedrijf waardoor de nieuwe werknemer is aangeworven in de vervolgkeuzelijst of maak een nieuw bedrijf aan door de naam in het veld te typen.
Optionele velden
Foto: Klik in het afbeeldingsvak rechtsboven op de werknemersfiche op het bewerkingspictogram ✏️ (potlood) om een foto te selecteren die je wilt uploaden.
Functie: Vul de functietitel van de werknemer in.
Labels: Klik op een label in het vervolgkeuzemenu om alle labels toe te voegen die van toepassing zijn op de werknemer. Elke label kan in dit veld worden aangemaakt door het in te typen. Eenmaal aangemaakt is de nieuwe label beschikbaar voor alle werknemersfiches. Een oneindig aantal labels kan worden toegevoegd.
Professionele contactgegevens: Voer het Professioneel gsm-nummer, het Professioneel telefoonnummer, het Professioneel e-mailadres van de werknemer en/of de naam van het Bedrijf in.
Afdeling: Kies in het vervolgkeuzemenu de afdeling van de werknemer.
Manager: Kies in het vervolgkeuzemenu de manager van de werknemer.
Coach: Kies in het vervolgkeuzemenu de coach van de werknemer.
Notitie
Als een Manager is geselecteerd en het veld Coach leeg is, dan word in het veld Coach de geselecteerde manager automatisch ingevuld.
Tip
Om de geselecteerde Afdeling, Manager, Coach, of Bedrijf te wijzigen, klik op de knop Externe link naast de betreffende selectie. De knop Externe link opent het geselecteerde formulier zodat je wijzigingen kunt aanbrengen. Klik op Opslaan nadat je wijzigingen hebt aangebracht.
Tabbladen aanvullende informatie
Tabblad Curriculum vitae
Cv
Next, enter the employee’s work history in the Resumé tab. Each resumé line must be entered individually. Click Create a New Entry, and the Create Resumé lines form appears. Enter the following information for each entry.
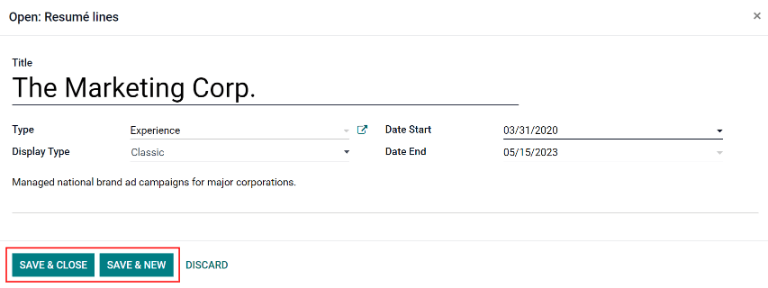
Title: Type in the title of the previous work experience.
Type: Kies in het vervolgkeuzemenu Ervaring, Opleiding, Interne certificering, Interne opleiding, of voer een nieuw item in.
Soort weergave: Kies in het vervolgkeuzemenu Klassiek, Certificering, of Cursus.
Startdatum en Einddatum: Kies de start- en einddatum van de werkervaring. Om een datum te kiezen, gebruik je de pijltjes < (links) en > (rechts) om naar de gewenste maand te gaan en klik vervolgens op de gewenste dag.
Omschrijving: Voer alle relevantie details in het veld in.
Once all the information is entered, click the Save & Close button if there is only one entry to add, or click the Save & New button to save the current entry and create another resumé line.
Notitie
After the new employee form is saved, the current position and company is automatically added to the Resumé tab as Experience, with the end date listed as Current.
Vaardigheden
An employee’s skills can be entered in the Resumé tab in the same manner a resumé line is created. Click the Create a New Entry button under Skills and a Create Skills form appears. Fill in the information on the form.
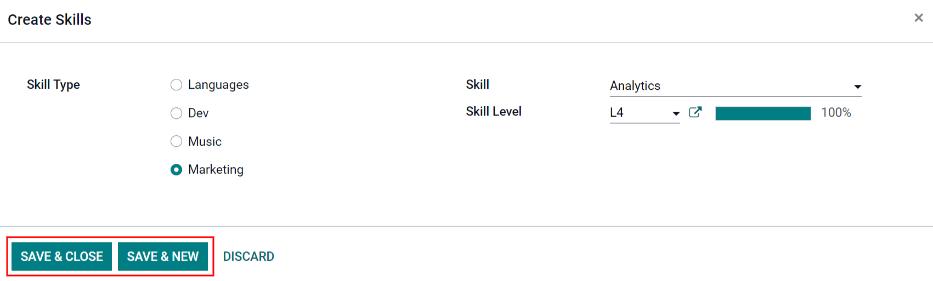
Skill Type: Select a skill type by clicking the radio button next to the skill type.
Vaardigheid: De vaardigheden die bij het geselecteerde Vaardigheidstype horen verschijnen in een vervolgkeuzemenu. Als je bijvoorbeeld Talen kiest als Vaardigheidstype, verschijnen er verschillende talen waaruit je kan kiezen in het veld Vaardigheden. Selecteer de juiste vooraf geconfigureerde vaardigheid of typ een nieuwe vaardigheid.
Skill Level: Pre-defined skill levels associated with the selected Skill Type appear in a drop-down menu. Select a skill level, then the progress bar automatically displays the pre-defined progress for that skill level. Skill levels and progress can be modified in the Skill Level pop-up form, which is accessed via the External Link button next to Skill Level field.
Once all the information is entered, click the Save & Close button if there is only one entry to add, or click the Save & New button to save the current entry and create another skill.
To delete any line from the Resumé tab, click the 🗑️ (trash can) icon to delete the entry. Add a new line by clicking the Add button next to the corresponding section.
Skill types
In order to add a skill to an employee’s form, the Skill Types must be configured. Go to to view the currently configured skill types and create new skill types. Click Create and a new Skill Type form appears. Fill out all the details and then click Save. Repeat this for all the skill types needed.
Skill Type: Enter the name of the skill type. This should be somewhat generic, since the specific skills listed will be housed under this category.
Skills: Click Add a line and enter the information for the new skill, then repeat for all other needed skills.
Levels: Click Add a line and a Create Levels form appears. Enter the name of the level, and assign a percentage (0-100) for that level. Click Save & New to save the entry and add another level, or click Save & Close to save the level and close the form.
Example
To add a math skill set, enter
Mathin the Name field. Next, in the Skills field, enterAlgebra,Calculus, andTrigonometry. Last, in the Levels field enterBeginner,Intermediate, andExpert, with the Progress listed as25,50, and100, respectively. Then, either click Save & Close or Save & New.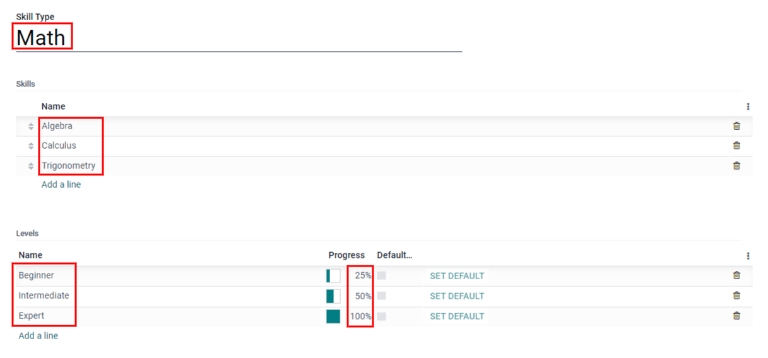
Tabblad Werkinformatie
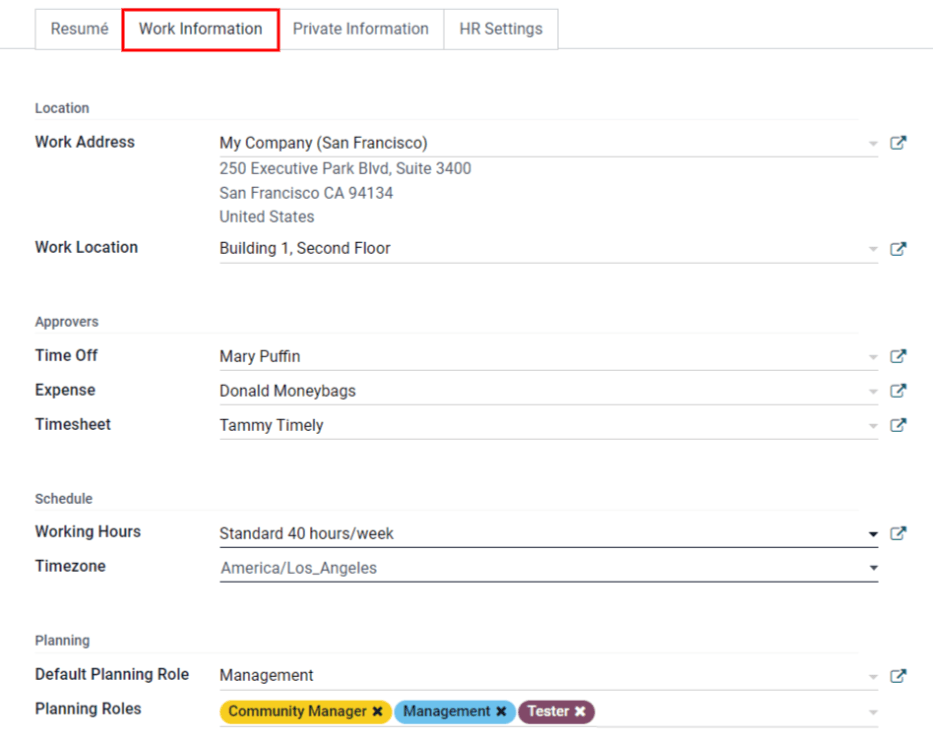
The Work Information tab is where the employee’s specific job related information is housed. Their working schedule, various roles, who approves their specific requests (time off, timesheets, and expenses), and specific work location details are listed here. Enter the following information for the new employee.
Location: Select the Work Address and Work Location from the corresponding drop-down menus. The work address External Link button opens up the selected company form in a window, and allows for editing. The Work Location is the specific location details, such as a floor or building. If a new work location is needed, add the location by typing it in the field.
Approvers: Using the drop-down menus, select the users responsible for approving Time Off, Expenses, and Timesheets for the employee. The External Link button opens a form with the approver’s Name, Email Address, Company, Phone, and Mobile fields. These can be modified, if needed. Click Save after making any edits.
Schedule: Select the Working Hours and Timezone (both required) for the employee. The External Link button opens up a detailed view of the specific daily working hours. Working hours can be modified or deleted here. Click Save to save any changes.
Planning: The Planning section affects the Planning app, and will only appear if the Planning app is installed. Click on a planning role from the drop-down menu for both the Default Planning Role and the Planning Roles fields to add a role. There is no limit to the amount of Planning Roles that can be selected for an employee, but there can only be one Default Planning Role. The default is the typical role that the employee performs, where the Planning Roles are all the specific roles the employee is able to perform.
Tip
The users that appear in the drop-down menu for the Approvers section must have Administrator rights set for the corresponding human resources role. To check who has these rights, go to . Click on an employee, and check the Human Resources section of the Access Rights tab.
In order for the user to appear as an approver for Expenses, they must have either Team Approver, All Approver, or Administrator set for the Expenses role.
In order for the user to appear as an approver for Time Off, they must have either Officer or Administrator set for the Time Off role.
In order for the user to appear as an approver for Timesheets, they must have either Manager, Officer, or Administrator set for the Payroll role.
Notitie
De Werkuren zijn gerelateerd aan de werktijden van een bedrijf en een werknemer kan geen werktijden hebben die buiten de werktijden van een bedrijf vallen.
Elke individuele werktijd is bedrijfsspecifiek, dus voor databases met meerdere bedrijven moet elk bedrijf zijn eigen werktijden hebben.
Als de werktijden van een werknemer niet zijn ingesteld als werktijden voor het bedrijf, kunnen nieuwe werktijden worden toegevoegd of bestaande werktijden worden gewijzigd. Om een werktijd toe te voegen of te wijzigen, ga naar de applicatie en voeg een nieuwe werktijd toe of bewerk een bestaande werktijd.
Nadat de werktijd is aangemaakt, stel je de werktijden voor de werknemer in.
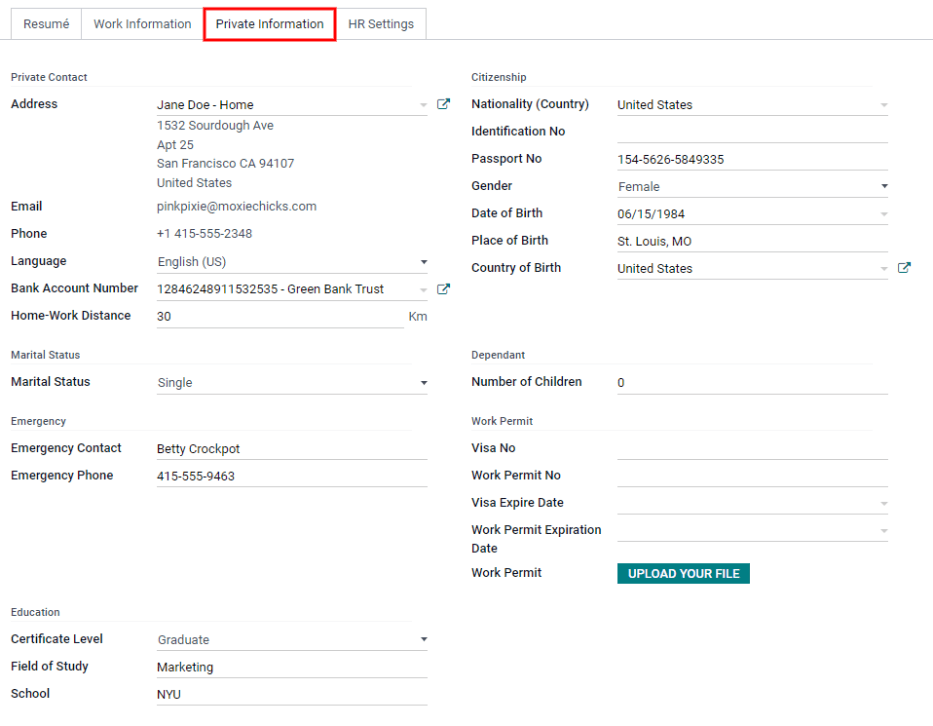
Tabblad privé informatie
Informatie in het tabblad Privé informatie is niet vereist, maar sommige informatie in dit gedeelte kan van cruciaal belang zijn voor de loonadministratie van het bedrijf. Om de loonstroken goed te kunnen verwerken en ervoor te zorgen dat alle inhoudingen worden verantwoord, moeten de persoonlijke gegevens van de werknemer worden ingevoerd.
Hier wordt de informatie over de Privé contact, de Burgerlijke staat, Noodcontactpersoon, Opleiding, Burgerschap, Personen ten laste en Werkvergunning van de werknemer ingevuld. De velden kunnen worden ingevoerd via een vervolgkeuzelijst, een selectievakje of een tekstvak.
Private Contact: Enter the personal Address for the employee. The selection can be made with the drop-down menu. If the information is not available, type in the name for the new address. To edit the new address, click the External Link button to open the address form. On the address form, enter the necessary details, then click Save
Some other information in the Private Contact section may auto-populate, if the address is already listed in the drop-down menu.
Next, enter the employee’s Email address and Phone number in the corresponding fields.
Select the employee’s preferred Language from the drop-down menu.
Enter the employee’s Bank Account Number using the drop-down menu. If the bank is not already configured (the typical situation when creating a new employee) enter the bank account number, and click Create and Edit. A Create: Bank Account Number for appears. Fill in the information, then click Save.
Finally, enter the Home-Work Distance in the field. This field is only necessary if the employee is receiving any type of commuter benefits.
Burgerlijke staat: Selecteer in het vervolgkeuzemenu Ongehuwd, Gehuwd, Wettelijk samenwonend, Weduwe/Weduwenaar, of Gescheiden.
Emergency: Type in the name and phone number of the employee’s emergency contact.
Opleiding: Selecteer in het vervolgkeuzemenu Niveau getuigeschrift het hoogste onderwijsniveau dat de werknemer heeft behaald. Je kan onder andere kiezen tussen Gediplomeerd, Bachelor, Master, Dokter, of Overige. Voer het Vakgebied en de naam van de School in de betreffende velden in.
Citizenship: This section houses all the information relevant to the citizenship of the employee. Some selections use a drop-down menu, as does the Nationality (Country), Gender, and Country of Birth sections. The Date of Birth uses a calendar module to select the date. First, click on the name of the month, then the year, to access the year ranges. Use the < (left) and > (right) arrow icons, navigate to the correct year range, and click on the year. Next, click on the month. Last, click on the day to select the date. Type in the information for the Identification No, Passport No, and Place of Birth fields.
Dependant: If the employee has any children, enter the Number of Children in the field.
Work Permit: If the employee has a work permit, enter the information in this section. Type in the Visa No and/or Work Permit No in the corresponding fields. Using the calendar module, select the Visa Expire Date and/or the Work Permit Expiration Date to enter the expiration date(s). If available, upload a digital copy of the work permit document. Click Upload Your File, navigate to the work permit file in the file explorer, and click Open.
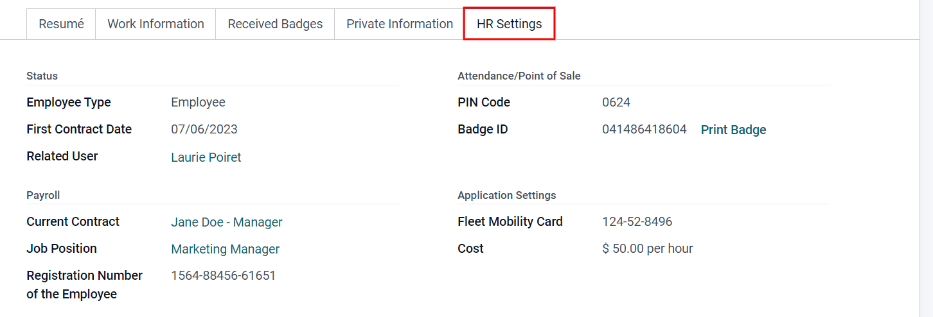
Tabblad Personeelsbeheer instellingen
Dit tabblad bevat verschillende velden voor verschillende informatie, afhankelijk van het land waar het bedrijf zich bevindt. Verschillende velden zijn geconfigureerd voor verschillende locaties, maar sommige secties worden ongeacht weergegeven.
Status: Select an Employee Type and, if applicable, a Related User, with the drop-down menus.
Payroll: Select the Current Contract and Job Position from the drop-down menus. If applicable, enter the Registration Number in this section.
Previous Employer: This section appears only for Belgian companies, and will not be visible for other locations. These are days that will be paid to the new employee. Enter any Simple Holiday Pay to Recover, Number of Days to recover, and Recovered Simple Holiday Pay from a previous employer, for both N and N-1 categories.
Previous Occupations: This section appears ony for Belgian companies, and will not be visible for other locations. Click Add a line to enter information for each previous occupation. Enter the number of Months, the Amount, and the Occupational Rate in the corresponding fields. Click the 🗑️ (trash can) icon to delete a line.
Attendance/Point of Sale: The employee’s Badge ID and PIN Code can be entered here, if the employee needs/has one. Click Generate next to the Badge ID to create a badge ID.
Application Settings: If applicable, enter the Fleet Mobility Card number. Enter the employee’s cost per hour in a $XX.XX format. This is factored in when the employee is working at a work center. This value affects the manufacturing costs for a product, if the value of the manufactured product is not a fixed amount.
Documenten
All documents associated with an employee are stored in the Documents app. The number of documents associated with the employee appear in the Documents smart button on the employee form. Click on the smart button, and all the documents appear. For more information on the Documents app, refer to the Documents documentation.
