Dynamic caller ID
Caller ID identifies the caller when they make a phone call. It allows the recipient of the call to see what number the caller is calling from. Caller ID shows users and clients who is calling, so they can choose to pick up or decline the call.
Axivox offers a dynamic caller ID option to choose which number is displayed on outgoing calls.
International numbers can be purchased to do business transactions internationally, via a phone call, from a number that has an area code or country code of the destination being called. By displaying a local number, this can increase customer engagement.
Some companies have many employees making calls from a call center. These employees are not always available to receive a return phone call from a prospective customer. In this case, VoIP can be configured in such a way that dynamic caller ID shows the main company phone number, so any number of employees in the group can answer the call. This way, a call is never missed.
Default outgoing number
In Axivox a default number can be set. This is a company’s main number. This means, when anyone from the company (user/employee) calls a number outside the company, the default outgoing number shows up automatically on the caller ID.
If someone from outside the company tries to call back a user/employee, they are then funneled back through the main line (default number). If there is a dial plan set up, they are prompted to make selections. This is especially helpful in cases where employees change positions frequently, or if they leave the company.
Перегляньте також
To access the default number, go to the Axivox management console, and log in. Then, click into Settings in the left menu, and navigate to Default outgoing number.
From here, change the Default outgoing number by clicking the drop-down menu, and making a selection from the incoming phone numbers available on Axivox.
Be sure to Save the changes, then click Apply changes in the upper-right corner of the General Settings page to implement the change.
The Default outgoing number is what shows up by default in the Axivox management portal. However, the outgoing number can also be configured differently at the user level.
Користувачі
To configure the outgoing number at the user level, log in to the Axivox management console. Next, click Users from the menu on the left, and then click Edit to the right of the user that is to be configured.
Under Outgoing number, click the drop-down menu to select either the Default outgoing number (as specified here: Default outgoing number), or any of the incoming numbers on the Axivox account.
Choosing the Default selection in the Outgoing number drop-down menu ensures this user has the Default outgoing number shown on their caller ID when making calls.
If a specific number is chosen, and that number is assigned to this user under Incoming numbers (in the Axivox console’s menu on the left), that means this user has a direct line for customers to reach them.
Once the desired changes are complete, be sure to click Save, then click Apply changes in the upper-right corner to implement the change.
Порада
By default, when creating a new user in Axivox, the Outgoing number is automatically set to Default.
Advanced options
To access the Advanced options, navigate to the Settings option in the menu on the left of the Axivox management console. Then, click Advanced options to the right of Default outgoing number.
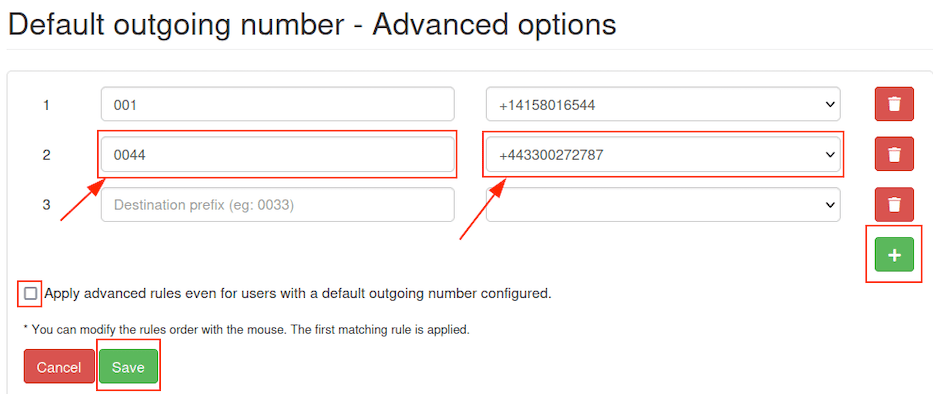
By default, there are not any advanced rules set. To create one, click the green + (plus) icon. Doing so reveals a line with two blank fields. From here, different caller IDs can be set up, depending on what location the user/employee is calling from.
To create a rule, first set the Destination prefix in the first empty field. This is the country code, complete with zero(s) in front of it. Then, in the second empty field, select the phone number that should be used for calling out from that country code.
Важливо
Check the box for Apply advanced rules even for users with a default outgoing number configured to allow these rules to take precedent over all other outgoing configurations.
Порада
The order of the rules can be modified by dragging-and-dropping them into another order. The first matching rule is applied.
Example
For example, a company wants all users/employees to utilize the configured number for Great
Britain when calling from the 0044 country code (Great Britain).
To accomplish that, simply type in 0044 into the Destination prefix field, and
select the number starting with the +44 country code. Order the rules as necessary, and select
the checkbox to supersede all other rules, if needed.
Once the desired configurations are complete, be sure to click Save, then click Apply changes in the upper-right corner to implement the change.