
Relatórios personalizados
Odoo comes with a powerful and easy-to-use reporting framework. The engine allows you to create new reports, such as tax reports, or balance sheets and income statements with specific groupings and layouts.
Importante
Activate the developer mode to access the accounting report creation interface.
To create a new report, open the Accounting app and navigate to . From here, you can either create a root report or a variant.
Relatórios raiz
Os relatórios raiz podem ser considerados como relatórios contábeis genéricos e neutros. Servem como modelos nos quais as versões contábeis locais são criadas. Se um relatório não tiver um relatório raiz, ele será considerado um relatório raiz.
Example
Um relatório fiscal da Bélgica e dos EUA usaria a mesma versão genérica como base e a adaptaria para suas regulamentações domésticas.
When creating a new root report, you need to create a menu item for it. To do so, open the report and, on that same report, click the (Actions) icon, then select Create Menu Item. Refresh the page; the report is now available under .
Nota
Os casos que exigem a criação de um novo relatório raiz são raros, como quando as autoridades fiscais de um país exigem um tipo novo e específico de relatório.
Variantes
As variantes são versões específicas de país dos relatórios raiz e, portanto, sempre se referem a um relatório raiz. Para criar uma variante, selecione um relatório genérico (raiz) no campo Relatório raiz ao criar um novo relatório.
When a root report is opened from one of the accounting app’s main menus, all its variants are displayed in the variant selector in the top right corner of the view.
Example
In the following image, VAT Report (BE) is the variant of the root Generic Tax report.
Report lines
After having created a report (either root or variant), you need to fill it with report lines. You can either create a new one by clicking on Add a line, or modify an existing report line by clicking on it. All report lines require a Name, and can have an optional additional Code (of your choice) if you wish to use their value in formulas.

Expressão
Each report line can contain one or multiple expressions. Expressions can be seen as sub-variables needed by a report line. To create an expression, click on Add a line within a report line.
When creating an expression, you must attribute a Label used to refer to that expression. Therefore, it has to be unique among the expressions of each line. Both a Computation Engine and a Formula must also be indicated. The engine defines how your formula(s) and subformula(s) are interpreted. It is possible to mix expressions using different computation engines under the same line if you need to.
Nota
Dependendo do mecanismo, as subfórmulas também pode ser necessárias.
‘Odoo Domain’ engine
With this engine, a formula is interpreted as an Odoo domain
targeting account.move.line objects.
A subfórmula permite que você defina como as linhas de movimentação que correspondem ao domínio são usadas para calcular o valor da expressão:
sumO resultado é a soma de todos os saldos das linhas de movimento correspondentes.
sum_if_posO resultado é a soma de todos os saldos das linhas de movimentação correspondentes, se esse valor for positivo. Caso contrário, será
0.sum_if_negO resultado é a soma de todos os saldos das linhas de movimentação correspondentes se esse valor for negativo. Caso contrário, será
0.count_rowsThe result is the number of sub-lines of this expression. If the report line has a group-by value, this will correspond to the number of distinct grouping keys in the matched move lines. Otherwise, it will be the number of matched move lines.
You can also put a - sign at the beginning of the subformula to reverse the sign of the
result.

‘Aggregate Other Formulas’ engine
Use this engine when you need to perform arithmetic operations on the amounts obtained for other
expressions. Formulas here are composed of references to expressions separated by one of the four
basic arithmetic operators (addition +, subtraction -, division /, and multiplication *). To
refer to an expression, type in its report line’s code followed by a period . and the
expression’s label (ex. code.label).
As subfórmulas podem ser uma das seguintes:
if_above(CUR(amount))O valor da expressão aritmética será retornado somente se for maior que o limite fornecido. Caso contrário, o resultado será
0.if_below(CUR(amount))O valor da expressão aritmética será retornado somente se for menor que o limite fornecido. Caso contrário, o resultado será
0.if_between(CUR1(amount1), CUR2(amount2))O valor da expressão aritmética será retornado somente se estiver estritamente entre os limites fornecidos. Caso contrário, será retornado para o limite mais próximo.
if_other_expr_above(LINE_CODE.EXPRESSION_LABEL, CUR(amount))O valor da expressão aritmética será retornado somente se o valor da expressão denotado pelo código de linha fornecido e pelo rótulo da expressão for maior que o limite fornecido. Caso contrário, o resultado será
0..if_other_expr_below(LINE_CODE.EXPRESSION_LABEL, CUR(amount))O valor da expressão aritmética será retornado somente se o valor da expressão denotado pelo código de linha fornecido e pelo rótulo da expressão for menor que o limite fornecido. Caso contrário, o resultado será
0..
CUR é o código da moeda em letras maiúsculas e amount é o valor do vínculo expresso nessa moeda.
cross_report(xml_id | report_id[, force_date_scope])Match an expression from another report targeted by the xml_id or the report ID itself. If
force_date_scopeis added, the Date Scope defined on the expression will be used to compute all the expressions used by the formula.
‘Prefix of Account Codes’ engine
This engine is used to match amounts made on accounts using the prefixes of these accounts’ codes as variables in an arithmetic expression.
Example
21Example
21 + 10 - 521 e 10 e subtrai o saldo das linhas feitas em contas com o prefixo 5.Também é possível ignorar uma seleção de subprefixos.
Example
21 + 10\(101, 102) - 5\(57)101, 102 e 57.Você pode aplicar “subfiltragem” de créditos e débitos usando os sufixos C e D. Nesse caso, uma conta só será considerada se o seu prefixo corresponder e se o saldo total das linhas de movimentação feitas nessa conta for crédito/débito.
Example
A conta 210001 tem um saldo de -42 e a conta 210002 tem um saldo de 25. A fórmula 21D só corresponde à conta 210002 e, portanto, retorna 25. A conta 210001 não é correspondida, pois seu saldo é crédito.
As exclusões de prefixo podem ser combinadas com os sufixos C e D.
Example
21D + 10\(101, 102)C - 5\(57)21 se for débito (D) e 10 se for crédito (C), mas ignora os prefixos 101, 102, e subtrai o saldo das linhas feitas em contas com o prefixo 5, ignorando o prefixo 57.Para combinar a letra C ou D em um prefixo e não usá-la como sufixo, use uma exclusão vazia ().
Example
21D\()21D, independentemente do sinal de saldo.Além de usar os prefixos de código para incluir contas, você também pode combiná-los com marcadores de contas. Isso é especialmente útil, por exemplo, se o seu país não tiver um plano de contas padronizado, em que o mesmo prefixo pode ser usado para finalidades diferentes entre as empresas.
Example
marcadores(25)If the tag you reference is defined in a data file, an xmlid can be used instead of the id.
Example
tag(my_module.my_tag)Você também pode usar expressões aritméticas com marcadores, possivelmente combinando-as com seleções de prefixo.
Example
tag(my_module.my_tag) + tag(42) + 1010.Os sufixos C e D podem ser usados da mesma forma que os marcadores.
Example
tag(my_module.my_tag)CA exclusão de prefixo também funciona com marcadores.
Example
tag(my_module.my_tag)\(10)10.‘External Value’ engine
The ‘external value’ engine is used to refer to manual and carryover values. Those values
are not stored using account.move.line, but with account.report.external.value. Each of these
objects directly points to the expression it impacts, so very little needs to be done about their
selection here.
As Fórmulas podem ser uma das seguintes:
sumSe o resultado deve e ser a soma de todos os valores externos no período.
most_recentSe o resultado deve ser o valor do último valor externo no período.
Além disso, as subfórmulas podem ser usadas de duas maneiras:
rounding=XA substituição de
Xpor um número instrui o arredondamento do valor para X casas decimais.editableIndica que é possível editar essa expressão manualmente acionando a exibição de um ícone no relatório, o que permite que o usuário execute tal ação.
Nota
Os valores manuais são criados na date_to atualmente selecionada no relatório.
Ambas as subfórmulas podem ser misturadas, separando-as com ;.
Example
editable;rounding=2‘Custom Python Function’ engine
This engine is a means for developers to introduce custom computation of expressions on a case-by-case basis. The formula is the name of a python function to call, and the subformula is a key to fetch in the dictionary returned by this function. Use it only if you are making a custom module of your own.
Date filtering
By default, the values computed for each expression will restrict the move lines they consider to the ones strictly within the interval selected on the report. To change that behavior, modify the Date Scope field of the expression.
Colunas
Os relatórios podem ter um número indefinido de colunas a serem exibidas. Cada coluna obtém seus valores das expressões declaradas nas linhas. O campo expression_label da coluna fornece o rótulo das expressões cujo valor é exibido. Se uma linha não tiver nenhuma expressão nesse campo, nada será exibido para ela nessa coluna. Se forem necessárias várias colunas, você deverá usar rótulos de expressão diferentes.
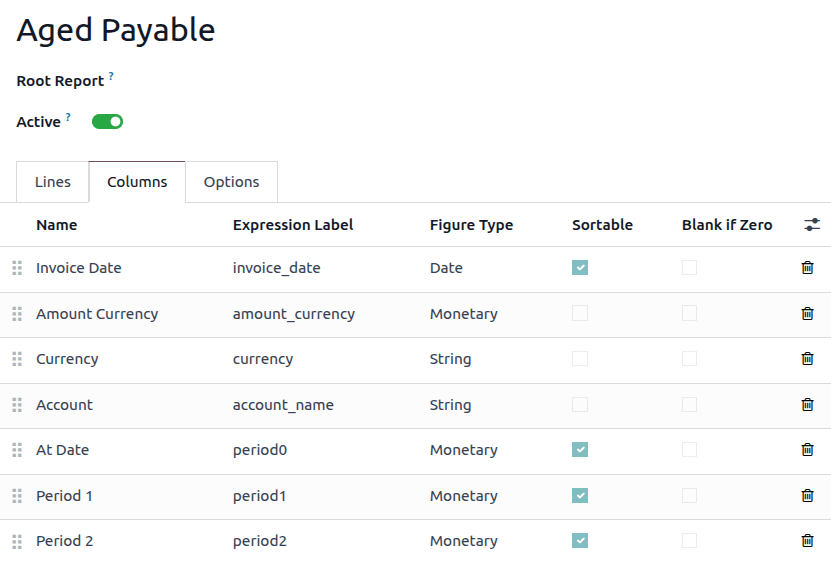
Ao usar o recurso de comparação de períodos encontrado na aba Opções de um relatório contábil, todas as colunas são repetidas em e para cada período.
Line grouping
Non-standard grouping is possible by adding or using existing fields on the Journal Item model, provided that the fields are related and non-stored.
Nota
Grouping lines requires the report to have explicit report lines that can be edited. The deferred reports, for example, do not support grouping lines as they use dynamic lines that are generated.
Create a new field on journal item
To create a non-stored, related field in the Journal Item model, first go to , and click the (bug) icon, then click Fields. Click New to create a new field, and complete the following fields:
Field Name: a technical name for the field
Field Label: the label to be displayed for the field
Field Type: the type of field that this related field should point to
Stored: Leave this field unchecked as only non-stored fields can be used to group lines.
Related Model: If the field type is one2many, many2many, or many2one, select the model of the original field to group by.
Related Field Definition: the technical path to the field you want to group by
Example
To group by the sales team of the commercial partner, set the related field definition to
move_id.team_id.
Group lines
To group lines, go to the Lines tab of the desired report, click on the line you want to group, and edit the Group by field. Enter the technical name (Field Name) of the field to use as the grouping key.
Dica
To find a list of all the model’s fields and their technical names, go to , and click the (bug) icon, then click Fields. The technical name of each field is listed in the Field Name column.
Veja também
Custom tax report setup
Report configuration
Dica
All technical terms and functions of Odoo’s reports engine are explained in the previous sections of this page. We strongly recommend reading these sections before setting up a custom tax report.
To create a custom tax report, open the Accounting app, navigate to , then click New:
Enter a name for your report.
Select a Root Report.
Under the Availability field, select Country Matches, then select the Country matching your company.
Next, create a report line by clicking the Add a line. Once created, click that report line to configure it:
Click Add a line again to create an Expression and name it.
In the Definition tab, select a Computation Engine for that expression depending on the following scenarios:
In this scenario, your company uses tax grids:
Select Tax Tags as the computation engine. Odoo uses this field to link the report line to your taxes.
In the Formula field, type your short grid identifier (e.g.,
vat_sales_base). Odoo automatically generates the+and-variants of this tag for you to map inside .In the Subformula field, enter either
baseto report the untaxed amount, ortaxto report the actual tax amount collected/paid.
Repeat this process as necessary. Then, Save & Close.
Alternatively, you can:
Select Aggregate Other Formulas as the computation engine. Odoo uses this field to perform math on lines already present in the report rather than scanning raw transactions.
In the Formula field, use basic algebra referencing your line codes (e.g.,
LINE_10 - LINE_20).
Repeat this process as necessary. Then, Save & Close.
In this scenario, your company does not use tax grids. Instead, it tracks everything strictly via General Ledger accounts:
Select Prefix of Account Codes as the computation engine: Odoo uses this for lines that need to pull financial totals. Instead of looking for transaction tags, Odoo pulls live balances directly from your chart of accounts.
In the Formula field, type the starting digits of the accounts you want to track, (e.g.,
40will pull the combined total of all revenue accounts starting with400000,401000, etc.).
Repeat this process as necessary. Then, Save & Close.
Alternatively, you can:
Select Aggregate Other Formulas as the computation engine. Odoo uses this to calculate subtotals, net tax, or grand totals by adding or subtracting your other report lines.
In the Formula field, use basic algebra referencing your line codes (e.g.,
LINE_10 - LINE_20).
Repeat this process as necessary. Then, Save & Close.
In this scenario, your company requires advanced filtering, manual user overrides, or complex algorithmic logic that standard tags and account prefixes cannot handle:
Select Odoo Domain as the computation engine: Odoo uses this to bypass tax tags entirely and filter raw journal items (
account.move.line) using standard Odoo search syntax.In the Formula field, enter a valid domain starting with brackets to isolate tax-exempt transactions for specific partner categories.
Alternatively, you can:
Select External Value as the computation engine. Odoo uses this to log manual overrides or historical carryover values.
In the Formula field, type either
sum(to add all manual values together over multi-period reports) ormost_recent(to display only the latest value).In the Subformula field, type
editableto display an edit icon on the live report, allowing users to modify the value manually. Additionally, you can round numbers by typingrounding=x.
Alternatively, you can:
Select Custom Python Function as the computation engine. Odoo uses this as an execution engine to run specific calculations through backend coding when rules involve progressive brackets, loops, or multi-tier thresholds.
In the Formula field, enter the exact technical name of the Python method defined in your custom localization module.
Repeat this process as necessary. Then, Save & Close.
In the Options tab of an Expression, populate the Carry Over To field with a formula to always carry over balances or only carry them over when the amount is negative. Leave this field blank if you do not want to use this feature.
Example
if_below(EUR(0))Tax configuration
Next, go to and click New to create and configure new taxes for your custom tax report. Create your Sales and Purchases taxes, and populate the Tax Grids for all taxes using the matching tax grids you created earlier. Finally, make sure to specify both a tax payable and tax receivable account for each tax.
Example

Closing entry
To close taxes, a tax group must be specified on each tax used in your custom tax report. To do this, open the Accounting app, navigate to , open a tax that requires a tax group, click the Advanced Options tab, and select a group in the Tax Group field. Once assigned, click the (right arrow) icon and set both a Tax Payable Account and a Tax Receivable Account.
Dica
When everything has been set up, make sure to test your report by creating invoices, bills, and credit notes using the taxes specific to that report. Finally, test the closing entry itself.
If you want to hide a specific account from displaying in the tax closing entry, go to , select the tax, and click the (settings adjust) icon. From there, check the Tax Closing Entry box to adjust its visibility.
Veja também