Offboarding
When an employee leaves the company, it is important to have an offboarding plan to ensure all necessary steps are followed, such as returning equipment, revoking access to business systems, filling out HR forms, having an exit interview, and more. Depending on the company, there could be several different offboarding plans, configured for specific departments or divisions, that have different requirements and steps from the main offboarding plan.
In addition to an offboarding plan, the employee record must be updated to reflect their departure, log the reason why they left, and close any open activities associated with the employee.
View offboarding plan
Before offboarding can begin, it is recommended to check the default offboarding plan that comes preconfigured with the Employees app. To view the current default plan, navigate to . Click Offboarding to view the detailed offboarding plan form.
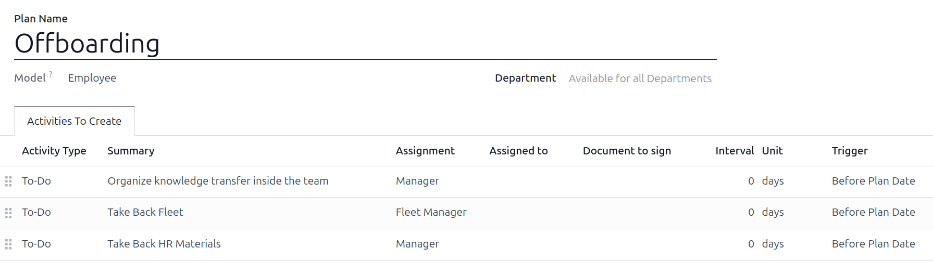
Offboarding plan steps
The default Offboarding plan is minimal, with two default steps (three if the Fleet app is installed). All steps are To-Do activities, and are scheduled for the day the offboarding plan is launched (0 days Before Plan Date). The default steps are:
Organize knowledge transfer inside the team: The manager must ensure all knowledge the employee has relating to their job position is either documented or shared with colleagues so there is no knowledge gap.
Take Back Fleet: The fleet manager ensures any vehicles assigned to the employee are either unassigned (available for other employees) or the next driver is assigned. This step only appears if the Fleet app is installed.
Take Back HR Materials: The manager must obtain any documents and materials the HR department requires. It is recommended to check with the HR department to ensure everything required for this step is completed.
Modify offboarding plan
The default offboarding plan is minimal, so that modifications can be made to accommodate any company’s offboarding needs. Every company has different requirements, therefore it is necessary to add the required steps to the offboarding plan.
If the offboarding plan is universal, add or modify the default offboarding plan. If the offboarding plan needed is only for a specific department, then a new plan should be created, specifically for that department.
To modify the default plan, first navigate to , then click on Offboarding.
To modify a step, click on the step and an Open: Activities pop-up window appears. Make any desired modifications to the step, then click Save to accept the changes and close the pop-up window.
To add a new step, click Add a line at the bottom of the listed activities in the Activities To Create tab, and a blank Create Activities pop-up window appears. Enter all the information in the pop-up window, then click Save & Close if there are no other steps to add, or click Save & New if more steps are needed.
Configure all the desired steps for the offboarding plan.
Create offboarding plan
For some companies, specific offboarding plans may be necessary for some departments. For these cases, a new department-specific offboarding plan may be needed.
To create a new onboarding plan, navigate to . Click the New button in the upper-left corner, and a blank Employee Plans form loads.
Enter the Plan Name, and select the Department using the drop-down menu. This creates a plan exclusively for that department.
Add the various offboarding activities by clicking Add a line in the Activities To Create tab, and configure each activity.
Enter the following information on the form:
Plan Name: The specific name for the plan.
Model: This field specifies where this plan can be used. In this case, in the Employees app. This field is not able to be modified.
Department: If left blank (the default setting) the plan is available for all departments. To make the plan department-specific, select a department using the drop-down menu.
Next, add the various steps for the plan by clicking Add a line at the bottom of the listed activities in the Activities To Create tab, and a blank Create Activities pop-up window appears.
Enter the following information in the pop-up window:
Activity Type: Using the drop-down menu, select the specific activity to be scheduled. The default options are To-Do, Email, Call, Meeting, Document, or Certifications. If the Sign app is installed, a Signature option is available.
Summary: Enter a short description for the step.
Assignment: Using the drop-down menu, select the person assigned to perform the activity. The default options are: Ask at launch, Default user, Coach, Manager, and Employee. If the Fleet app is installed, a Fleet Manager option is available.
Note
The selection for the Assignment role is in relation to the employee. If Coach is selected, the employee’s coach is assigned to the activity.
If Default user is selected, an Assigned to field appears. Using the drop-down menu, select the user who will always be assigned this activity.
Interval: Configure the fields in this line to determine the due date of the activity. Enter a number in the first field, then, using the drop-down menus in the following two fields, configure when the due date should be created; (
#) of days, weeks, or months, either Before Plan Date or After Plan Date.
When the Create Activities form is completed, click Save & Close if there are no other steps to add, or click Save & New to add more steps, as needed.
Example
A company specializing in after-school art programs has two separate offboarding plans, one for the teachers working in the field, and one for office workers.
The offboarding plan for the teachers is set for the Art Program Teachers department, and includes specialized tasks relating to those jobs. These include ensuring all art supplies are catalogued and returned, all student feedback forms are turned in, and all access badges and keys for the various locations are returned.

Launch offboarding plan
After an employee has given notice (typically two weeks) or once the company has decided to terminate the working relationship with the employee, the offboarding plan should be launched. Navigate to the and click on the departing employee profile. Click the Launch Plan button, and a blank Launch Plan pop-up window loads.
The top of the screen displays a button for each available plan, as well as a button for the various available activities. Click the desired offboarding plan to select it. Then, using the calendar selector, set a date in the Due Date field. This is typically the employee’s last day, but any date can be selected.
The Plan Summary section of the Launch Plan pop-up window displays all the steps in the selected plan, along with the user icon for the person assigned to each activity.
Click the Schedule button, and Odoo schedules everything in the plan, according to their respective due dates.
Archive an employee
In Odoo, when an employee leaves the company they must be archived. This step should be done after the employee has been fully offboarded. To archive an employee, first navigate to the . From here, locate the employee who is leaving the company, and click on their employee card.
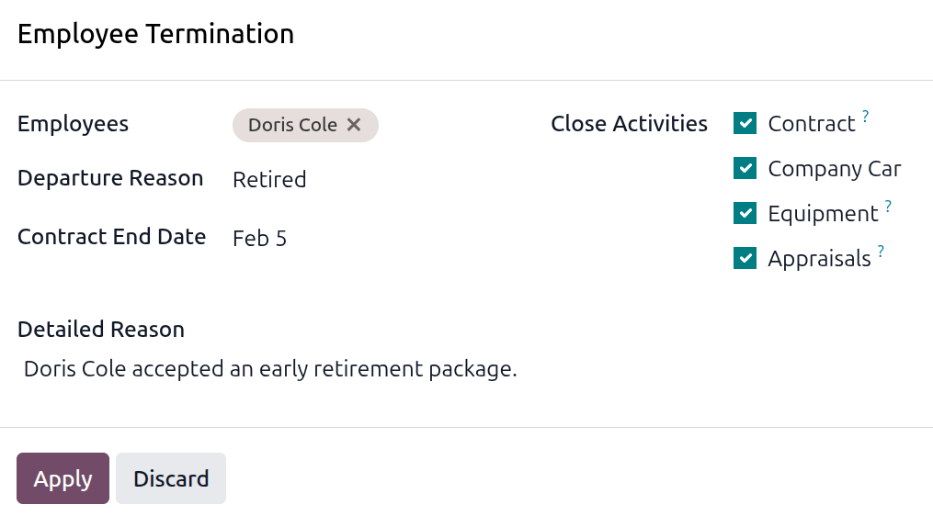
The employee form loads, displaying all their information. Click the (gear) icon in the top-left corner, and a drop-down menu appears. Click Archive, and an Employee Termination pop-up window appears.
Fill out the following fields on the form:
Employees: The selected employee populates this field by default. Multiple employees can be archived at once by adding the additional employees to archive in this field.
Departure Reason: Select a reason the employee is leaving from the drop-down menu. The default options are:
Fired: Select this option when an employee is being let go, and the company has given notice.
Resigned: Select this option when the employee no longer wishes to be employed, and the employee has given notice.
Retired: Select this option when the employee is retiring.
Note
If a new departure reason is needed, a new one can be created. Close the Employee Termination pop-up window, and navigate to . Click the New button, and a blank line appears at the bottom of the list. Enter the new reason, and click Save.
Contract End Date: Using the calendar selector, select the last day the employee is working for the company.
Detailed Reason: Enter a short description for the employee’s departure in this field.
Close Activities: Click the checkbox next to each type of activity to close or delete any open activities associated with it. It is recommended to click all checkboxes that are applicable. The available options are:
Contract: Applies an end date for the current contract.
Company Car: Removes the employee as the driver for their current company car, and assigns the next driver, if applicable.
Equipment: Unassigns the employee from any assigned equipment.
Appraisals: Cancels all appraisals scheduled after the contract end date.
When the form is complete, click Apply. The employee record is archived, and a red Archived banner appears in the top-right corner of the employee form. The chatter logs the various details, including the Departure Date, Departure Reason, Contract End Date, the dates for the last work entries, and the employee version that was archived.
Note
If any issues exist that prevent Odoo from archiving the employee, the detailed reasons appear in
a red warning box in the Employee Termination pop-up window. The warning states The plan
"(Plan Name)" cannot be launched, then lists the various steps that must be done before
archiving the employee.