Toegangsrechten
Toegangsrechten zijn rechten die bepalen tot welke inhoud en applicaties gebruikers toegang hebben en welke ze kunnen bewerken. In Odoo kunnen deze rechten worden ingesteld voor individuele gebruikers of voor groepen gebruikers. Het beperken van permissies tot alleen degenen die ze nodig hebben zorgt ervoor dat gebruikers niets wijzigen of verwijderen waar ze geen toegang toe zouden moeten hebben.
Alleen een beheerder kan toegangsrechten wijzigen.
Gevaar
Het wijzigen van toegangsrechten kan een nadelige invloed hebben op de database. Dit geldt ook voor impotent admin, wat betekent dat geen enkele gebruiker in de database wijzigingen kan aanbrengen in de toegangsrechten. Daarom raadt Odoo aan om contact op te nemen met een Odoo Business Analyst of ons Support Team voordat je wijzigingen aanbrengt.
Tip
Een gebruiker moet de specifieke toegangsrechten Administratie hebben ingesteld op zijn gebruikersprofiel om wijzigingen te kunnen aanbrengen in de instellingen voor toegangsrechten van een andere gebruiker.
Om toegang te krijgen tot deze instelling, navigeer je naar :menuselectie:`Instellingen app --> Beheer gebruikers --> selecteer een gebruiker --> Tabblad Toegangsrechten --> Beheer gedeelte --> Beheer veld`.
Eenmaal bij de instelling moet een reeds bestaande beheerder **de instelling in het Administratie]-veld wijzigen in :guilabel:`Toegangsrechten.
Als je klaar bent, klik je op Opslaan om de wijzigingen op te slaan en de gebruiker als beheerder te implementeren.
Manage user permissions
De toegangsrechten voor individuele gebruikers worden ingesteld wanneer de gebruiker wordt toegevoegd aan de database, maar ze kunnen op elk moment in het profiel van de gebruiker worden aangepast.
To make changes to a user’s rights, click the desired user to edit their profile.

Blader op de profielpagina van de gebruiker op het tabblad Toegangsrechten naar beneden om de huidige machtigingen te bekijken.
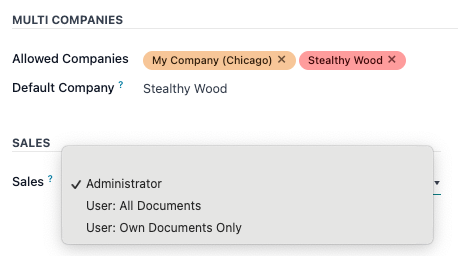
Gebruik voor elke app het uitklapmenu om te selecteren welk toestemmingsniveau deze gebruiker moet hebben. De opties verschillen per sectie, maar de meest voorkomende zijn: Blank/None, User: Own Documents, User: All Documents, of Administrator.
Het Administratie veld in het Toegangsrechten tabblad heeft de volgende opties: Instellingen of Toegangsrechten.
Manage specific permissions
While access rights are typically assigned in bundles under specific roles, they can also be set as explicit permissions.
Example
When a user is assigned the Administrator permission for Timesheets, it gives them full access to that app. That user, while holding full access, can still have their ability to manage their own timesheets restricted — such as in the case of a salaried payroll administrator who does not need to track time.
To manage specific permissions, developer mode must be enabled.
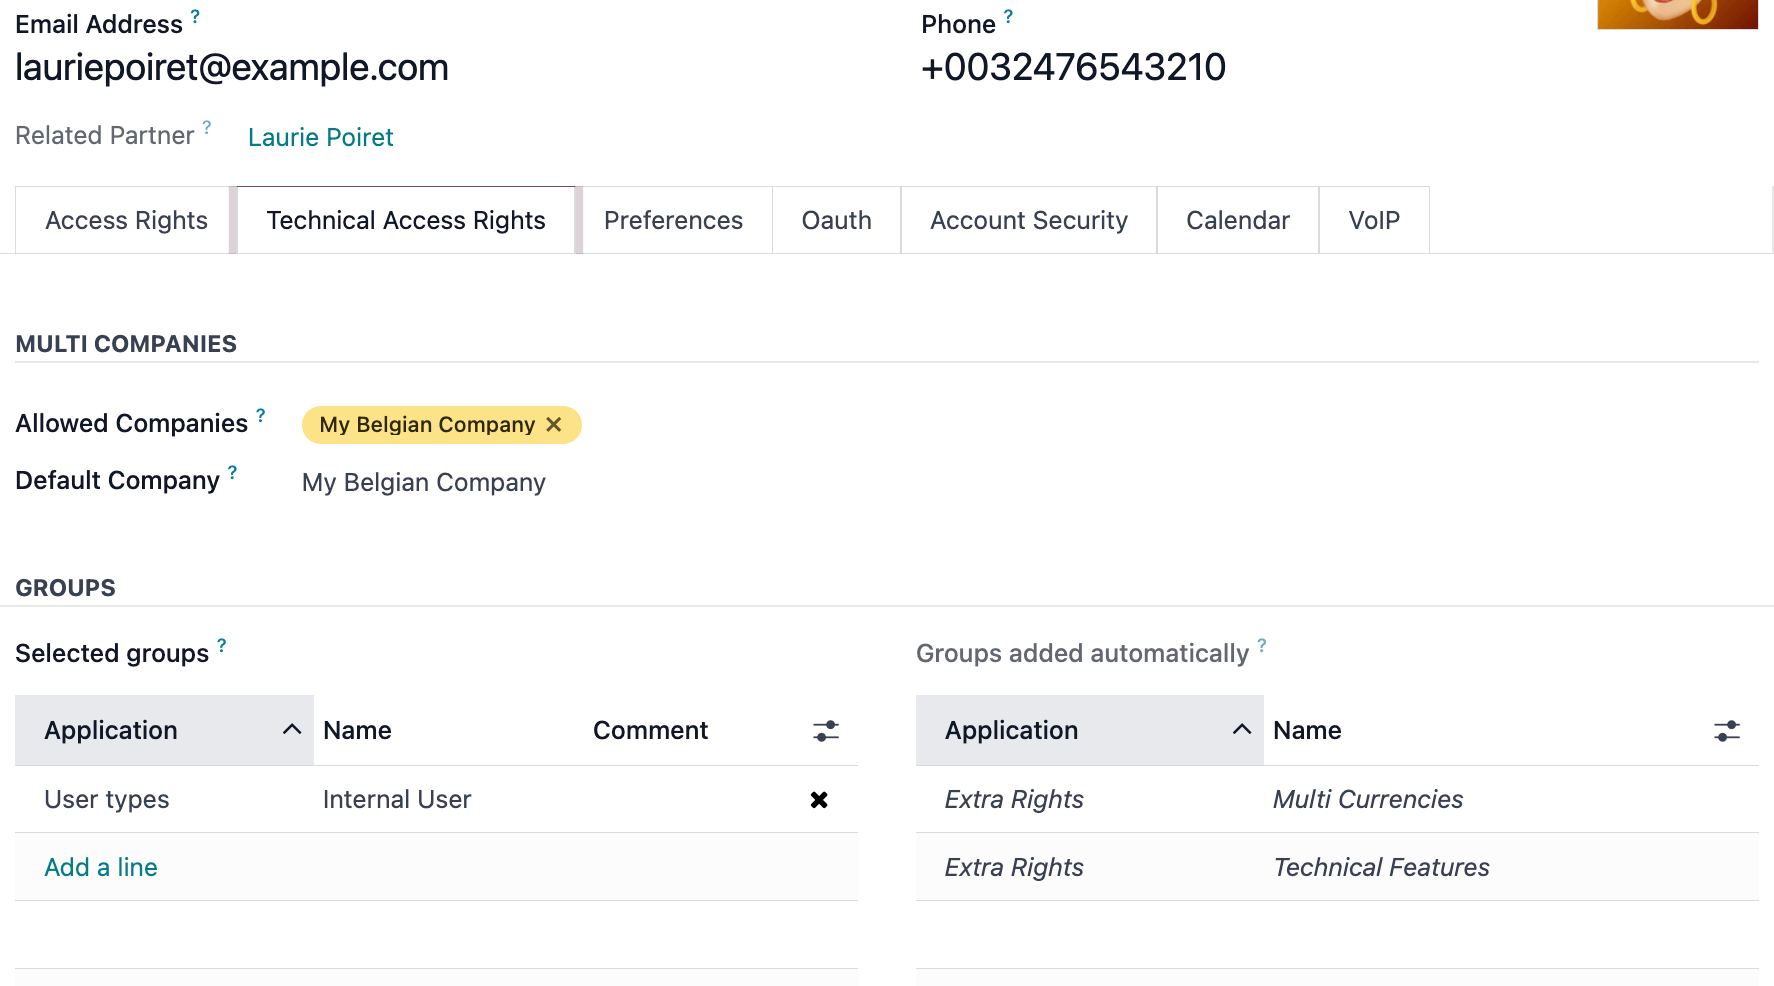
After that, navigate to the app. Then click Manage Users, select a user, and go to the Technical Access Rights tab. From here, Groups can be edited, and specific access rights can be managed across the various sections. If no changes are made to these groups, then their permissions will mirror the selections made in the Access Rights tab.
Selected groups: a list of detailed access rights, set by choices made in the Access Rights tab.
Groups added automatically: implied permissions that are inherited with the explicit permissions already granted to the user. The values here will match the values listed under a given Group’s form located under the menu, in the Inherited tab.
Example
When the Sales Administrator permission set is assigned to a user, the Canned Responses Administrator permissions are inherited automatically. These assignments are reflected across the values listed in the Selected Groups and Groups added automatically tables, respectively.
To add a permission to this user profile, click Add a line in the Selected groups table, and then add permissions to this user profile. To remove a permission, click the (cancel) icon at the end of that permission’s row.
Waarschuwing
Removing permissions from the Selected Groups list can impact what permissions are listed in the Groups added automatically list, since selected permission groups inform what permission groups are added automatically.
Clicking on the permission itself will open a group management form. Learn more about managing groups.
Any permission in the Groups added automatically section is implied or required by the permission shown in the Selected groups section. These cannot be removed, but more users can be given these permissions by clicking on the permission itself, and then adding the user to that permission’s group.
Notitie
Any permission in green is already provided by another permission (for example, setting the Website app’s permission to Editor and Designer will also give that user the Restricted Editor permission).
Any permissions in red are conflicting and cannot be active at the same time.
Any permissions in italics are implied by a Selected group (these are usually found in the Groups added automatically).
Groepen maken en wijzigen
Groepen zijn app-specifieke sets van rechten die worden gebruikt om gemeenschappelijke toegangsrechten voor een groot aantal gebruikers te beheren. Beheerders kunnen de bestaande groepen in Odoo aanpassen of nieuwe groepen aanmaken om regels te definiëren voor modellen binnen een applicatie.
Om toegang te krijgen tot groepen, activeer je eerst Odoo’s ontwikkelmodus en ga je vervolgens naar :menuselectie:`Instellingen app --> Gebruikers & Bedrijven --> Groepen`.

Om een nieuwe groep te maken op de Groepen pagina, klik je op Maken. Selecteer vervolgens op het lege groepsformulier een Toepassing en vul het groepsformulier in (zie hieronder).
To modify an existing group, click an existing group from the list displayed on the Groups page, and edit the contents of the form.
Voer een Naam in voor de groep en vink het vakje naast Groep delen aan, als deze groep is gemaakt om toegangsrechten in te stellen voor het delen van gegevens met bepaalde gebruikers.
Belangrijk
Test altijd de instellingen die worden gewijzigd om er zeker van te zijn dat ze worden toegepast op de juiste gebruikers.
The group form contains multiple tabs for managing all elements of the group. In each tab, click Add a line to add a new row for users or rules, and click the (cancel) icon to remove a row.
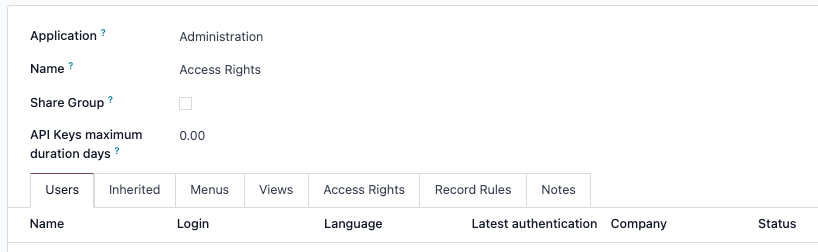
tabblad Users: toont de huidige gebruikers in de groep. Gebruikers in het zwart hebben beheerdersrechten. Gebruikers zonder beheerdersrechten worden blauw weergegeven. Klik op Een regel toevoegen om gebruikers aan deze groep toe te voegen.
Inherited tab: Inherited means that users added to this group are automatically added to the groups listed on this tab. Click Add a line to add inherited groups.
Example
Als de groep Verkoop/Beheerder bijvoorbeeld de groep Website/Beperkte redacteur in zijn Overgedragen tabblad vermeldt, dan krijgen alle gebruikers die aan de groep Verkoop/Beheerder worden toegevoegd automatisch ook toegang tot de groep Website/Beperkte redacteur.
Menus tab: defines which models the group can have access to. Click Add a line to add a specific menu.
tabblad Views: toont tot welke weergaven in Odoo de groep toegang heeft. Klik op Een regel toevoegen om een weergave aan de groep toe te voegen.
Access Rights tab: lists the first level of rights (models) that this group has. The Name column represents the name for the current group’s access to the model selected in the Model column.
To link a new access right to a group, click Add a line. Select the appropriate model from the Model drop-down, then enter a name for the access right in the Name column. For each model, enable the following options as appropriate:
Read: Users can see the object’s existing values.
Write: Users can edit the object’s existing values.
Create: Users can create new values for the object.
Delete: Users can delete values for the object.
Tip
While there are no conventions for naming access rights, it is advisable to choose a name that identifies its purpose.
For example, the access that purchase managers have to the Contact model could be named
res.partner.purchase.manager. This consists of the technical name of the model, followed by a name identifying the group of users in question.
To find the model’s technical name from the current view, first enter a placeholder text in the Name field, then click the Model name, then the (Internal link) icon.
Recordregels: toont de tweede laag van bewerkings- en zichtbaarheidsrechten. Recordregels overschrijven, of verfijnen, de toegangsrechten van de groep. Klik op Een regel toevoegen om een recordregel aan deze groep toe te voegen. Kies voor elke regel waarden voor de volgende opties:
Aanvragen voor lezen.
Aanvragen voor schrijven.
Aanvragen voor aanmaken.
Aanvragen voor verwijderen.
Belangrijk
Recordregels worden geschreven met behulp van een domein, of voorwaarden die gegevens filteren. Een domeinexpressie is een lijst van zulke voorwaarden. Bijvoorbeeld:
[('mrp_productie_ids', "in", user.partner_id.commerciële_partner_id.productie_ids.ids)]Deze recordregel is om MRP-verbruikswaarschuwingen voor onderaannemers in te schakelen.
Odoo heeft een bibliotheek met vooraf geconfigureerde recordregels voor gebruiksgemak. Gebruikers zonder kennis van domeinen (en domeinexpressies) moeten een Odoo Business Analyst of het Odoo Support Team raadplegen voordat ze wijzigingen aanbrengen.
Session and inactivity timeouts
When the auth_timeout module is installed, administrators can configure automatic logout rules for
users assigned to a specific user group. This module may be installed automatically by certain
localizations (for example, the Australian Payroll localization).
Once installed, a Timeouts tab appears on user group forms. This tab allows administrators to define how long users can remain logged in under different conditions.
Two types of timeouts can be configured:
Inactivity timeout
Inactivity timeout controls whether users are automatically logged out after a period of inactivity.
To enable inactivity timeout, click the Timeouts tab and tick the Inactivity checkbox. Next, choose either Screen lock or Screen lock with two-factor authentication from the drop-down menu. This determines whether the user must to complete 2FA verification when logging back in.
Then, enter the desired amount of time before enforcing screen lock, and select a unit of measure from the drop-down menu. Inactivity can be measured in minutes, hours, or days.
Session timeout
Session timeout controls whether users are logged out after a fixed session duration, regardless of activity.
To enable session timeout, click on the Timeouts tab, and tick the Session checkbox. Next, choose either Logout or Logout with two-factor authentication from the drop-down menu. This determines whether the user must to complete 2FA verification when logging back in.
Then, enter the desired amount of time before the user is logged out, and select a unit of measure from the drop-down menu. Session timeouts can be measured in minutes, hours, or days.
Supergebruikersmodus
Superuser mode allows the user to bypass record rules and access rights. To activate Superuser mode, first, activate developer mode. Then, navigate to the debug menu, represented by a (debug) icon, located in the top banner.
Klik ten slotte onderaan het menu op Become Superuser.
Belangrijk
Alleen gebruikers met Instellingen toegang voor het gedeelte Beheer van de Toegangsrechten (in hun gebruikersprofiel) mogen inloggen in de Supergebruikersmodus.
Gevaar
Superuser mode maakt het mogelijk om recordregels en toegangsrechten te omzeilen en moet daarom met uiterste voorzichtigheid worden gebruikt.
Bij het verlaten van de Superuser modus kunnen gebruikers worden geblokkeerd uit de database, vanwege de wijzigingen die zijn aangebracht. Dit kan leiden tot impotente admin, of een beheerder zonder de mogelijkheid om toegangsrechten/instellingen te wijzigen.
Neem in dit geval hier contact op met Odoo Support: nieuw helpticket. Het supportteam kan de toegang herstellen met behulp van een support login.
Om de Superuser mode te verlaten log je uit door naar de rechterbovenhoek te gaan en op de OdooBot gebruikersnaam te klikken. Selecteer dan de Uitloggen optie.
Tip
An alternative way to activate Superuser mode is to log in as a superuser. To do that, navigate to the login screen, and enter the appropriate Email and Password.
In plaats van op Login te klikken, klik je op Log in als superuser.