Recrutamento
O Odoo mantém todos os candidatos a emprego organizados com uma série pré-configurada de etapas e estágios pelos quais cada candidato passa. Cada estágio tem uma ou mais etapas específicas que devem ser executadas. Essas etapas vão desde o agendamento de uma ligação telefônica até a realização de uma entrevista ou o envio de uma oferta de emprego, por exemplo. Esse processo é chamado de “fluxo de candidatos”.
Quando um candidato se candidata a uma vaga de emprego, um cartão de candidato é criado automaticamente no aplicativo Recrutamento do Odoo para essa vaga específica. À medida que o candidato avança no funil de recrutamento, a equipe de recrutamento move seu cartão de um estágio para o outro.
É possível configurar estágios para que um e-mail seja enviado automaticamente, usando um modelo pré-configurado, assim que o cartão de um candidato entrar em um estágio. Esses e-mails automatizados são definidos em cada estágio do fluxo de candidatos.
O fluxo de candidatos explicado neste documento é o fluxo padrão no Odoo e passa pelo fluxo de candidatos quando se usa a configuração padrão do aplicativo Recrutamento. O fluxo de candidatos pode ser modificado para se adequar ao fluxo de recrutamento específico de qualquer empresa.
Nota
O fluxo de candidatos com todos os seus estágios é universal e se aplica a todos os cargos, a menos que seja especificado. Um estágio específico pode ser configurado para ser específico do cargo, o que significa que esse estágio específico só é visível para esse cargo específico. Caso contrário, se um novo estágio for criado ou um estágio existente for modificado, essas alterações serão visíveis em todos os cargos.
Definições
Antes de criar uma vaga de emprego no Odoo, defina as configurações necessárias para o aplicativo Recrutamento. Para visualizar e editar as configurações, navegue até . Depois de fazer qualquer alteração, clique no botão Salvar no canto superior esquerdo para salvar todas as alterações.
Anúncio de vagas
A seção Anúncio de vagas das configurações do aplicativo Recrutamento tem apenas uma seleção a ser feita. Se as vagas de emprego tiverem que ser publicadas no site da empresa, ative a opção Publicação online.
Nota
Publicação online só está disponível se o aplicativo Site também estiver instalado.
Processo de recrutamento
A seção Processo de recrutamento da página de configurações especifica o que a base de dados pode ou não fazer durante o processo de recrutamento.
Enviar pesquisa sobre entrevista
O Odoo é capaz de enviar uma pesquisa a um candidato para coletar mais informações. As pesquisas podem ser consideradas como testes ou questionários e podem ser personalizadas de várias maneiras para fornecer à equipe de recrutamento informações valiosas sobre o candidato.
Ative a opção Enviar pesquisa sobre entrevista para enviar questionários aos candidatos. Uma vez ativada, um link interno Pesquisa sobre entrevista é exibido. Clique no link para navegar até uma lista de todas as pesquisas criadas.
Essa lista inclui todas as pesquisas que foram criadas na base de dados, não apenas as pesquisas usadas no aplicativo Recrutamento. Se nenhuma pesquisa tiver sido criada, a lista de pesquisas exibirá uma mensagem Nenhuma pergunta encontrada e apresentará opções para criar uma pesquisa a partir de vários modelos de pesquisa pré-configurados.
Veja também
Para obter informações mais detalhadas sobre pesquisas, consulte a documentação Noções básicas de Pesquisas.
Nota
A ativação da opção Enviar pesquisa sobre entrevista instalará o aplicativo Pesquisas assim que as configurações forem salvas, se ainda não estiver instalado.
Enviar SMS
É possível enviar mensagens de texto aos candidatos diretamente pelo aplicativo Recrutamento. Para fazer isso, ative a opção Enviar SMS. Essa opção requer créditos para ser usada, que podem ser obtidos clicando no link interno Comprar créditos que aparece quando o recurso é ativado.
Veja também
Para obter mais informações, consulte a documentação Preços e perguntas frequentes sobre SMS.
Exibição de CV
Quando os candidatos enviam uma candidatura, um dos campos obrigatórios padrão é o currículo, ou CV. Todos os currículos são armazenados no aplicativo Documentos e podem ser acessados no cartão do candidato.
Há a opção de exibir o currículo no formulário do candidato, que pode ser visualizado clicando no cartão do candidato. O currículo aparece no lado direito da tela. Se isso não estiver ativado, o currículo será acessado por um link no chatter, que deve ser clicado clicar para expandir e visualizar ou baixá-lo.
Ative a opção Exibição de CV para mostrar o currículo no cartão do candidato por padrão, além do link do documento. Se ativada, o currículo aparece no lado direito do cartão do candidato.
Nota
Para que o currículo seja exibido no lado direito, a janela do navegador deve estar no modo de tela cheia (em que o navegador ocupa toda a tela).
Se a janela do navegador estiver definida para um tamanho menor que a largura total da tela (não em tela cheia), o currículo não aparecerá no lado direito. Em vez disso, o currículo aparecerá na seção Arquivos do chatter, abaixo do cartão do candidato.

Digitalização de CV (OCR)
Quando uma candidatura é enviada por qualquer um dos métodos disponíveis, como por uma candidatura on-line, por um currículo para o e-mail do cargo ou pela criação de um registro de candidato diretamente da base de dados, é possível fazer com que o Odoo extraia o nome, o número de telefone e o endereço de e-mail do candidato do currículo e preencha o formulário do candidato. Para fazer isso, ative a opção Digitalização de CV (OCR).
Quando ativada, são exibidas opções adicionais. Clique no botão de rádio correspondente para selecionar uma das seguintes opções:
Não digitalizar: essa opção desativa a digitalização do currículo.
Somente digitalizar sob demanda: essa opção digitaliza os currículos somente quando solicitado. Um botão Digitalizar documento aparece nos cartões de candidato. Quando clicado, o currículo é digitalizado e o cartão do candidato é atualizado.
Digitalizar automaticamente: essa opção digitaliza automaticamente todos os currículos quando eles são enviados.
Abaixo dessas opções há dois links adicionais. Clique no botão Comprar créditos para comprar créditos para digitalização de CV. Clique no botão Ver meus serviços para visualizar uma lista de todos os serviços atuais e seus saldos de créditos restantes.
Para obter mais informações sobre digitalização de documentos e IAP’s, consulte a documentação Compra no aplicativo (IAP).
Nota
A opção Não digitalizar para Digitalização de CV (OCR), a princípio, pode parecer uma redundância. Ela parece ser o mesmo que desativar a opção Digitalização de CV (OCR).
Quando a opção Digitalização de CV (OCR) está ativada, é instalado um módulo para que os currículos possam ser digitalizados. A desativação dessa opção desinstalará o módulo.
Se, em algum momento, houver o desejo de interromper temporariamente a digitalização de currículos, a opção Não digitalizar será selecionada. O motivo pelo qual essa opção está disponível é para que o módulo não seja desinstalado, permitindo que a digitalização seja ativada no futuro, selecionando uma das outras duas opções.
Configurador de pacote salarial
Ao enviar uma oferta a um candidato, é possível definir uma data de expiração para a oferta. Digite o número de dias em que uma oferta é válida no campo dias. Depois que o número de dias definido tiver passado, se o candidato não tiver aceitado a oferta, ela não estará mais disponível.
Visualização Kanban
Para acessar a visualização Kanban de uma vaga de emprego, navegue até o painel principal , que é a visualização padrão ao abrir o aplicativo. Todos os cargos aparecem no painel principal. Clique no botão inteligente (Nº) Novas candidaturas em um cartão de cargo para navegar até o modo de visualização Kanban de todos os candidatos a esse cargo específico.

Dentro da candidatura, são exibidos os estágios do Kanban, com todos os candidatos preenchidos em suas respectivas colunas, indicando em qual estágio estão atualmente. Há seis estágios padrão no Odoo:
A última coluna, Contrato assinado, é dobrada por padrão. As colunas dobradas aparecem em cinza e os candidatos nelas contidos ficam ocultos. Para expandir o estágio dobrado e visualizar os cartões de candidato dessa coluna, clique em qualquer lugar da coluna cinza fina que diz o nome do estágio e a coluna se expande, revelando os candidatos.

Cada estágio tem uma barra codificada por cores abaixo do nome do estágio, fornecendo informações de status para os candidatos naquele estágio específico. As cores de status são:
Verde: o candidato está pronto para passar para a próxima etapa.
Vermelho: o candidato está impedido de passar para a próxima etapa.
Cinza: o candidato ainda está em andamento no estágio atual e não está pronto nem bloqueado para o próximo estágio.
O status de cada cartão é definido manualmente. Para definir o status, clique no pequeno círculo no canto inferior esquerdo do cartão do candidato. É exibida uma janela pop-up de status. Clique no status desejado para o candidato. O ponto de status no cartão do candidato e a barra de status são atualizados.

Dica
Os nomes das três cores de status (Em andamento, Bloqueado e Pronto para o próximo estágio) podem ser modificados, se desejado.
Personalizar estágios
Os estágios podem ser modificados, adicionados ou excluídos para melhor atender às necessidades das etapas de contratação específicas de uma empresa.
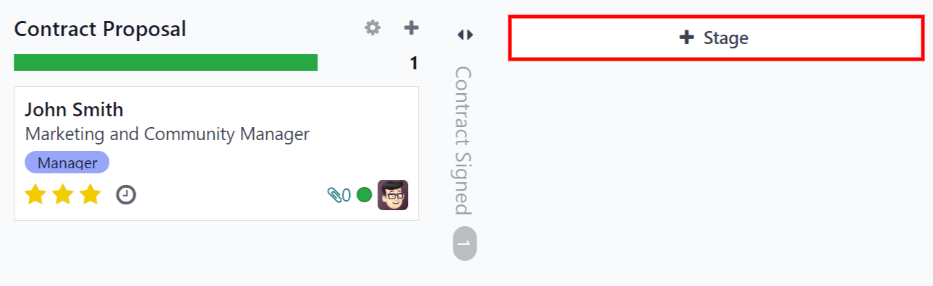
Novo estágio
Para criar um novo estágio, clique em Estágio e uma nova coluna será exibida. Digite o título do novo estágio no campo Título do estágio e, em seguida, clique em Adicionar. A nova coluna é exibida e outro novo estágio está disponível para ser criado. Se não houver necessidade de novos estágios, clique em qualquer lugar da tela para sair da criação do novo estágio.
Modificar estágio
Para modificar as configurações de um estágio, passe o mouse sobre o nome do estágio e um ícone (engrenagem) aparecerá no canto superior direito do estágio. Clique no ícone (engrenagem) e um menu será exibido. Em seguida, clique na opção Editar. Um formulário Editar: (Estágio) será exibido. Faça as modificações desejadas no formulário e, quando terminar, clique em Salvar e fechar.

Editar formulário de estágio
O formulário Editar: (Estágio) é onde as configurações do palco são definidas. O único campo obrigatório é o Nome do estágio.
Os campos a serem preenchidos ou modificados são:
Nome do estágio: digite um nome para o estágio.
Modelo de e-mail: no menu suspenso, selecione um modelo de e-mail a usar. Ao selecionar um modelo, quando o cartão do candidato entrar na etapa, um e-mail com o modelo selecionado será enviado automaticamente para o candidato.
Dobrado no Kanban: marque a caixa para que o estágio apareça sempre dobrado (oculto) na visualização padrão.
Estágio contratado: marque a caixa se essa etapa indicar que o candidato foi contratado. Quando o cartão de um candidato entra nesse estágio, o cartão exibe um banner Contratado no canto superior direito. Se essa caixa estiver marcada, esse estágio será usado para determinar a data de contratação de um candidato.
Específico do cargo: se a etapa se aplicar apenas a cargos específicos, selecione-os no menu suspenso. Vários cargos podem ser selecionados.
Mostrar em Indicações: marque a caixa se esse estágio deve ser visto no aplicativo Indicações e permitir que quem fez a indicação acumule pontos quando o candidato indicado atingir esse estágio. Se essa opção estiver ativa, um campo Pontos será exibido. Digite a quantidade de pontos que o funcionário recebe quando o candidato entra nesse estágio. O aplicativo Indicações deve estar instalado para que essa opção possa ser usada.
Seção Dicas: há três rótulos de status pré-configurados (círculos coloridos) para cada cartão de candidato, indicando seu status. Essas cores são exibidas na parte superior de cada etapa para refletir o status dos candidatos no estágio. Os nomes dos rótulos podem ser modificados, mas o rótulo em si (a cor) não. Os nomes e rótulos padrão são: Em andamento (cinza), Bloqueado (vermelho) e Pronto para o próximo estágio (verde).
Requisitos: insira notas internas para esse estágio, explicando seus requisitos.
Excluir estágio
Se um estágio não for mais necessário, ele poderá ser excluído. Para excluir um estágio, passe o mouse sobre o nome do estágio e um ícone (engrenagem) será exibido. Primeiro, clique no ícone (engrenagem) para exibir um menu suspenso e, em seguida, clique em Excluir. Um aviso pop-up de Confirmação é exibido, perguntando Tem certeza de que quer excluir esta coluna? Clique em Excluir para excluir a coluna.
Importante
Se houver candidatos no estágio que está sendo excluído, um erro aparecerá ao tentar excluir a etapa. Os registros atualmente no estágio precisam ser excluídos, arquivados ou movidos para um estágio diferente antes que o estágio possa ser excluído.
Modelos de e-mail
Para se comunicar com o candidato, o Odoo tem vários modelos de e-mail pré-configurados que podem ser usados:
Recrutamento: Confirmação do candidato: esse modelo é usado para informar ao candidato que sua candidatura foi recebida. Esse e-mail é enviado automaticamente quando o candidato está no estágio Novo.
Recrutamento: interesse: esse modelo é usado para informar ao candidato que sua candidatura chamou a atenção do recrutador e que ele foi pré-selecionado para uma ligação telefônica ou uma entrevista.
Recrutamento: Agendar entrevista”: esse modelo é usado para informar ao candidato que ele foi aprovado na etapa de “Qualificação inicial” e que será contatado para marcar uma entrevista com o recrutador. Esse e-mail é enviado automaticamente quando o candidato está na fase de :guilabel:`Qualificação Iinicial.
Recrutamento: não estou mais interessado: esse modelo é usado quando um candidato comunica que não está mais interessado na vaga e agradece pelo tempo e consideração.
Recrutamento: recusa: esse modelo é usado quando um candidato não está mais sendo considerado para o cargo.
Nota
Os modelos de e-mail podem ser criados, modificados e excluídos para atender às necessidades de uma empresa. Para obter mais informações sobre modelos de e-mail, consulte a documentação Email templates.
Para enviar um e-mail manualmente, clique em Enviar mensagem no chatter. Uma caixa de texto é exibida, bem como o endereço de e-mail do candidato.
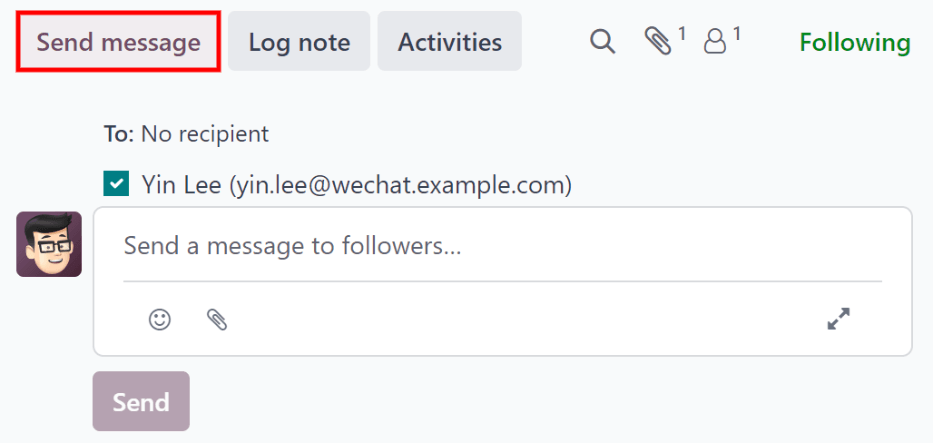
Clique no ícone (expandir) do compositor completo no canto inferior direito da aba Enviar mensagem no chatter. Uma janela pop-up Compor e-mail é carregada, com os campos Destinatários e Assunto pré-preenchidos. O endereço de e-mail do candidato é inserido na linha Destinatários e o Assunto é (Cargo). O corpo do e-mail está vazio por padrão.
Para usar um modelo de e-mail pré-configurado, clique no campo ao lado de Carregar modelo na seção inferior da janela. No menu suspenso, selecione o modelo de e-mail a usar.
Os modelos de e-mail pré-configurados podem conter marcadores de posição dinâmicos, de modo que informações exclusivas possam ser preenchidas no e-mail para uma mensagem mais personalizada para o candidato. Há vários modelos de e-mail pré-configurados para você escolher. Dependendo do modelo selecionado, o assunto e/ou o corpo do e-mail podem ser alterados.
Nota
Somente os modelos de e-mail configurados para o modelo são carregados. Há outros modelos de e-mail pré-configurados no Odoo, mas se não estiverem configurados para o aplicativo de recrutamento, não aparecerão na lista de modelos disponíveis.
Se for necessário adicionar algum anexo, clique no botão Anexos no canto inferior esquerdo. Navegue até o arquivo a ser anexado e clique em Abrir para anexá-lo. Para excluir um anexo, clique no ícone (excluir) à direita do anexo.
Edite o corpo do e-mail se for necessário fazer alguma alteração. Se as edições precisarem ser salvas para uso futuro, é possível salvar o e-mail como um novo modelo. Clique no botão Salvar modelo na parte inferior. Para enviar o e-mail, clique em Enviar e o e-mail será enviado ao candidato. O e-mail aparecerá no chatter.

Veja também