Automated actions (automations)
Automated actions are used to trigger automatic changes based on user actions (e.g., apply a modification when a field is set to a specific value) or on time conditions (e.g., archive a record 7 days after its last update).
To create an automated action with Studio, go to Automations from anywhere within Studio.
For every automated action you create, the following elements should be defined: the Model, the Trigger, the Apply on, and the Action.
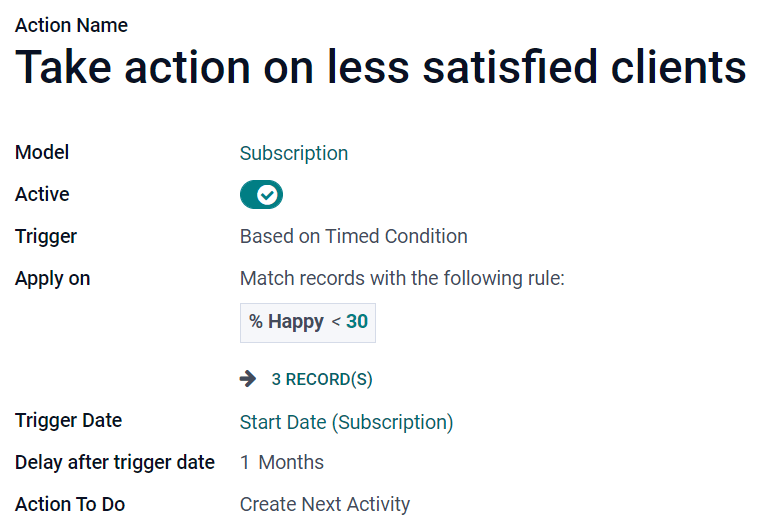
Example
Model
Select the model where the automated action should be applied.
Note
The model you are on when you click on Automations is pre-selected by default.
Trigger
Define when the automated action should be applied. Six triggers are available.
On Creation
The action is triggered when a record is created and then saved.
On Update
The action is triggered when a previously saved record is edited and then saved.
Use Trigger Fields to specify which fields - and only those - trigger the action on their update.
To detect when a record changes from one state to another, define a Before Update Domain filter, which checks if the condition is satisfied before the record is updated. Then set an Apply on filter, which checks if the condition is met after the record is updated.
Example
If you want the automated action to happen when an email address is set on a contact, define the Before Update Domain to
Email is not set, and the Apply on domain toEmail is set.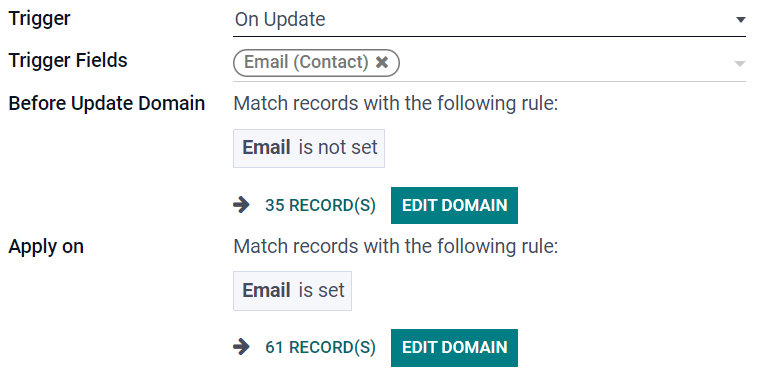
On Creation & Update
The action is triggered when a record is created and saved or edited afterward and saved.
On Deletion
The action is triggered when a record is deleted.
Note
This trigger is rarely used, as archiving records is usually preferred to deletion.
Based on Form Modification
The action is triggered when any change is done to a trigger field’s value on the Form view, even before saving the record. This trigger only works on the user interface when a modification is made by a user. If the field is changed through another action and not by the user, the action will not run.
Note
This trigger can only be used with the Execute Python Code action, so development is required.
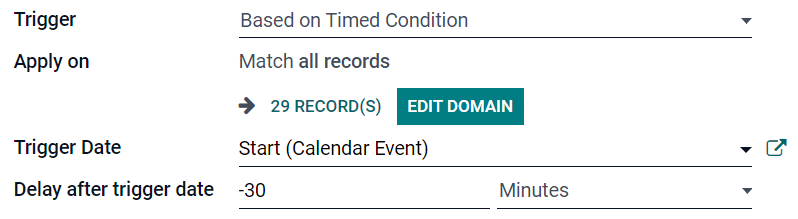
Based on Timed Condition
The action is triggered when a trigger field’s date or date & time value is reached.
To trigger the action after the Trigger Date, add a number of minutes, hours, days, or months under Delay after trigger date. To trigger the action before, add a negative number instead.
Example
If you want to send a reminder email 30 minutes before the start of a calendar event, select the Start (Calendar Event) under Trigger Date and set the Delay after trigger date to -30 Minutes.
Note
By default, the scheduler checks for trigger dates every 4 hours.
Apply on
Define on which records of the model the automated action should be applied. It works the same way as when you apply filters on a model.
Action
Determine what the automated action should do (server action). There are eight types of action to choose from.
Execute Python Code
The action is used to execute Python code. The available variables are described on the Python Code tab, which is also used to write your code, or on the Help tab.
To allow the action to be run through the website, tick Available on the Website and add a Website Path.
Create a new Record
The action is used to create a new record on any model.
Note
Selecting a Target Model is only required if you want to target another model than the one you are on.
To link the record that triggered the creation of the new record, select a field under Link Field. For example, you could create a contact automatically when a lead is turned into an opportunity.
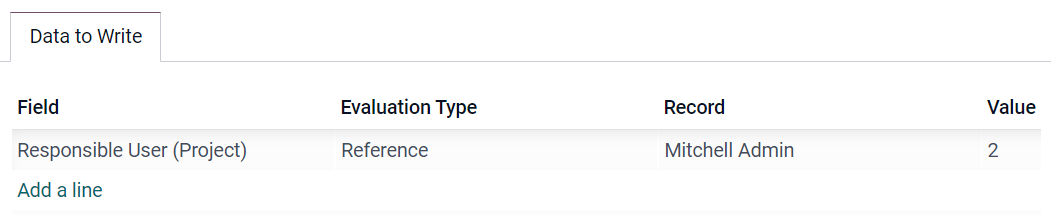
Data to Write tab: the tab is used to specify the new record’s values. After selecting a Field, select its Evaluation Type:
Value: used to directly give the field’s raw value in the Value column.
Reference: used to select the record under the Record column and let Studio add the internal ID in the Value column.
Example
If an automated action creates a new task in a project, you can assign it to a specific user by setting the Field to Responsible User (Project), the Evaluation Type to Reference, and the Record to a specific user.
Python expression: used to dynamically define the newly created record’s value for a field using Python code in the Value column.
Update the Record
The action is used to set value(s) for field(s) of any record on the current model.
Note
The process to fill in the Data to Write tab is the same as described under Create a new Record.
Execute several actions
The action is used to trigger multiple actions at the same time. To do so, click on Add a line under the Actions tab. In the Child Actions pop-up, click on Create and configure the action.
Send Email
The action is used to send an email to a contact linked to a specific record. To do so, select or create an Email Template.
Add Followers
The action is used to subscribe existing contacts to the record.
Create Next Activity
The action is used to schedule a new activity linked to the record. Use the Activity tab to set it up as usual, but instead of the Assigned to field, select an Activity User Type. Select Specific User and add the user under Responsible if the activity should always be assigned to the same user. To dynamically target a user linked to the record, select Generic User From Record instead and change the User field name if necessary.
Example
After a lead is turned into an opportunity, you want your automated action to set up a call for the user responsible for the lead. To do so, set the Activity to Call and set the Activity User Type to Generic User From Record.

Send SMS Text Message
The action is used to send an SMS to a contact linked to the record. To do so, select or create an SMS Template.
Tip
If you want sent messages to be logged in the Chatter, tick Log as Note.