Working schedules
In Odoo, working schedules determine the hours employees are expected to work, according to their contract, and informs the Payroll app how to compute work entries, ultimately affecting salaries and payslips. It is necessary to ensure all working schedules for employees are configured in the database.
To view the currently configured working schedules, navigate to , and the Working Schedules dashboard loads.

Note
In Odoo’s Payroll app, working schedules are referred to as working hours in salary structures.
New working schedule
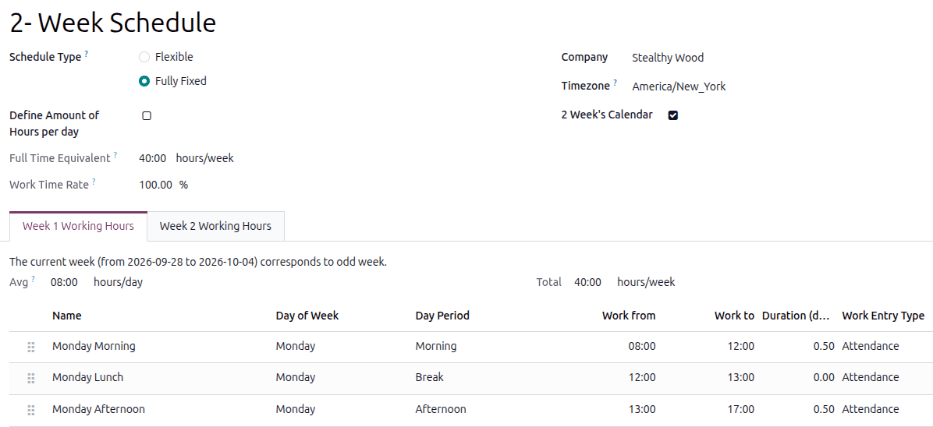
To create a new working schedule, navigate to , click New, and a blank Working Schedules form loads. The form has two sections, a general information section and a Working Hours tab listing out all the individual working hours by day and time.
Fill out the following information on the top-half of the form:
Name: Type in the name for the new default working schedule. This should be descriptive and clear to understand, such as
Standard 20 Hours/Week. The placeholder nameWorking Hours of (Company)populates this field by default.Schedule Type: Click the radio button next to Flexible indicating a flexible schedule, or Fully Fixed for a set schedule with specific working hours. If Flexible is selected, the Working Hours tab is hidden.
Define Amount of Hours per day: Enable this option to have specific start and end working times.
Full Time Equivalent: The amount of hours an employee must work each week to be considered a full time employee. This field cannot be modified, and is determined by the country the company is located in.
Work Time Rate: The percentage of hours compared to the full time schedule. The percentage is auto-generated based on the Full Time Equivalent and the working hours configured in the Working Hours tab. This number should be between
0.00%and100%, so if the percentage is above100%, it is an indication that the working times may need adjustment.Company: Select the company that can use these new default working hours from the drop-down menu. A blank field indicates it is available for all companies.
2 Week’s Calendar: Enable this option to switch from a one-week calendar to a two-week calendar. When enabled, two tabs appear: Week 1 Working Hours and Week 2 Working Hours.
Next, configure the individual hours in the Working Hours tab. This tab lists the specific working hours for each day, including breaks.
The default presented working hours are for a 40-hour work week, with each day divided into three timed sections. Every day has morning (8:00-12:00), lunch (12:00-13:00), and evening (13:00-17:00) hours configured.
Note
The Work from and Work to times must be in a 24-hour format. For
example, 2:00 PM is entered as 14:00.
Update the Name of each shift, if desired. Modify the Day of Week, Day Period, and Work Entry Type selections by clicking into the drop-down menus in each column and making the desired selection. The Work from, and Work to columns are modified by typing in the time.

Tip
If the working hours are not consistent each week, and the hours are on a bi-weekly schedule instead, enable the Switch to 2 week calendar checkbox on the new Working Schedules form. This changes the single Working Hours tab to two tabs, a Week 1 Working Hours and a Week 2 Working Hours tab, where the working times can be adjusted.